
Product Manual


56-VOLT LITHIUM-ION CORDLESS 15" STRING TRIMMER 15
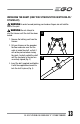
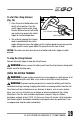
MOUNTING AND ADJUSTING THE
FRONT HANDLE
1. Loosen and remove the quick-
release lever and wing nut from the
front handle (Fig. 6).
2. Push the front handle onto the shaft
within the mounting zone between
the rear handle housing and the
hinge (Fig. 7).
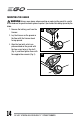
3. Insert the clamping block into the
handle slot (Fig. 8).
4. Mount the quick-release lever and pre-tighten the wing nut. Make sure that the
front handle is positioned upwards and points toward the top of the rear handle
(Fig. 9).
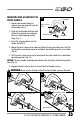
5. Pull the quick-release lever up to move/rotate the front handle to a comfortable
operating position (Fig. 10).
NOTICE: The front handle should be positioned on the shaft only within the mounting
zone (Fig. 10).
6. Engage the quick-release lever to secure the front handle in place.
WARNING:
Never use the trimmer without the front handle securely attached.
7 8
Clamping Block
9
Quick-release Lever
Wing Nut
10
Rear handle housing
Mounting Zone
Hinge
6
Clamping Block
Wing Nut
Quick-release
Lever
Front Handle