29 8001 1.
Funkwerk Dabendorf reserves the right to modifi cations in the course of technological progress and deviations from the delivery scope! All rights reserved! Reproduction, in whole or in part, is only permitted with the prior written consent of Funkwerk Dabendorf GmbH! EGO FLASH
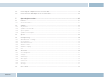
1 Inhaltsverzeichnis 2 List of illustrations ........................................................................................................ 6 3 Introduction / foreword ................................................................................................. 7 4 Safety notes................................................................................................................... 8 5 Scope of delivery / package content .........................................................
EGO FLASH 6.6 Connecting the components to the electronics box.....................................................................................18 6.7. Connection of the EGO iDapter to the electronics box .................................................................................20 7 Operating instructions................................................................................................... 21 7.1 Features ........................................................................
8 Software update ............................................................................................................ 40 9 Service .......................................................................................................................... 41 10 Spares parts and accessories ....................................................................................... 44 11 Technical data ..................................................................................................
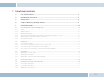
2 List of illustrations EGO FLASH Fig. 01 Scope of Delivery ............................................................................................................ 9 Fig. 02 Signal transmission of the Bluetooth® antenna ............................................................. 11 Fig. 03 Installation locations for the electronics box ................................................................ 12 Fig. 04 Installation location for microphone ..........................................
3 Introduction / foreword Congratulations on your new EGO! Whether you’re browsing through your contacts list, reading SMS messages or selecting music for playback – EGO FLASH is a practical all-rounder with a razor-sharp OLED display and intuitive controls. Its handy size and sleek design make it a must-have accessory for your car. The installation of your EGO FLASH in your car requires specialized knowledge and skills. We therefore recommend that the installation be performed by a qualified professional.
4 Safety notes EGO FLASH 1. Incorrect installation – Incorrect installation may lead to damage to the units and/or your car! Specialized knowledge and skills are required for installing the system. We strongly recommend that the system be installed by a qualified professional. 2. Risk of injury – Unsuitable installation locations may become a source of injury in an accident situation, or may inhibit the correct functioning of essential safety equipment.
5 Scope of delivery / package content [1] Electronics box [2] Control unit with integrated OLED display [3] Microphone [4] ISO-cable for connection to the car electrical system [5] Self-adhesive pad [6] Quick Guide [7] Safety manual [1] [2] [4] 26*$, (6*%& [3] [5] 1. &(0 '-"4) 2. [6] Improper installation – Improper installation may cause damages to the unit abilities.
6 Installation guide 6.1 Determination of required configuration Before installation of your EGO FLASH, please note which features and connection options are provided by your car audio system. It is advantageous when your audio has the following: a muting function, phone input and line-in. You can find out which of these input options your audio system has in the documentation provided. 6.1.
6.1.6 Car audio line-in input A car audio with a line-in input option is required for music reproduction in stereo. As an alternative to line-in, the car audio may have a mini-ISO port (block connector C), a 0.14 in jack socket or a RCA input socket. An appropriate adapter lead is required for the connection between the EGO FLASH line-out and the line-in version of your audio system.
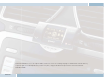
Suitable locations for the electronics box: Passenger side, next to the middle console under the paneling, model-specific installation console (dealer). Our suggested installation locations are shown in the illustration on the right. Fig. 03: Installation locations for the electronics box Further unsuitable locations are: Leg and knee height, potential head impact zone, airbag inflation space, engine compartment 6.2.
6.3 Installation DAMAGE TO ESSENTIAL VEHICLE COMPONENTS! Essential vehicle components or wiring can be damaged when drilling mounting holes or screwing in self-threading screws. Please make sure there is always sufficient space behind the screw holes and drilled holes! 6.3.1 Mounting the electronics box Installation consoles for a number of car models are available from your dealer. These are designed to contain all the system components, including the electronics box.
Attaching the microphone Attach the microphone by sliding it into the holder and position the microphone head towards the direction of speech. 6.3.3 Mounting the control unit with integrated display Define the mounting location The control console is mounted on a smooth service by means of the self-adhesive pad provided. Make sure that the location is within easy reach of the intended user. Cleaning and degreasing the mounting location The mounting location must be clean and free from grease and dirt/dust.
the 14-pin plug) should be connected to „Phone Out“, and the purple lead (pin 7 of the 14-pin plug) to „Phone In +“ of the Mini-ISO socket. For information on the phone connection options of your car audio system, please consult the manufacturer‘s user manual. NOTE: If your car audio system has different phone connection options from those mentioned here, please consult a qualified professional for installation of the system.
6.5.1 Checking the mute inputs Picture 5 of Fig. 07 shows mute inputs 1–3. The yellow mute lead of the hands-free system should be connected to one of these inputs.
6.5.2 Checking the installation When the ISO connection cable is correctly installed, a call remains active until the call is ended, even if the ignition has already been turned off beforehand. The system switches off automatically when the call has been ended. If the system switches to off immediately switches off,then exchange the ignition lead (blue) with the power supply lead (red) as shown in Fig. 11b 1A 2A blue 1 red 1A red 2A 2 red blue blue blue 3 2A 1A red +12V 1A +12V Fig.
Pin 1 2 3 4 5 Colour Brown Yellow 6 White Car audio speaker output + (front right) 7 Purple Speaker lead + (front right) 8 9 10 11 12 Red Blue Permanent positive (30) Ignition (15) 13 Black Car audio speaker output (front right) 14 Green Speaker lead (front right) 6.
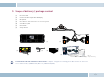
[3] [4] [5] [6] The electronics box line-out must be connected to the car audio line-in. Depending on the car audio line-in configuration, one of the following cables is required: → Connection cable 0.14 in stereo jack to 0.14 in stereo jack (l = 4.92 ft) → Connection cable 0.14 in stereo jack to RCA plug (l = 4.92 ft) → Connection cable 0.14 in stereo jack to Mini-ISO (l = 4.92 ft) The control unit with display must be connected to the port.
6.7. Connection of the EGO iDapter to the electronics box Before the EGO iDapter is connected to the Ego Look/Flash, a Bluetooth update to software version 7.0 or higher must be performed. Following this, the EGO iDapter can be attached to the Ego Look/Flash as described in the connection diagram. Abb.
7 Operating instructions ROAD SAFETY RISK! Failure to pay attention can lead to dangerous situations in traffic. You must always direct your complete attention to current traffic conditions, even when speaking with a hands-free device. It is advisable to avoid phone calls while driving in difficult traffic situations! NOTE: Depending on the software, individual functions may not be available! For more information, visit www.egohandsfree.com. 7.1 Features 7.1.
7.2 Symbols The control unit of the EGO FLASH features an OLED display and a total of 6 keys. The illustration below gives a quick overview of the keys. The functions of the individual keys are explained in this section. 7.2.1 Key functions → The key (green) is for accepting calls. Prolonged pressing of the key will also launch voice control. Possible voice commands can be found in the “Voice control” chapter of these operating instructions. Another function is the selection of menu items.
→ The key is used to increase volume during a phone call and during music playback. This key can also be used to navigate the menu and speller. Functions in brief: → The key is used to decrease volume during a phone call and during music playback. This key can also be used to navigate the menu and speller. Functions in brief: increase volume, navigate menu and speller, end screensaver Reduce volume, navigate menu and speller, end screensaver NOTE: The EGO FLASH features a screen saver.
Symbol for changing to numeric input Symbol for changing to lowercase letters Symbol for changing to uppercase letters Symbol for changing to special characters Symbol for exiting the speller 7.2.4 Symbols for menu options Activated option. This symbol appears in front of an activated menu item. Deactivated option. This symbol appears in front of a menu item when it may be activated as an option. 7.3 Speller The EGO FLASH is controlled with the , keys.
7.4 Getting started Take enough time to familiarize yourself with the use of the EGO FLASH in combination with your mobile phone. First of all, make a few calls to determine the ideal volume and the best voice pickup direction before using the EGO FLASH in traffic. When getting started, your car should be parked in a quiet place. It is also helpful if the person you will be calling can take time to let you make some test calls. 7.4.
7.4.4 Hands-free mode In some cases, coupling with your mobile phone in the hands-free mode does not work when using the method described above. If you are sure that your mobile phone supports the Bluetooth® hands-free profile, proceed as follows: In the list of detected devices, select “couple from phone”. Now you need to search for Bluetooth® devices using your mobile phone. The procedure for this can be found in the operating instructions for your mobile phone.
The following methods may be used to initiate a call from the menu: → by selecting from the contacts list and the mobile phone → by direct outward dialing of a number with the number speller → dialing from the call list on your mobile phone → through the call-back feature for received SMS messages. And lastly, you may also dial a number directly on your mobile phone.
→ DTMF tones Here, touch key tones are selected and then sent by means of the speller. → Mute mic. With this option, the microphone can be switched to mute. The person you have been speaking with can then no longer hear you. Pressing again deactivates the muting of the microphone. → Private mode During a phone call, you may switch to private mode by selecting the “Private mode” menu item and pressing the key. Conversation is now possible only via the mobile phone.
→ Music player The “Music player” menu allows you to playback songs and to control them as usual with Play, Pause, Stop, Forward, and Reverse. The playback device can be coupled to the EGO FLASH under “Options”. For details, see the “Music player” chapter. → Contacts list The contacts list contains the entries downloaded from the mobile phone. Each number in an entry can be accessed. In addition, direct outward dialing is possible here (without voice control).
Main menu structure for the EGO FLASH User management Settings Call lists Messages New user Playback → Search → Missed User 1 - Melody - Pause - Play → Options → Accepted - Read aloud - Change initials - Volume - Stop - Pause - Direct dialing → Dialed - Call back Options - Stopp - Synchronization - Playback list - Forwards - SIM - Reverse - Telephone - Template 1 Options - SIM & telephone - Template 2 - Log in → - Log out - Delete → User 2 Brightness - Brightness
7.5.1 User management Symbol: The EGO FLASH allows you to manage up to 10 user profiles; you can quickly and easily switch between these profiles while using the EGO FLASH. Individual information saved for each user includes the following: → → → → → → Contacts list Display brightness Ringtone Display language Volume settings Call lists Opening user management To enter user management, go to the symbol in the main screen display and press .
7.5.2 Settings Symbol: The “Settings” menu is highly complex, since many settings for the EGO FLASH can be carried out under this menu item. The following settings can be carried out: → → → → → → → → → → → Ringtone Brightness Call settings Delay time Reset Software update Info Language Voice control Audio Switch off Ringtone The “Ringtone” menu is subdivided into “Melody” and “Volume”. Under “Melody”, multiple ringtones are available, which can be set , keys. according to personal preference.
Info Provides information about the various software and hardware versions of your EGO FLASH. Use this information when you contact our service department with questions and problems. Language The EGO FLASH supports multiple display languages. You can change the display language within this menu item. Voice control → Activate Carrying out this item launches voice control. Control is performed with specific commands. For more information see the “Voice control” chapter.
→ Mutedelay Here, you can set the waiting time between the activation of the mute line and the voice recognition. This is logical, as car radios require various amounts of time to recognize a mute signal and the switchover of the audio channels in the radio. The time should be set so that the first announcement of the EGO „Main menu“ can be completely heard. Possible statuses: 0.5 sec. / 1.0 sec. / 1.5 sec. / 2.0 sec. / 2.5 sec. / 3.0 sec. → Reset Resets all audio settings to the default values.
→ Forward (track-by-track in the current playlist) → Backward (track-by-track in the current playlist) → Volume control The iPodTM is charged via the EGO iDapter. The iPodTM charging can be manually switched off under Options in the „Settings“ menu item in the iPodTM player 7.5.4 Music player Symbol: The music player is activated through the main menu. The music player may also be activated without a mobile phone being couple to the EGO FLASH.
7.5.5 Contacts list Symbol: The mobile phone’s contacts list can be read via the “Contacts list” menu item. In addition to dialing numbers from the contact information with the key, entries can be found more quickly with the search function. You may also download the contacts list from the mobile phone under the “Option” menu item, or enter the number via direct outward dialing. Read To read numbers from the contacts list, please select the menu item.
by selecting the corresponding upper list entries. Some mobile phones do not support access to the call list; in this case, a call list is maintained within the EGO FLASH. 7.5.7 Messages Symbol: The EGO FLASH supports the sending and receiving of text messages. The menu is structured in same form users are familiar with from their mobile phones. Messages received can be viewed under the “Incoming SMS” item. The sender of the message can be called back by phone using the “Call-back” function.
You may cancel each voice dialogue at almost any time with another prolonged pressing of the key. If the EGO FLASH is waiting for a voice command, you may end the dialogue by saying “abort”. If there is no Bluetooth® phone connected to the EGO FLASH, voice-activated dialing cannot be activated.
“Dial number” You will be prompted to enter the number to be dialed. This may be done with individual numerals as well as groups of numbers. If you insert a pause, the last number/group of numbers entered is repeated for checking. In addition, you will be notified if you exceed the maximum telephone number length.
8 Software update The software for your EGO FLASH can be updated to the latest version via Bluetooth®. In order to receive the most current software, please visit our website at www.egohandsfree.com. A detailed description of the update procedure is included with the software.
9 Service (FAQ) – A list of frequently asked questions: 1. Is it possible to dial directly (without voice control) with the EGO unit? Yes, with all EGO units except EGO TALK, under the menu item “Contacts list / Options / Direct outward dialing”. 2. What are the exact dimensions of the EGO FLASH components? You can find the dimensions in the operating instructions under the “Technical data” section. 3. Are EGO units suitable for all types of vehicles? Yes, EGO units are suitable for all types of vehicles.
Troubleshooting: Problem Cause Remedy No supply voltage Replace fuse if needed and check cable and connections Ignition not switched on Switch on ignition Ignition line interrupted Check line and 1A fuse The microphone is not plugged in Connect the microphone to the electronics box.
Problem iPod TM cannot be connected to the EGO system System no longer reacts to operation Cause Remedy Incorrect connection of the components Disconnect system from the mains power supply and check connection, remedy any connection faults EGO iDapter was not completely initialized Shut down and restart system EGO iDapter cable not completely connected Reconnect cable to iPod TM Simultaneously press the green button and the „up“ button for longer than 2 seconds.
10 Spares parts and accessories You can find out more about supported mobile phones on our website at www.egohandsfree.com. Your dealer will also be happy to advise you if you have any questions. Accessories: Stereo Mute Box Relax and listen to music or phone from your car. The Stereo Mute Box provides smart sound management. This compact box plays your calls or music over the car‘s speakers – of course in superb stereo sound. The car radio is muted during calls or when listening to music.
EGO iDapter The EGO iDapter allows convenient integration of your iPodTM into the vehicle. You thus always have your favorite music with you and can charge the battery of the iPodTM at the same time. Features: - Remote control of the iPodTM via EGO system - Volume control via EGO system - Navigation through the track lists in the iPod TM - Automatic charging of the iPodTM iPodTM is a registered trademark of Apple Inc.
Replacement parts: [1] Electronics box [2] Control unit with display [3] Microphone [4] Set of connecting cables [1] [2] [4] [3] EGO FLASH
11 Technical data Outer dimensions of the electronics box Outer dimensions of control unit with display Control unit cable lengths Operating voltage Quiescent current consumption (ignition off) Steady plus fuse protection Ignition fuse protection Temperature range Interfaces Supports Bluetooth® profiles 5.138 in x 2.126 in x 0.886 in 3.039 in x 3.039 in x 0.906 in 6,56 ft 11 V to 15 V max. 0.
13 Conformity statement This equipment employs Bluetooth® wireless technology. In some countries, the use of this equipment may be restricted or forbidden. Please make sure you are familiar with such restrictions and do not use your equipment if you are unsure whether its use is permitted in particular countries you may be visiting. Bluetooth® is a registered brand name of Bluetooth SIG, Inc.
FCC statements This device complies with part 15 of the FCC Rules. Operation is subject to the following two conditions: (1) This device may not cause harmful interference, and (2) this device must accept any interference received, including interference that may cause undesired operation. NOTE: This equipment has been tested and found to comply with the limits for a Class B digital device, pursuant to Part 15 of the FCC Rules.
14 Hotline Any questions, comments, or suggestions? Would you like some more detailed information? Do you need an adviser or service in your area? Just give us a call! Our service hotline is there to help you during the following times. Monday–Friday from 7.15 a.m. to 6.00 p.m. (PST) Before you call us with your problem, please check first with the following steps: → → → Check whether you can solve your problem with the „Troubleshooting“ checklist in Chapter 8.
Funkwerk Americas Inc. 8820 Kenamar Drive, Ste 506 San Diego, CA 92121 Telephone +1 (858) 566 - 2159 Fax +1 (858) 566 - 2179 eMail support@egohandsfree.com Internet www.egohandsfree.