
User`s manual


Quick Start
Install the modules (up to three) by firmly inserting the module into the slot. Then
tighten the two captive thumbscrews until the module panel is pulled in flush with
the chassis panel. Always install a blank “filler” panel into any unused module
slots for safety. To remove a module, turn the two thumbscrews counter
clockwise until they are loose. Grasp the thumbscrews and pull out. For safety,
we strongly recommend the amp be powered down before changing modules.
Front Panel:
INPUT: Plug your guitar in here.
CHANNEL: Selects the desired preamp module.
EFFECTS: Adjusts the effects return level for the PARALLEL LOOP.
MASTER: The overall level for all channels.
PRESENCE: Adds brightness to the overall tone.
DENSITY: Adds bottom the overall tone.
See “Master Density and Presence” on page two of this
manual for important details.
Rear Panel:
SERIES LOOP: A “normalled” loop for standard effects.
PARALLEL LOOP: A specialized loop that retains the direct (dry) signal at all
times. Akin to the effects buss on a PA or recording mixer,
your direct tone is unaffected. The level of the effects is
controlled by the front panel EFFECTS knob. It is imperative
that the effects unit be programmed for 100% effects (wet)
when using this loop.
See “Effects Loop Operation” on page three of this manual
for more detailed instructions.
FOOTSWITCH IN: For channel selection. Use the EGNATER pedal or any midi
controller.
THRU: Passes the signal from the IN jack for controlling other
devices.
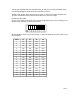
AC INLET: Accepts a standard IEC power cord. Remove the fuse holder
and insert so that the arrow points to the correct voltage. Be
sure to use the proper value fuse as indicated.