
Instructions / Assembly
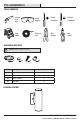


4
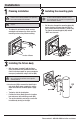
Installation
1
Planning installation
WARNING: Turn off electrical power at the fuse or circuit
breaker box before starting installation of the light xture.
Do not remove insulation from the xture.
NOTE: Your product may not look exactly as shown
in gures.
□ To reduce risk of electrical shock, create a
watertight seal between the xture and the
mounting surface using silicone caulking.
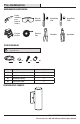
2
Installing the mounting plate
IMPORTANT: This product must be installed in
accordance with the applicable installation code by a
person familiar with the construction and operation of the
product and hazards involved.
□
Pull the wires through the mounting plate (AA)
before attaching the mounting plate (AA) to
your junction box with two 3/4 in. screws (CC).
The side of the mounting plate (AA) mark
ed
“GND” must face out.
3
Installing the fixture body
□ With the power turned off, hold the xture
firmly, and connect the ground wire from the
fixture to the bare copper or green ground wire
from your junction box, using a wire nut (DD).
NOTE: If your house wiring does not include a ground
wire, consult your local electrical code for approved
grounding methods.
□ Use wire nuts (DD) to connect the black fixture
wire to the black power supply wire and the
white xture wire to the white power supply
wire.
□ Tuck wires into the junction box.
□ Position the xture body (A) over the junction
box and secure with mounting screws (BB).
□ Turn on the electricity, and verify a successful
installation by turning on the light.
clear silicone
AA
DD
A
BB
cc
WWW.HOMEDEPOT.COM/HOMEDECORATORS
Please contact 1-800-986-3460 for further assistance.