Eggtimer TRS Flight Computer User’s Manual Firmware Release 1.
Important Regulatory Information This device complies with Part 15 of the FCC Rules. Operation is subject to the following two conditions: (1) this device may not cause harmful interference, and (2) this device must accept any interference received, including interference that may cause undesired operation.
Important Links: FCC Part 15 (governing unlicensed intentional emitters) http://www.ecfr.gov/cgi-bin/textidx?SID=adb12f74b498e43ec453f7899d9df0fd&node=47:1.0.1.1.16&rgn=div5 Hope RF HM-TRP Documentation (FCC test documentation) http://www.hoperf.com/upload/rf/HM-TRP-915(20dBm)-FCC.pdf FAA Regulations for Amateur Rocketry (Part 101) http://www.ecfr.gov/cgi-bin/textidx?c=ecfr&rgn=div5&view=text&node=14:2.0.1.3.
The Eggtimer TRS works in conjunction with the Eggfinder receivers, either the Eggfinder RX “dongle” receiver that plugs into the USB port of your computer, or the Eggfinder LCD handheld receiver that displays GPS coordinates and altitude in real-time during your flight.
Other Features Can be programmed and armed remotely using an Eggfinder LCD receiver Also programmable using USB-TTL data cable (not included) and standard VT100/ANSI text terminal programs, compatible with virtually all computers (PC, Mac, Linux) Firmware can be updated from a standard PC using the serial cable Power: 4.5-30v. 2S 7.4V LiPo’s, 350 mAH minimum recommended. Current draw: 70 mA average (200 mA at startup) Weight about 25 grams, size approx. 3.9” x 1.2”; fits in BT-55 body tube or 38mm coupler.
will be more than happy to give you advice and we might be able to help you find your error if you send us some high resolution pictures, to support@EggtimerRocketry.com . We cannot take responsibility for your assembly techniques; if you do not have experience building kits of this nature, we recommend that you enlist some help. (Another reason for joining a rocketry club, there is usually at least one electronically-inclined member who can be bribed with a beverage or two to give you a hand.
Meet the Eggtimer TRS The Eggtimer TRS is a barometric altimeter-based flight computer with two deployment channels and an integrated GPS RF tracker. It can record up to 32 flights, of varying length. It can deploy two parachutes, a drogue chute that deploys near apogee to slow the rocket down from high altitudes and a larger main chute that brings the rocket to a safe landing.
no user intervention or programming required. This is the same logic that has been proven in the classic Eggtimer for hundreds, if not thousands, of flights. Getting to know your Eggtimer TRS Although the Eggtimer TRS seems relatively simple, you will want to familiarize yourself with it BEFORE you install it in a rocket, and certainly before you try flying it. There are several set of solder pads for making connections to the board, and some indicators.
Reset Pads (RST) When shorted, the Reset terminals put the Eggtimer TRS “on hold”, i.e. resets it so that it does nothing. When it is in reset mode all outputs are held low, so this is the “safe” mode when multiple deployment systems are used; they cannot be triggered while the Eggtimer TRS is reset. This can be used to disable Eggtimer TRS while it’s sitting on the pad for a long time, and can be released shortly before launch.
from the “-“ wire. You can also use solid wire, but solid wire is harder to work with and has a tendency to break after being bent a few times. These breaks can be a pain to find, because they are typically inside the insulator jacket where you can’t see them. To prevent them, we recommend that you zip-tie the wires to the sled to strain-relieve them. If you use stranded wire, you MUST TWIST AND TIN THE WIRES BEFORE SOLDERING TO THE BOARD.
possibly a whole flying weekend. You CAN use a battery as small as 200 mAH if you have a small rocket and know that it’s not going to be “on” for more than 2 hours; we’ve done that with rockets using 24mm and 29mm motors, but you have to recognize the limitations, and make sure you charge it before every flight (which you should do anyway!) We do NOT recommend using a 9V alkaline battery to power the Eggfinder GPS.
if you’re using as 9v battery you should replace it if it’s under 7.2v (80% of its rated value) because its voltage and current-sourcing ability drops rapidly as it begins to run down. The Eggtimer TRS’ built-in battery tester is designed to be used as a quick check to see if your battery may be getting low. It is not a substitute for checking the battery with a DVM, it does not have the accuracy that you’re going to get with a dedicated instrument.
Using Your Eggtimer TRS with the Eggfinder LCD Receiver The Eggtimer TRS is designed to be used with the Eggfinder LCD receiver.
This is the standard Eggtinder LCD “welcome” screen, and it will be displayed for about 5 seconds. You will then see this screen: Status: 915 0 GPS:D Alt:F 6.4V This is the Eggfinder LCD status screen, that tells you what your Eggfinder LCD receiver’s current settings and battery voltage are.
The Eggtimer TRS/Eggfinder LCD Interface The Eggfinder LCD receiver has a two-line x 16 character LCD display, and one button. When in terminal mode paired with an Eggtimer TRS, the display generally shows you what is being displayed/changed on the top line, and the current value on the bottom line.
This screen is where you would enter your Flight Settings (Drogue mode and Main deployment altitude). It is also where you go to save your settings and ARM your Eggtimer TRS to start the flight sequence. Note that you MUST at least display the flight settings before you are allowed to ARM the unit and start a flight. This is done so that you KNOW what the settings are… you don’t have to “remember” what you think they might have been when you flew a month ago.
The Check Status Menu The first menu that you will see when you start up is the Check Status menu. This shows you several things about your Eggtimer TRS unit: • Battery voltage • Drogue channel continuity • Main channel continuity To select the Display Status menu, PRESS the button from the Main Menu screen when you see this screen: Main Menu Check Status • PRESS button for 1 second and release to select… Status: 8.
Display/Change Settings Menu One of the nice things about having the Eggfinder LCD receiver is that it makes it really easy to change your flight settings, you don’t need to break out the cable and your laptop, or even open up the AV bay (which can be a pain it the butt for most rockets). Once you’ve reviewed or changed your settings, you can arm the unit to start a flight, reset the unit and put it on hold, or simply go back to the menus.
Drogue ?OFF This setting turns the Drogue channel off, for example if you were going to use motor-deploy for the drogue or even the main chute for a single-deploy project. Note that when the Drogue channel is OFF you will still get a drogue continuity display, but it will ignore the drogue channel when checking to see if you’re ready to fly. To select the displayed value, PRESS the button for at least 1 second, it will beep to confirm your selection and you’ll see the next item that can be changed.
Saving Your Flight Settings, and Starting a Flight Once you’ve displayed and/or changed your settings, you can do several things: • Discard whatever you’ve changed and start a flight with the old settings • Save the new settings and start a flight (this is probably what you’re most likely to do) • Save the new settings and halt the TRS (this is what you’d do at home, the night before…) • Go back to the Main Menu without saving Note that you cannot save the settings and go back to the Main Menu.
Typically what you will most likely do is to change your settings at your work table with the deployment power off and leave it on the “Save Options” menu, take it to the RSO to get it checked off, cycle through the settings to double-check them after you put the rocket on the rodrail, turn on the deployment power, then choose “Save and FLY”. This keeps the TRS disarmed until you’re safely on the pad.
Programming Your Eggtimer TRS with the USB Cable The Eggtimer TRS can be programmed from just about any USB-compatible computer using a USB-TTL serial data cable. This cable has the interface circuitry imbedded in the USB connector, so it doesn’t use up any board space or power on the Eggtimer. It uses a Prolific PL2303 serial interface chip, you will need to install the drivers for it before you can connect it to your Eggtimer TRS. See the Eggtimer Rocketry web site for the appropriate drivers.
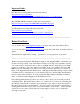
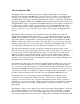
Eggtimer TRS 1.4K 1.4K MY EGGTIMER A B Flight Settings 1 700 Drogue <0=OFF,1=Nose<0=OFF,1=Nose-Over,2=Backup> Main Altitude <100<100-2000 by 50, 0=OFF> 900 0 Frequency (Ctrl(Ctrl-F to Change) ID Code T:23.50 P:97804.00 A:975.39 Main:1 Drogue:1 Batt:7.
This setting controls the Main deployment channel. This channel is typically used to deploy the large “main” parachute, at a pre-programmed altitude after apogee. When set to “0”, the channel is turned off, and will not fire. The altitude and elapsed time of Main deployment are recorded in the Flight Summary memory for downloading. Zeroes in these fields means that the Main channel wasn’t enabled and therefore didn’t fire.
Programming the Frequency, ID Code, and Device Name All Eggfinder GPS units are shipped on 915 MHz with an ID Code of zero. Using the USB data cable, you can change the center frequency and ID code, allowing up to 72 Eggtimer TRS units to be running simulataneously. In addition, you an also “name” your device, so that when you pair your Eggfinder LCD receiver with it you will be sure that it’s YOUR device that you’re looking at.
Flying Your Eggtimer TRS Once you’ve programmed your Eggtimer TRS, you are ready for a flight. In general, a generic flight prep procedure for a multiple deployment rocket looks something like this (assuming that you’re using switches for deployment battery power, and also for Reset if you aren’t using an LCD receiver).
Count the number of beeps to see what caused the error (there may be more than one error) Take the rocket off the rod/rail, open up the payload bay, disconnect all batteries, and fix the failed condition. Then, you can start all over having hopefully learned one more thing to check in the future… You can see that if you’re doing multiple deployments, it’s a lot more involved than just stuffing some wadding and the parachute into the tube, popping in the motor, and hooking up the igniter.
The beep codes are: Number of Beeps 1 2 3 4 5 Problem Battery Low Error (< 6.5v) Altimeter Sensor or Hardware Error GPS Error (no feed) Channel A (Main) error - igniter/servo/battery Channel B (Drogue/Airstart) error – igniter/servo/battery Important: The self-test routine is executed ONCE when the Eggtimer TRS is powered on. In the event that it passes self-test and a condition arises after it has passed, it will NOT notify you of this fact.
Mach Transition… As your motor continues to burn and the velocity increases, if the velocity exceeds 800 ft/sec aerodynamic shock wave pressure buildup can fool the pressure sensor into thinking that the rocket is descending when in fact it is actually ascending at a rather rapid speed.
When Nose-Over is detected, the Eggtimer TRS begins using the Descent Samples value for altitude sampling. This setting is very low, 2 samples/sec. As the rocket descends, when the altitude drops below the Main deployment altitude the Main channel is triggered, for 2 seconds. At this point your Main chute should pop out, to thundering applause and a hearty round of high-fives all around.
Displaying Your Flights with the Eggfinder LCD Receiver One of the nice things about having an Eggfinder LCD receiver with the TRS is that you can review your flights without having to break out the laptop and the USB cable. You can’t get as much data as you can from the cable, since your LCD receiver obviously can’t create graphs or give you detailed flight statistics, but you can get a quick display of your apogee, maximum velocity, and a few other flight “milestones”.
Flt #0 [28] Apogee:7128 To cycle through the screens, simply TAP the button… each tap will take you to the next screen. Flt#0 [28] T@Apogee:12.4 This is the time-to-apogee for that flight. Flt#0 [28] Max Veloc:864 This the the maximum velocity (the same as on the summary display) Flt#0 [28] T@MaxV: 2.3 This is the time to maximum velocity… Flt#0 [28] Drogue Alt:7116 This is the altitude that the Drogue fired at. It will only be displayed if the Drogue channel was enabled.
Downloading Flight Data with the Data Cable The Eggtimer TRS records your last 32 flights into its flight memory, reporting three types of data: - Flight Settings – All of the settings on the Flight Settings menu Summary Data – Stuff like apogee, length of flight, maximum velocity, etc.
operations, you can save them separately by simply closing the buffer after downloading the summary data, then opening it again for the detail data. We recommend that you use a file name like “Flight 2014-08-26 No1.txt” for the summary data, and “Flight 2014-08-26 No1.csv” for the detail data. This way, when you open up the data files you will automatically associate the data type with the right program, i.e.
The flight status is updated by the Eggtimer TRS as the flight progresses, and saved into the flight memory. In the event that for some reason something goes wrong, you can use this value to help you figure it out.
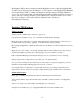
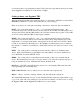
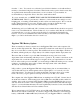
An Excel scatter graph from this data looks something like this: 5000 FAlt 4000 FVeloc 3000 LDA LowV 2000 Apogee N-O 1000 Drogue 0 Main 0 20000 40000 60000 80000 100000 120000 140000 -1000 The “FAlt” trace is altitude @ time, the “FVeloc” trace is the filtered altitude @ time. The other “spikes” are event markers; they point to the altitude and time at which specific events in the flight have occurred.
Building Your Rocket to Use the Eggtimer Mounting First things first… the Cardinal Rule of tracker mounting is KEEP THE ANTENNA AWAY FROM METAL OBJECTS. More on this later… In order to use your Eggtimer TRS with a rocket, it will need to be properly mounted and secured. The Eggtimer TRS is designed to be used with just about any rocket with a 1.35” dia. (BT-55) or 38mm payload bay, so any rocket that will take an egg will easily take the Eggtimer TRS.
OUTSIDE of the AV bay, away from the allthreads. To do that, you will need to install an RPSMA connector instead of the wire antenna, and you may need to get a short RP-SMA malefemale cable to bring the connector outside. Simply use the cable to bring the connector outside, screw your antenna into it (rubber duckies work well for this…), and wrap the cable/antenna around your shock cord with some duct tape.
may be living… check with your local fire marshal if you aren’t sure. If you can’t test in your backyard, check with your local club to see where you can test; they may have an area set aside during launches for such testing. 4) Batteries can be heavy, especially 9v “transistor” batteries. For best flight performance, use the lightest batteries that you can get by with. 3.
Air Pressure Ports For the altimeter to work properly, there must be an undisturbed exposure to the outside air pressure. This is a little trickier than it sounds, because the air is whizzing by the rocket at several hundred feet per second during flight, so as you may remember from Bernoulli’s principle in Physics this is going to cause the pressure at that location to drop if the pressure cannot be equalized.
4) Multiply #1 and #3 11.25 5) Divide by 1500 .0075 6) Take the square root: .0866 We’ll multiply this by 32 to get the size of the drill in 1/32nds, it’s 2.77/32” so we should be fine with a 3/32 drill bit. Make sure that you use a good sharp drill bit, you do not want any burrs on the outside of the tube disturbing the airflow.
Appendix A – Special Functions There are some special functions that are accessed from the settings screen that are not on the menu. In general, you will probably not need to use these functions very often, if at all, but you need to be aware of them in case you do. Master Reset A master reset completely clears all flight memory, and resets the flight settings to the defaults.
Hold the Button down and release it to start the dump. The memory dump format is: Page No., Page Address, Memory Address, High Byte, Low Byte, Integer Value Page No. : Page Number (0-31) Page Address: Address within page (0-2047) Memory Address: Address within memory (0-65534, by two’s) High Byte: Byte value of first byte Low Byte: Byte value of second byte Integer value: Value of integer (two’s complement if negative) Note: Memory dumps can take awhile, especially the “A” dump.
Appendix B – Deployment Channel Testing You must perform a Master Reset before you can perform deployment channel testing, see the Eggtimer Assembly Manual for details. IMPORTANT: The output channels are designed to be used with some kind of resistive load, i.e. an igniter, a Christmas Tree light bulb, etc. NEVER CONNECT A SIMPLE PIECE OF WIRE ACROSS THE DEPLOYMENT TERMINALS TO PERFORM A DEPLOYMENT TEST. If you do, and your battery is capable of sourcing more than 8A of current (i.e.
If you press and release the button, you will see DEPLOYMENT TEST ?MAIN You can cycle through the channels by tapping the button. Select whichever channel you wish to test by holding the button for at least 2 seconds. You will see: MAIN TEST HOLD TO TEST Hold the button down for at least 7 SECONDS, you will hear a long tone for 10 seconds, then the channel will fire. Afterwards, you will see TEST COMPLETE EGGTIMER RESET Approach the rocket, turn off the deployment power, then turn off the Eggtimer TRS.
To test the Drogue deployment channel, enter the monitor mode by holding the Button down while turning on the Eggtimer TRS. You will hear a long beep, and you will see a MON> prompt on the terminal screen. Hit the “B” key, and you will hear a continuous warning beep. Press the Button, and the Drogue igniter channel will fire for two seconds. Afterwards, the Eggtimer TRS will go into Reset Mode, i.e. the buzzer will beep slowly and continuously, Turn off the deployment power, then the Eggtimer TRS power. .
Appendix E - Specifications Pressure Sensor: Type Bosch BMP-180, accuracy rated to approx. 9000 m (29,500 ft) Accuracy Approx 1m (3 ft) throughout rated pressure range Precision Approx ½ m (1.5 ft) throughout rated pressure range GPS Type Rate Maestro Wireless A2235H SiRF IV 1 sample/sec. RF Type Power Modulation Frequency Hope RF HM-TRP-915 100 mW (20 dBi) FSK/Digital 909-926.
Eggtimer TRS Quick Reference (Release 1.4K) Typical Flight Sequence 1) Long Beep – Power On 2) Slow Beep-Beep for 45 seconds – Eggfinder LCD pairing mode 3) Fast Beep-Beep for 30 seconds – Cabled Programming Mode 4) Pause while baseline samples are taken and self-test is executed (about 10 seconds) 5) Long Beep (Self-Test passed ) OR Beep Codes (Self-Test failed) 6) Chirping – Ready for Launch Launch….
• To update the real-time readings on the right-hand side, press the ENTER key • To change values: press the LETTER of the option, use +/- to change the values, hit ENTER to accept value • To accept settings and save, hit the ESC key… the buzzer will start beeping slowly (Eggtimer is now in Halted mode) • To perform a Master Reset, clearing all flight memory and resetting to initial settings, hit CTRL and Y, then hold button for 10 seconds to confirm (You should only need to do this once, unless otherwise i
Eggtimer TRS & Eggfinder LCD Menus Startup Sequence • Turn on Eggtimer TRS • Turn on Eggfinder LCD Eggfinder RX LCD Version 1.09d (Displays for 5 secs…) Status: 915 0 GPS:D Alt:F 6.4V (Displays for 10 secs…) Waiting for Sync (Looks for Eggtimer TRS… up to 30 secs.
Check Status Menu Main Menu Check Status • HOLD button for 1 second and release to select… Status: 8.1V DRO:OFF MAIN:ON • TAP button to exit NOTE: If either deployment channel is enabled but there is no continuity, you will get a beep alert and the channel will flash until you have fixed the problem. You CANNOT continue a flight if both deployment channels are not consistent with the state of the channel selection.
| V Save Options Save Options ?FLY w/o Saving • TAP button to go to next item… • Hold button for 1 sec. to change • TAP button to to go next value… • Hold button for 1 sec.
| | V Flt#0 [28] T@MaxV: 2.
| Hold for 7 secs.