7700 Series OPERATING MANUAL FM Portable Radio Intrinsically-Safe SMARTNET™, SmartZone® Conventional 1
LAND MOBILE PRODUCT WARRANTY - The manufacturer’s warranty statement for this product is available from your product supplier or from the E.F. Johnson Company, 299 Johnson Avenue, Box 1249, Waseca, MN 56093-0514. Phone (507) 835-6222. Copyright© 2000 by the E.F. Johnson Company The E.F. Johnson Company, which was founded in 1923, provides wireless communication systems solutions for public safety, government, and commercial customers.
SAFETY INFORMATION SAFETY INFORMATION The FCC has adopted a safety standard for human exposure to RF energy. Proper operation of this radio under normal conditions results in user exposure to RF energy below the Occupational Safety and Health Act and Federal Communication Commission limits. WARNING • DO NOT allow the antenna to touch or come in very close proximity with the eyes, face, or any exposed body parts while the radio is transmitting.
OTHER IMPORTANT OPERATING INFORMATION • DO NOT use accessories that have not been approved by the Factory Mutual Corporation for use with this transceiver. NOTE: The above warning list is not intended to include all hazards that may be encountered when using this radio. This device complies with Part 15 of the FCC rules. Operation is subject to the condition that this device does not cause harmful interference. In addition, changes or modifications to this equipment not expressly approved by the E.F.
FEATURES FEATURES General Features • • • • • 16 Zones with 16 Channels per Zone (256 Channels Total) Home Zone Select Radio-Wide Scan Time-Out Timer LCD 8-Character Alphanumeric Display with 12 Status Annunciators Conventional Features • • • • • • • • • • Channel Scan with User Programmable Scan Lists Priority Channel Sampling Busy Channel Lockout Monitor Mode Call Guard Squelch Control Penalty Timer Conversation Timer Repeater Talk-around DTMF/ANI Signaling User Selectable Power Output SMARTNET™ II
TABLE OF CONTENTS TABLE OF CONTENTS SAFETY INFORMATION . . . . . . . . . . . . . . . . . . . . . . . . . . . . . . 4 OTHER IMPORTANT OPERATING INFORMATION . . . . . . 5 FEATURES . . . . . . . . . . . . . . . . . . . . . . . . . . . . . . . . . . . . . . . . . . 6 General Features . . . . . . . . . . . . . . . . . . . . . . . . . . . . . . . . . . . . . 6 Conventional Features . . . . . . . . . . . . . . . . . . . . . . . . . . . . . . . . 6 SMARTNET™ II Features . . . . . . . . . . . . . . . . . . . . . .
TABLE OF CONTENTS Conversation Timer . . . . . . . . . . . . . . . . . . . . . . . . . . . . . . . . . Repeater Talk-Around . . . . . . . . . . . . . . . . . . . . . . . . . . . . . . . Power Output Select . . . . . . . . . . . . . . . . . . . . . . . . . . . . . . . . . Conventional Mode Scanning . . . . . . . . . . . . . . . . . . . . . . . . . Priority Channel Sampling . . . . . . . . . . . . . . . . . . . . . . . . . . . . Standard Conventional Calls . . . . . . . . . . . . . . . . . . . . . . . . . .
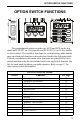
OPTION SWITCH FUNCTIONS OPTION SWITCH FUNCTIONS AUX F1 F2 F3 ENT FCN 1 2 3 4 5 6 7 8 9 * 0 # F1 F2 CLR F3 ENT The programmable option switches are AUX and FCN on the side panel and F1/F2/F3 on 3-key models and F1/F2/F3/*/# on 15-key models as shown above. The available functions for each operating mode and the page on which each function is described are listed in the following table.
OPTION SWITCH FUNCTIONS SMARTNET/SMARTZONE MODE Switch Function Backlight Call Alert Call Response Emergency Home Zone Keypad Lock Message Phone Private Call Radio Wide Scan Scan Site Lock (SmartZone only) Site Search (SmartZone only) Status Tones On-Off Zone 10 See Page 17 44 41 47 19 18 45 41 36, 39 21 21 50 49 46 20 18
CONTROLS AND DISPLAY CONTROLS AND DISPLAY Antenna Jack Channel Select Sw 16 1 2 15 14 3 4 13 5 12 6 11 10 9 8 7 TX Transmitter Keyed RX On-Off/Volume OFF/VOL BATT Receive Signal Detected Low Battery Top Panel Controls On-Off Volume - Turning this knob clockwise turns power on and sets the volume level. Turning it counterclockwise to the detent turns power off. Channel Select Switch - Selects up to 16 preprogrammed channels. Antenna Jack - Connection point for the antenna.
CONTROLS AND DISPLAY Side Controls AUX PTT AUX (Auxiliary) - This is a dealer programmable switch that can control various functions (see page 9). With the limited keypad (3-key) version, it is also the CLR key. PTT (Push-To-Talk) - This switch is pressed to turn the transmitter on. The red TX indicator on the top panel lights when the transmitter is on. FCN Battery Release Button FCN (Function) - This is a dealer programmable switch that can control various functions (see page 9).
CONTROLS AND DISPLAY F1 F2 F3 ENT Front Panel Keys (3-Key Model) F1, F2, F3 - Each of these keys can be programmed by your dealer to control a specific function (see page 9). These keys are also used in menus to scroll left ( ), scroll right ( ), and for the Enter (ENT) function. In addition, the top key on the side (AUX) functions as a CLR key in menus.
CONTROLS AND DISPLAY 1 2 3 4 5 6 7 8 9 CLR * 0 # F3 F1 F2 ENT Front Panel Keys (15-Key Model) 0 - 9 - These keys enter a number whenever number entry is required. F1 - Programmable by your dealer to control a specific function (see page 9). F2 - Programmable by your dealer to control a specific function. In addition, in menus, it provides the Clear (CLR) function. F3 - Programmable by your dealer to control a specific function. In addition, in menus, it provides the Enter (ENT) function.
CONTROLS AND DISPLAY Telephone Radio- Talk-Around Monitor Scan Wide Mode Mode Call Enabled Scan In Scan Private List Call Low Tx Power Busy Channel Priority Channel Low Battery Keypad Locked Display The following information is indicated by the display: Alphanumeric Display - This eight-character area of the display indicates alphanumeric messages and feature selection information. S - Indicates that standard scanning is enabled (see page 20).
GENERAL OPERATION - The conventional monitor mode is enabled (page 26). P - The selected conventional channel is a priority channel (page 32). LOW - Low transmit power is selected on a conventional channel (page 29). BUSY - A busy system or transmit channel is being detected by the Busy Channel Lockout feature (page 27). - The battery needs recharging (page 18). - The keypad has been locked by pressing the Keypad Lock option switch (page 18).
GENERAL OPERATION The relative volume level can be determined by noting the position of the index on the On-Off/Volume knob. To enable a reference tone for setting the volume, proceed as follows: • If key press tones are enabled (see page 20), a short tone sounds when front panel keys are pressed. • If a conventional channel is selected and the Monitor option switch is programmed (see page 26), pressing that switch unsquelches/squelches the receiver and either voice or background noise is heard.
GENERAL OPERATION dealer to determine how your switches have been programmed. If no option switch has been programmed to control a particular function, that function may not be available or may be in a fixed mode. Keypad Lock If the Keypad Lock option switch has been programmed, the keypad can be locked (disabled) to prevent keys from being accidentally pressed. To lock the keypad, press this switch and a locked keypad is indicated by the icon in the display.
GENERAL OPERATION Zone Select A zone is a group of up to any 16 conventional and SMARTNET/ SmartZone channels defined by dealer programming. Up to 16 zones can be programmed for a total of 16 x 16 or 256 channels. One use of zones may be to select groups of channels programmed for operation in different geographical areas or radio systems. If selectable zones have been programmed in your radio, consult your dealer for more information on how they are used. Zones are selected as follows: 1.
GENERAL OPERATION time, the transmitter is disabled and an invalid condition tone sounds. Five seconds before time-out occurs, an alert tone sounds to indicate that time-out is approaching. The timer and tone are reset by releasing the PTT switch. One use of this feature is to prevent a channel from being kept busy for an extended period by an accidentally keyed transmitter. It can also prevent possible transmitter damage caused by transmitting for an excessively long period.
GENERAL OPERATION wide scanning is occurring, radio wide scanning is automatically disabled and vice versa. More information on these modes follows. Standard Scanning Standard scanning monitors only channels that are the same type as that currently selected. Therefore, if a conventional channel is selected, only conventional channels are scanned, and if a SMARTNET channel is selected, only SMARTNET channels are scanned. Standard scanning is turned on and off by the Scan option switch as follows.
GENERAL OPERATION • To turn radio wide scanning off, press the Radio Wide Scan option switch again. The icon is then no longer indicated and “RWS OFF” is displayed briefly. • If the zone or channel is changed while radio wide scanning, scanning continues normally. Scan Resume Delay When a message is received or transmitted while scanning, there is a dealer programmable delay before scanning resumes.
GENERAL OPERATION Determining Which Channels are in Scan List Channels in the standard SMARTNET/SmartZone and radio wide lists are not indicated. With conventional channels, the selected channel is in the current scan list if the box icon (around “S”) is indicated in the upper left corner of the display. Nuisance Channel Delete With standard scanning, channels can be temporarily deleted from the scan list, for example, if messages on a channel become annoying.
GENERAL OPERATION Conventional Operation This is a non-trunked operation mode which accesses independent radio channels (there is no automatic access to several channels as with trunked operation). Monitoring before transmitting may not occur automatically in this mode, so you may have to manually monitor the channel before transmitting to make sure that it is not being used by anyone else (see page 25).
CONVENTIONAL FEATURES CONVENTIONAL FEATURES Introduction The following information describes features unique to the conventional operating mode (see brief description on preceding page). Refer to the preceding “General Operation” section for information on features common to all operating modes, and to the SMARTNET/SmartZone section starting page 34 for information on features unique to that mode.
CONVENTIONAL FEATURES Automatic Channel Monitoring If the selected channel is programmed for Busy Channel Lockout feature (consult your dealer), monitoring is performed automatically. Refer to the description of this feature on page 27 for more information. Manual Channel Monitoring The automatic monitoring just described may not be programmed or it may occasionally disable the transmitter even if the channel is not in use.
CONVENTIONAL FEATURES (approximately 1 second). This function may be useful, for example, during weak signal conditions if intermittent squelching makes a message difficult to understand. Busy Channel Lockout The Busy Channel Lockout feature (also called Transmit Disable On Busy) automatically disables the transmitter if the channel is busy when the PTT switch is pressed.
CONVENTIONAL FEATURES Call Guard Squelch Enable/Disable To disable Call Guard (Selective) squelch so that all messages on the selected or scanned channels are heard, press the Normal/Selective option switch if programmed. Then to re-enable Call Guard squelch, press the Normal/Selective switch again. When Call Guard squelch is disabled by this switch, “SQ NORM” is flashed on the lower line of the display, and when it is enabled, “SQ SLCT” is flashed.
CONVENTIONAL FEATURES when the PTT switch is released after the transmitter has been disabled. If the PTT switch is pressed during the penalty time, the time-out indication occurs again. A beep sounds when the penalty timer expires and the transmitter can then be keyed. Conversation Timer A conversation timer can be programmed on conventional channels to limit the total length of a conversation rather than just the length of each transmission as with the time-out timer.
CONVENTIONAL FEATURES opposite occurs with the low power setting. When the low power is selected on the current channel, “LOW” is indicated continuously near the bottom of the display. Pressing the High/Low Power switch toggles the power setting. The new level is flashed in the display when this switch is pressed as “HI POWER” or “LO POWER”. If power selection is not permitted on the channel, the fixed power level is flashed and no power change occurs.
CONVENTIONAL FEATURES Programming a Scan List When full keypad (15-key) models, each of the three scan lists is user programmable if the Scan Edit option switch is programmed and user programming of the list is allowed. Scan list programming is not available with limited keypad (3-key) models. Proceed as follows to program a scan list: 1. Make sure all scanning is off (neither the standard scan “S” icon or radio-wide scan icon displayed). 2.
CONVENTIONAL FEATURES • • • Priority channel (see following description) Selected channel Channel of a call if the response is made before scanning resumes Priority Channel Sampling General The priority channel sampling feature ensures that when standard scanning, messages on the priority channel are not missed while listening to a message on some other channel.
CONVENTIONAL FEATURES Standard Conventional Calls Standard conventional calls are calls to or from other mobile units on the selected channel. The proper coded Call Guard signaling (see page 27) may need to be transmitted for them to receive your call and also for you to receive their calls. Proceed as follows to place and receive these calls: Placing a Standard Conventional Call 1. Turn power on and set the volume as described on page 16.
SMARTNET/SMARTZONE FEATURES DTMF/ANI Signaling DTMF (Dual Tone Multi-Frequency) tones can be generated manually or automatically for ANI (Automatic Number Identification) and other purposes. The following options may be enabled by dealer programming for each conventional channel: DTMF Keypad - Pressing 0-9, *, or # on the keypad while holding the PTT switch transmits the corresponding tone until the key is released.
SMARTNET/SMARTZONE FEATURES Standard Group Calls Standard group calls are between you and another mobile, group of mobiles, or a control station (a radio at a fixed location). Most calls you make will probably be this type. Placing a Standard Group Call 1. Turn power on and set the volume as described on page 16. Select the channel programmed for the talk group you want to call (see page 18). A regular or announcement talk group can be selected. 2.
SMARTNET/SMARTZONE FEATURES Enhanced Private Conversation Calls General Private calls allow you to place a call to a specific mobile unit. Either the Enhanced Private Conversation™ or Private Conversation II™ modes may be programmed depending on the capabilities of the radio system. The Enhanced Private Conversation mode is described in the following information, and the Private Conversation II mode is described starting on page 39.
SMARTNET/SMARTZONE FEATURES Direct Entry Method (Full Keypad Models Only) 1. With a SMARTNET/SmartZone channel selected, press and hold the Private Call option switch until a tone sounds (approximately 1 second). The last ID called is displayed, and the private call mode is indicated by “C” in the upper part of the display. 2. Using the 0-9 keys, enter the 6-digit ID of the mobile unit you are calling. Press the key to erase the last digit entered or press the CLR key to cancel the call. 3.
SMARTNET/SMARTZONE FEATURES • If the called party answers but the radio system is busy, four low tones sound and “BUSY” and “WAIT” are alternately displayed. When the system is no longer busy, the called party automatically responds. • If an out-of-range condition exists or the radio system is not in service, “LOST CALL” is displayed and a continuous tone sounds. End the call by pressing the CLR key.
SMARTNET/SMARTZONE FEATURES the call back tone (four beeps) is heard and your radio automatically starts transmitting. Press the PTT switch to continue the call. • To ignore an incoming call, press the CLR key or wait 20 seconds until the recurring unit call tone stops sounding. NOTE: If the CLR key is programmed for the Call function, it will not clear the call. Private Conversation II Calls General Private calls allow you to place a call to a specific mobile unit.
SMARTNET/SMARTZONE FEATURES 2. Enter the index of the desired ID if you know it or scroll through the list using the and keys until you find the desired ID. Press the CLR key to cancel the call. 3. Press the PTT switch to initiate the call. The display then indicates the alias of the destination radio. Wait approximately 1 second and then begin talking. Proceed to the bulleted list which follows the next method for conditions that may then occur. Direct Entry Method (Full Keypad Models Only) 1.
SMARTNET/SMARTZONE FEATURES Receiving a Private Conversation II Call Unit-to-unit calls are automatically received if a SMARTNET/ SmartZone channel is selected. Proceed as follows: 1. When a call is received, an alert tone sounds and the caller’s voice is heard. While voice is heard, “C” is indicated in the upper part of the display and “CALL RCV” and the current channel alias are alternately displayed. 2. To answer the call, press the Private Call option switch and then the PTT switch and begin talking.
SMARTNET/SMARTZONE FEATURES List Entry Method 1. With a SMARTNET/SmartZone channel selected, momentarily press the Phone option switch. The phone mode is indicated by the icon, and the display indicates the alias of the last called telephone number if it is in your phone number list. Otherwise, the last called telephone number is displayed. 2. Enter the index of the desired telephone number if you know it or scroll through the list using the and keys until you find the desired number.
SMARTNET/SMARTZONE FEATURES telephone number and the normal ringing or busy tone is heard. Any of the following conditions may then occur. • After the called party answers, press the PTT switch to talk and release it to listen. You cannot talk and listen at the same time because the radio cannot transmit and receive at the same time. Each time the PTT switch is released, a tone is heard by the other party that indicates when a response can be made.
SMARTNET/SMARTZONE FEATURES 3. To end the call when the conversation is complete or at any other time, press the CLR key. Also press the CLR key to ignore an incoming call and end it without answering. NOTE: If the CLR key is programmed for the Phone function, it will not clear the call. Call Alert The Call Alert™ feature allows pages to be sent and received.
SMARTNET/SMARTZONE FEATURES 2. Using the 0-9 keys, enter the 6-digit ID of the unit you are calling. Press the key to erase the last digit entered or press the CLR key to cancel the page. 3. Press the PTT switch or the ENT key to send the page. If the entered ID is invalid, “INVALID” is momentarily displayed and the page is not sent. If the entered ID is valid, the display indicates the alias of the ID if it matches an ID in your call list. Otherwise, the ID you entered continues to be displayed.
SMARTNET/SMARTZONE FEATURES 1. Momentarily press the Message option switch. The alias of the last message sent is displayed. 2. Enter the index of the desired message if you know it or scroll through the list using the and keys until you find the desired message. Press the CLR key to cancel the message. 3. Press the PTT switch or the ENT key to send the message.
SMARTNET/SMARTZONE FEATURES Emergency Alarm and Emergency Call Emergency alarms and emergency calls are separate functions that can be individually programmed on SMARTNET/SmartZone channels. The Emergency option switch is required to initiate these features. An emergency alarm is a special data transmission to alert your dispatcher of an emergency situation, and an emergency call is an urgent request for access to a voice channel.
SMARTNET/SMARTZONE FEATURES When in the failsoft mode, operation is in the conventional mode on a preprogrammed failsoft channel. If a transmission is attempted before a failsoft channel is located, a continuous tone sounds until the PTT switch is released. When the radio system returns to normal operation, this condition is automatically detected and normal operation resumes.
SMARTNET/SMARTZONE FEATURES 2. To reset all talk and announcement groups to normal so that only the designated regrouping channel is on the dynamic group, manually select the designated regrouping channel if you know it. If this channel is not selected or there is no designated regrouping channel, all transmissions occur on the dynamically assigned group regardless of which channel is selected, and the regrouping tone sounds each time the PTT switch is pressed. 3.
MISCELLANEOUS Locking/Unlocking a Site It is sometimes desirable to stay on the current site regardless of signal level. To lock the radio on the current site so that it does not search for another, press the Site Lock option switch (if programmed). The display then momentarily indicates “LOCK x” to indicate that the current site is locked (“x” is the current site number). To unlock the site, press the Lock switch again and “UNLOCK” is momentarily displayed.
MISCELLANEOUS • • • • • • • The transmitter has been disabled by the conversation timer (page 29). An out-of-range condition exists (SMARTNET/SmartZone only). A transmission is being attempted before the penalty timer has expired (page 28). Dynamic regrouping has been exited but the dynamic regrouping channel is still selected (page 48). The paged mobile did not acknowledge the page (page 44). The message that was sent has not been acknowledged (page 45).
MISCELLANEOUS Gurgle-Like Tone • • Dynamic regrouping has occurred (page 48). Dynamic regrouping has occurred but the regrouping channel is not selected (page 48). Four Low Tones (Busy Signal) • The radio system is busy or a busy condition exists when making a telephone call. Four Alternating High and Low Tones • A channel is available after a busy condition occurred (SMARTNET/ SmartZone only). Rechargeable Battery Pack WARNING Do not dispose of the battery pack in fire because it may explode.
MISCELLANEOUS operating time varies accordingly. The charge of the battery and ambient temperature also affect operating time. NOTE: Be sure to turn transceiver power off before removing the battery pack. Failure to do so may result in the current settings not being saved in memory. Recharging Recharging is required when the icon appears in the lower part of the display.
MISCELLANEOUS Dealer Programming As noted several times in this manual, programming determines the availability and specific operation of many features. This refers to the programming performed by your dealer when the radio was set up, not to any programming that you can perform. If a feature is controlled by a front panel option switch and that switch is not available, it is probably not available or in a fixed condition.
INTRINSICALLY SAFE CLASSIFICATION Transceiver Service If the transceiver begins operating improperly, try turning power off and then on again to reset the logic. Also make sure that the battery is fully charged and in good condition. If the transceiver still does not operate properly, return it to your dealer for service. NOTE: There are no user-serviceable components inside this transceiver.
INTRINSICALLY SAFE CLASSIFICATION Classification of Hazardous Areas (Division) Hazardous areas are classified as Division 1 or 2 as shown below. Since a Division 1 area is considered most hazardous, a transceiver approved for a specific Division 1 atmosphere can also be used in the same Division 2 atmosphere. The intrinsically safe rating applies to Division 1 areas and the nonincendive rating applies to Division 2 areas.
INDEX Typical Hazard Acetylene Hydrogen Ethylene, ethyl ether, cyclopropane Gasoline, naphtha, butane, propane, alcohol, acetone, benzol, natural gas Metal dust including aluminum, magnesium, and their alloys Carbon black, coal or coke dust Flour, starch, or grain dusts Ignitable fibers/flyings such as rayon and cotton Group Class A B C D I I I I E II F G - II II III INDEX A Accessory Connector 12 Alias 18 ANI Signaling 34 Antenna Jack 11 Atmosphere Classifications 56 AUX Switch 12, 17 B Backligh
INDEX Display Mode Select 25 Division Classifications 56 DTMF/ANI Signaling 34 Dynamic Regrouping 48 E Emergency Alarms 47 Emergency Calls 47 Enh. Priv.
INDEX Priority Calls Conv 32 SmartNet 48 Priv.
Part Number 002-7781-500 9-00hph Printed in U.S.