SpeedStream ® Wireless DSL Gateway User’s Guide Model 6200/6300 REV 2.55 Part No.
© Copyright 2003, Efficient Networks, Inc. All rights reserved. Printed in the U.S.A. Product names mentioned herein may be trademarks and/or registered trademarks of their respective companies. Efficient Networks, Inc. shall not be liable for technical or editorial errors or omissions in this document; nor for incidental or consequential damages resulting from the furnishing, performance, or use of this material. Efficient Networks, Inc.
E. Upon request from EFFICIENT, the end user must prove the date of the original purchase of the product by a dated bill of sale or dated itemized receipt. 5.Limitations.
Wireless DSL Gateway User Guide Contents CHAPTER 1 INTRODUCTION ............................................................................................................... 1 Features of the Wireless DSL Gateway ............................................................................................. 1 Network (LAN) Features................................................................................................................. 1 Security Features ............................................
SpeedStream Wireless DSL Gateway Contents Connecting to the Gateway............................................................................................................ 22 Using UPnP (Windows XP and Me) .......................................................................................22 Using your Web Browser ........................................................................................................22 Setup Wizard....................................................................
SpeedStream Wireless DSL Gateway Contents Wireless Filter and Options Configuration..............................................................................67 UPnP (Universal Plug and Play) .............................................................................................69 About UPnP ...................................................................................................................................................... 70 Security.............................................
Wireless DSL Gateway User Guide 1 Chapter 1 Introduction This chapter provides an overview of the Gateway's features and capabilities. Congratulations on the purchase of your new SpeedStream SS6000 Series Wireless DSL Gateway (“Gateway”). The Gateway is a multi-function device providing the following services: • Built-in DSL Modem provides shared Internet access for multiple users. • Five-port 10/100 Ethernet Switch for 10Base-T or 100Base-T connections.
SpeedStream Wireless DSL Gateway Introduction Security Features 24. Password-protected Configuration Password protection is provided to prevent unauthorized users from modifying the Gateway’s configuration data and settings. 25. NAT Protection An intrinsic side effect of NAT (Network Address Translation) technology is that by allowing all your network users to share a single IP address, the location and even the existence of each computer is hidden.
SpeedStream Wireless DSL Gateway Introduction optional wireless expansion card. Custom configuration options include wireless access control, 128- bit wireless encryption, disable SSID broadcast, and pass phrase key generation for added security. Minimum System Requirements At a minimum, your computer must be equipped with the following to successfully install the DSL Gateway. Your Internet Service Provider may have additional requirements for use of their service.
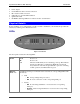
SpeedStream Wireless DSL Gateway • • • • • • Introduction Power adapter CAT-5 Ethernet cable for LAN connections RJ11 cable for DSL connection USB cable for optional USB installation Quick Start Guide CD-ROM containing USB driver software and user documentation Physical Details Before installing, we recommend that you take a moment to familiarize yourself with the SpeedStream Gateway by referring to the illustrations below. LEDs Figure 1.
SpeedStream Wireless DSL Gateway DSL Port For the DSL connection, there are 2 LEDs: • Link - • Off No data being transmitted or received via the DSL connection. Flashing Data is being transmitted or received via the DSL connection. For the USB port, there are 2 LEDs: • Link - • On USB connection to computer is active. Off No active USB connection to computer. Activity - 802.11 On DSL connection is active. Off No active DSL connection.
SpeedStream Wireless DSL Gateway Introduction Figure 3: Model 6300 Rear Panel DSL Port (RJ11) Connect the RJ11 DSL cable (looks like a telephone cord) here to use your DSL connection through an existing phone line. Reset Button This button can be used to clear all data and restore all settings to the factory default values. Note: To clear all data and restore the factory default values: 7. Power off the Gateway. 8. Hold the Reset button down for 5-10 seconds. 9.
SpeedStream Wireless DSL Gateway Introduction Power Button Push this button to power the Gateway on and off. Wireless Expansion Card Slot (Model 6200) Consult your Internet Service Provider for 802.11 wireless card options and availability. Use only the wireless card recommended by your Service Provider. Attempting to use any other wireless card may damage the Gateway and will void your manufacturer’s warranty.
Wireless DSL Gateway User Guide 2 Chapter 2 Installation This chapter covers the physical installation of the SpeedStream Wireless DSL Gateway. Minimum System Requirements • DSL service and an Internet access account from an Internet Service Provider (ISP). • Network cables for each device you intend to connect to the Gateway. Use standard CAT5 Ethernet cables with RJ45 connectors. • TCP/IP network protocol must be installed on all computers.
SpeedStream Wireless DSL Gateway Installation Wireless Card Installation (Model 6200) If your SpeedStream Gateway came with a wireless expansion card, install this card in the PMCICA expansion slot on the side of the Gateway before proceeding further with the installation. 1. 2. 3. 4. 5. Remove the wireless card from the anti-static bag. Remove the protective cover from the PCMCIA expansion slot on the side of the Gateway. Insert the expansion card in the slot with the colored label facing up.
SpeedStream Wireless DSL Gateway Installation Wall-Mount Filter For a wall-mounted telephone, install a wall mount filter: 1. Remove the telephone. 2. Connect the wall mount filter to the wall plate. 3. Reconnect the telephone. Two-to-One Adapter If your DSL router and another device will share the same telephone jack, install a two-to-one adapter: 1. Plug a two-to-one adapter into the telephone jack. 2. Plug a line filter into one of the sockets of the two-to-one adapter.
SpeedStream Wireless DSL Gateway Installation Figure 4: (Model 6200) Ethernet Connection Installation Figure 5: (Model 6300) Ethernet Connection Installation 1. Connect the Ethernet cable(s): 1) With your computer powered off, connect the Ethernet cable to an Ethernet port (1-5) on the SpeedStream Gateway. 2) Connect the other end of the Ethernet cable to the Ethernet port on your computer.
SpeedStream Wireless DSL Gateway Installation 2. Connect the DSL cable: 1) Connect the DSL cable (resembles a telephone cord) to the DSL port on the rear of the SpeedStream Gateway. 2) Plug the other end of the DSL cable into the phone jack. 3. Connect the power: 1) Connect the power adapter to the rear of the SpeedStream Gateway. 2) Plug the power adapter into the electrical wall outlet. 3) Flip the power switch to power on the SpeedStream Gateway. 4) Power on all connected computers. 4.
SpeedStream Wireless DSL Gateway Installation 1. Connect the USB Cable 1) With your computer off, connect the provided USB cable to the USB port on the SpeedStream Gateway. 2) Connect the other end of the USB cable to an open USB port on your computer. 3) If desired, use standard 10/100 CAT5 Ethernet cables to connect additional computers to the Ethernet ports on the rear of the Gateway. 2.
SpeedStream Wireless DSL Gateway Installation Chapter 3 Operating System Configuration 3 This chapter details the configuration required for each computer on your network. Overview The operating system on each computer in your network, must have the TCP/IP network settings and Internet access settings configured.
SpeedStream Wireless DSL Gateway Installation 3. Click Properties. The system responds with the “TCP/IP Properties” window. 4. Ensure that the Obtain an IP address automatically option is selected. This is the default Windows settings. Figure 8: IP Address (Win 9x) 5. Restart your computer to ensure it obtains an IP address from the Gateway. Checking TCP/IP Settings (Windows 2000) 1. On the Windows taskbar click Start>Control Panel. The system responds with the “Control Panel” window. 2.
SpeedStream Wireless DSL Gateway Installation 5. Click Properties. The system responds with the “Internet Protocol (TCP/IP) Properties” window. Figure 9: Network Configuration (Win 2000) 6. Select the “Obtain an IP address automatically” option. Figure 10: TCP/IP Properties Window (Win 2000) 7. Restart your computer to ensure it obtains an IP address from the Gateway.
SpeedStream Wireless DSL Gateway Installation Checking TCP/IP Settings (Windows XP) 1. On the Windows taskbar click Start>Control Panel >Network Connection. 2. Right-click Local Area Connection; then click Properties. The system responds with the “Local Area Connection Properties” window. Figure 11: Network Configuration (Windows XP) 3. Select the TCP/IP protocol for your network card. 4. Click Properties. The system responds with the “Internet Protocol (TCP/IP) Properties” window. 5.
SpeedStream Wireless DSL Gateway Installation 6. Restart your computer to ensure it obtains an IP address from the Gateway. Figure 12: TCP/IP Properties (Windows XP) Internet Access To configure your computers to use the Gateway for Internet access, ensure that the Gateway is installed correctly and the DSL line is functional. Then follow the procedure below to configure your Web browser to access the Internet via the LAN, rather than by a dial-up connection. For Windows 9x/2000 1.
SpeedStream Wireless DSL Gateway Installation For Windows XP 1. Select Start Menu - Control Panel - Network and Internet Connections. 2. Select Set up or change your Internet Connection. 3. Select the Connection tab, and click Setup. 4. Cancel the pop-up Location Information screen. 5. Click Next on the New Connection Wizard screen. 6. Select Connect to the Internet and click Next. 7. Select Set up my connection manually and click Next. 8.
SpeedStream Wireless DSL Gateway Installation 3. Set the following values: • Connect via: Ethernet Built-in • Configure: Using DHCP Server • Leave the remaining fields blank 4. Close the TCP/IP Control Panel and click Save. 5. Reboot when configuration is saved. Once rebooted, the computer will pull an IP address from the DHCP server on the Gateway. Checking TCP/IP Settings (MAC OS X) 1. Select Apple Menu – System Preferences – Network. 2. Select the TCP/IP tab.
SpeedStream Wireless DSL Gateway Chapter 4 SpeedStream Gateway Setup 4 This chapter provides details of the setup processes. Overview This chapter describes the basic setup procedures for configuring your computer and establishing Internet access. Some computers on your network may require additional configuration to share an Internet connection through the Gateway. For more information, please see the section in this document titled Chapter 3. Operating System Configuration.
SpeedStream Wireless DSL Gateway Computer Configuration Preparation Before attempting to configure the Gateway, please ensure that: • Your computer can establish a physical connection to the Gateway. The computer and the DSL Gateway must be directly connected using either the USB or Ethernet ports on the Gateway. • The SpeedStream Gateway is installed correctly and powered on. • The TCP/IP protocol is installed on all computers on your network.
SpeedStream Wireless DSL Gateway Computer Configuration Setup Wizard The first time you connect to the Gateway via Web browser, the Setup Wizard runs automatically. (The Setup Wizard also runs if the Gateway's default settings are restored.) Proceed through the entire Setup wizard to ensure accuracy of the installation. Note: You will need to know the username and password for Internet service provided by your ISP. Check the information supplied by your ISP for details. Gateway Setup Wizard 1.
SpeedStream Wireless DSL Gateway Computer Configuration 4. The “Configure Time Zone” window allows you to set the time zone of the area of the world in which you live. Select the “Yes” option from under the “Enable Time Client” heading. 5. Select your time zone from the “Select Time Zone” drop-down and click Next. Figure 16. Setup Wizard Time Zone Window 6. The Wireless Setup Configuration window allows you to set up wireless clients on your gateway.
SpeedStream Wireless DSL Gateway Computer Configuration 9. Click Next. Figure 17. Wireless Setup Configuration Window 10. The “Wireless Security Configuration” window allows you to set the wireless security level you wish to use. All wireless devices attached to the gateway MUST have the same wireless security settings for your network to have proper communications and security. If you own the 6200 series gateway, the “Wireless Security Configuration” window does not appear.
SpeedStream Wireless DSL Gateway Computer Configuration Wireless Setup WEP 64-Bit Option WEP security offers the same security offered by a wired LAN with encrypted packets. This option offers 64-bit encryption, which is the least secure WEP option. This section assumes you currently have the “Wireless Security Configuration” window displayed on your computer. To use the WEP 64-bit option: 1. Select the WEP 64-bits option from the “Security Mode” drop-down. 2. Click Next. Figure 18.
SpeedStream Wireless DSL Gateway Computer Configuration 6. Click Next. Figure 19. Wireless 64-Bit WEP Configuration Window 7. On the “Congratulations” window, click Finish. The system responds with the “What do I do now?” window. From this window you may either: • Click Surf Now. Your Web browser re-directs you to default home page of the Web browser you are using. You may return to the Gateway’s configuration interface at anytime should you choose to further configure the Gateway. • Click Continue.
SpeedStream Wireless DSL Gateway Computer Configuration Wireless Setup WEP 128-Bit Option WEP security offers the same security offered by a wired LAN with encrypted packets. This option offers 128-bit encryption, which is the most secure WEP option. This section assumes you currently have the “Wireless Security Configuration” window displayed on your computer. To use the WEP 64-bit option: 1. Select the WEP 64-bits option from the “Security Mode” drop-down. 2. Click Next. Figure 20.
SpeedStream Wireless DSL Gateway Computer Configuration 6. Click Next. Figure 21. Wireless 128-Bit WEP Configuration Window 7. On the “Congratulations” window, click Finish. The system responds with the “What do I do now?” window. From this window you may either: • Click Surf Now. Your Web browser re-directs you to default home page of the Web browser you are using. You may return to the Gateway’s configuration interface at anytime should you choose to further configure the Gateway. • Click Continue.
SpeedStream Wireless DSL Gateway Computer Configuration Wireless Setup WPA PSK Option WPA security changes encryption keys after a specified amount of time. This is the most secure option for wireless networks. This section assumes you currently have the “Wireless Security Configuration” window displayed on your computer. To use the WPA option: 1. Select the WEP 64-bits option from the “Security Mode” drop-down. 2. Click Next. Figure 22. Wireless Security Configuration WPA-PSK 3.
SpeedStream Wireless DSL Gateway Computer Configuration 5. Type a numeric value (in seconds) of the time lapse in changing the key in the “Group Key Renewal” box and click Next. Note: The minimum time value is 30. Figure 23. Wireless WPA Configuration Window 6. On the “Congratulations” window, click Finish. The system responds with the “What do I do now?” window. From this window you may either: • Click Surf Now. Your Web browser re-directs you to default home page of the Web browser you are using.
SpeedStream Wireless DSL Gateway Computer Configuration Gateway Environment Home Window After finishing the Setup Wizard and clicking Configure, the Home window appears. When connecting to the Gateway in the future, this screen appears. Pay special attention to the Login box in the top left-hand corner of the screen to ensure that you are logged in to access all available features.
SpeedStream Wireless DSL Gateway Computer Configuration Toolbar The Gateway has three primary toolbar buttons: Users, Devices, and Gateway. The options for all of the toolbar buttons differ depending on the user login. The administrator has the most authority with all options enabled, while the user has limited options based on the user profile for the login. Please see the table below for more information.
SpeedStream Wireless DSL Gateway Computer Configuration Logging out of the Gateway To log out of the gateway: 1. Click GO next to the “Log Out” heading. The system responds by displaying the Home window. Figure 26. Logout Gateway Options In the left-pan of the Home window, there are configuration options for the gateway. These options differ depending on how a user is logged into the system. An administrator has full configuration rights, while a user has limited configuration rights.
SpeedStream Wireless DSL Gateway Chapter 5 Gateway Configuration Options 5 This chapter explains when and how to use the Gateway’s modem options. Overview Many advanced features, status, and diagnostic screens and are provided for your convenience. This chapter contains details of the configuration and use of each of these features.
SpeedStream Wireless DSL Gateway Advanced Features Adding a User You may add different users to the gateway to restrict their access to both gateway functions and to the Internet. You MUST be logged in as the administrator to add a user. To add a user: 1. Click Add New User in the left-navigation-pane. The system responds with the “Profile User Information” window. Figure 29. Profile User Information Window 2. Type a user name in the “Username” box. 3. Type a password in the “Password” box. 4.
SpeedStream Wireless DSL Gateway Advanced Features Content Filtering (Optional) Content filtering restricts access to undesirable Web sites and Web content. Note: The “Enable User Profiling” checkbox option must be selected on the “User Profiles” window for the content filtering option to be operational. To use content filtering: 1. Select one of the following options from under the “These are three ways to set this up” heading: • Disable: All Internet content is allowed for this user.
SpeedStream Wireless DSL Gateway Advanced Features Profile Configuration Access (Optional) Profile configuration allows the administrator to grant users certain permissions to access options on the gateway. To use profile configuration access: 1. Select one of the following profiles and click Next. Note: Optionally, you can click Finish to complete the user profile. The system accepts all of the defaults for a user. Figure 31: Profile Configuration Access Window 2.
SpeedStream Wireless DSL Gateway Advanced Features Profile Time Settings (Optional) Profile time settings are used to limit a users ability to use the Internet during certain times of the day or night. You can also define the amount of time a user stays logged on to the Internet without Web surfing activity (Idle Time). Note: To use the time of day restrictions, you must have the Time Client enabled. Please see Gateway Setup Wizard for more information. To use profile time settings: 1.
SpeedStream Wireless DSL Gateway Advanced Features Figure 33: Associated Computer/Connected Device Window All computers and devices currently on the network, powered on, and detected by the Gateway are displayed in the list. Note: Optionally, you can click Finish to complete the user profile. The system accepts all of the defaults for a user. To associate a connected computer: 1. Select a specific device to associate with the profile, or select None to require the user to log in from any device used. 2.
SpeedStream Wireless DSL Gateway Advanced Features Editing a User To edit a user: 1. Log on as the administrator. 2. Click the Users button in the toolbar. The system responds with the “User Profile” window. 3. Click a user icon in the left-navigation-pane. The system responds with the “Profile Monitor” window. 4. Click Edit Profile. Figure 34. Profile Monitor Window (Editing a User Profile) 5. Make any changes and click Finish.
SpeedStream Wireless DSL Gateway Advanced Features Deleting a User To delete a user: 1. Log on as the administrator. 2. Click the Users button in the toolbar. The system responds with the “User Profile” window. 3. Click a user icon in the left-navigation-pane. The system responds with the “Profile Monitor” window. 4. Click Delete User. The system responds with by deleting the user from the system. Figure 35.
SpeedStream Wireless DSL Gateway Advanced Features Viewing User Logs User logs provide time stamped information about the activity of the user over the network. To use user logs: 1. Click the Users button in the toolbar. The system responds with the “User Profile” window. 2. Click a user icon in the left-navigation-pane. The system responds with the “Profile Monitor” window. 3. Click View User Log.
SpeedStream Wireless DSL Gateway Advanced Features Devices The Devices option allows you to view connected devices to your gateway. If you are logged in as the administrator, you can view all of the connected devices to the gateway. If you are logged in as a specific user, you can only view devices associated with that user. To use the Devices option: 1. Click Devices in the toolbar. The system responds with the “Connected Devices” window displaying general information about devices on your network.
SpeedStream Wireless DSL Gateway Advanced Features Gateway The Gateway option provides access to all Gateway configuration options, security settings, Gateway health monitoring screens, and Internet connection and network details. The options that display under the Modem Options heading in the left-navigation-pane are based on how you logged into the system. If you logged in as the administrator, all options are turned on and enabled.
SpeedStream Wireless DSL Gateway Advanced Features 4. Click one of the ISP connections (in red) to reconfigure that connection. Please check with your ISP for the information required to reconfigure a connection. Figure 39: ISP Connection Information Window 5. Click Advanced Settings to configure additional access options from your ISP. The system responds with the “Advanced Internet Options” window. Figure 40. Advanced Internet Options Window 6.
SpeedStream Wireless DSL Gateway Advanced Features Advanced Internet Options All of the options in this section should only be configured with the help and guidance of your ISP. Incorrect changes to any of these options, could result in the failure of your Internet connection. ATM Virtual Circuits The ATM virtual circuit option provides access to settings that your Internet Service Provider may advise you to modify depending upon your service needs.
SpeedStream Wireless DSL Gateway Advanced Features To use the static route option: 1. Click Advanced Settings. The system responds with the “Advanced Internet Options” window. 2. Click the “Add Static Routes for Direct IP Connections” hyperlink. The system responds with the “Static Routes” window. Figure 42: Static Routes Window 3. Type the IP address of the destination device in the “Destination” box. 4. Optionally, click the “View the current routing table” hyperlink to view the current routing table.
SpeedStream Wireless DSL Gateway Advanced Features Routing Table This screen shows a table of routing information including Destination IP Address, Subnet Mask, Flags, Gateway, Metric and Interface of all static and dynamic routes for network devices. To access the routing table: 1. Log on as the administrator. 2. Click Gateway in the toolbar. 3. Click ISP Connection in the left-navigation-pane. 4. Click Advanced Settings. The system responds with the “Advanced Internet Options” window. 5.
SpeedStream Wireless DSL Gateway Advanced Features 2. In the Address bar of your browser type www.dydns.org/services/dydns and press the ENTER key. The system responds by displaying the “DynDNS.org” Web page. Figure 44. DynDNS Main Web Page 3. Click the “Sign Up Now” hyperlink in the upper-right corner of the “DynDNS” Web page. The system responds with the “Create Account” Web page. 4. Read the license agreement and click the “I have read and agree to the Acceptable Use Policy above” checkbox. 5.
SpeedStream Wireless DSL Gateway Advanced Features 11. Re-type www.dydns.org/services/dydns in the Address bar of your browser. In the upper-right corner of the DynDNS Web page, type your user ID in the “User” box. 12. Type your password in the “Pass” box. 13. Click Login. Figure 45. DyDNS Login 14. At the bottom of the “DynDNS” Web page, click the “Add a Host” hyperlink. Figure 46.
SpeedStream Wireless DSL Gateway Advanced Features 15. In the “New Dynamic DNS Host” Web page, type a hostname in the “Hostname” box. The hostname can be something like “mypage.athome.” 16. Select the second part of the hostname in the drop-down next to the “Hostname” box. 17. The system automatically displays the IP address of the device you are using. Type the gateway IP in the “IP Address” box. 18. Optionally, select the “Enable Wildcard” checkbox if using custom DNS options. 19.
SpeedStream Wireless DSL Gateway Advanced Features To set up Dynamic DNS: 1. Click the “Set up Dynamic DNS” hyperlink. The system responds with the “Set Up Dynamic DNS” window. Figure 47: Dynamic DNS Window 2. Select the “Enable” option. 3. Type the name provided to you by www.dydns.org in the “Service Username” box. 4. Type your www.dydns.org password in the “Password” box. 5. Type the domain or host name provided by www.dydns.org in the “Host Name 1” box. 6.
SpeedStream Wireless DSL Gateway Advanced Features RIP (Routing Information Protocol) RIP (Routing Information Protocol) is based on distance algorithms that calculate the shortest distance between two points on the network based on the addresses of the originating devices. The shortest path is determined by the number of hops between these two points. RIP also allows for the receiving of routing updates from the devices connected to the gateway. 1.
SpeedStream Wireless DSL Gateway Advanced Features Home Network The home network option displays all network-related information. Note: You must be logged in as the administrator to access this option. To use the Home Network option: 1. Log on as the administrator. 2. Click Gateway in the toolbar. 3. Click Home Network in the left-navigation-pane. The system responds with the “Home Network” window. Figure 49: Home Network Window 4. Optionally, click Advanced Settings.
SpeedStream Wireless DSL Gateway Advanced Features IP Network The Gateway provides the flexibility to use different ranges of IP addresses to be assigned by the DHCP Server housed in the Gateway. DHCP (Dynamic Host Configuration Protocol) allows computers to obtain either permanently or temporarily, IP addresses from a central server. Ensure that you select an IP address range that is not in conflict with any existing devices. A custom configuration option is provided for advanced users.
SpeedStream Wireless DSL Gateway Advanced Features Server Ports Common applications such as HTTP (Web site traffic), FTP, and Telnet use pre-defined incoming port numbers for compatibility with other services. If you wish to change the ports used by these applications you may do so from this screen. This feature is recommended for use by advanced users only. To use the server port option: 1. Click the “Configure the Local SpeedStream Gateway Server Ports” hyperlink.
SpeedStream Wireless DSL Gateway Advanced Features LAN/WAN Port Ethernet port #5 can be used as either a LAN (network) port or as a WAN (Internet connection) port. Select the appropriate option to define whether the port is used as a fifth local network port or as a connection for another broadband device. Note: For configuration of the port as a WAN port, you may be required to consult your Internet Service Provider for the appropriate settings. To configure the LAN/WAN port: 1.
SpeedStream Wireless DSL Gateway Advanced Features Wireless Network (Optional) This option allows you to either setup or configure a pre-existing setup of the wireless equipment in your gateway. Note: This option is only shown when a SpeedStream wireless expansion card is installed in the SpeedStream 6200 Gateway, or with the SpeedStream 6300 model with built-in wireless interface. The wireless settings on the Gateway must match those of any wireless clients on your network.
SpeedStream Wireless DSL Gateway Advanced Features 5. Click Next. Figure 55. Wireless Configuration Window (Default) 6. The “Wireless Security Configuration” window allows you to set the wireless security level you wish to use. All wireless devices attached to the gateway MUST have the same wireless security settings for your network to have proper communications and security. If you own the 6200 series gateway, the “Wireless Security Configuration” window does not appear.
SpeedStream Wireless DSL Gateway Advanced Features Wireless Setup WEP 64-Bit Option (Advanced Home Networking) WEP security offers the same security offered by a wired LAN with encrypted packets. This option offers 64-bit encryption, which is the least secure WEP option. This section assumes you currently have the “Wireless Security Configuration” window displayed. To use the WEP 64-bit option: 1. Select the WEP 64-bits option from the “Security Mode” drop-down. 2.
SpeedStream Wireless DSL Gateway Advanced Features 9. Click Generate Keys. The system responds by generating keys that display in the boxes under the “Passphrase” box. 10. Click Next. Figure 57. Wireless 64-Bit WEP Configuration Window 11. Please see the section in this document titled Wireless Filter and Options Configuration.
SpeedStream Wireless DSL Gateway Advanced Features Wireless Setup WEP 128-Bit Option (Advanced Home Networking) WEP security offers the same security offered by a wired LAN with encrypted packets. This option offers 128-bit encryption, which is the most secure WEP option. This section assumes you currently have the “Wireless Security Configuration” window displayed. To use the WEP 64-bit option: 1. Select the WEP 64-bits option from the “Security Mode” drop-down. 2.
SpeedStream Wireless DSL Gateway Advanced Features 6. Click Generate Keys. The system responds by generating keys that display in the boxes under the “Passphrase” box. 7. Click Next. Figure 59. Wireless 64-Bit WEP Configuration Window 7. Please see the section in this document titled Wireless Filter and Options Configuration.
SpeedStream Wireless DSL Gateway Advanced Features Wireless Setup WPA PSK Option (Advanced Home Networking) WPA security changes encryption keys after a specified amount of time. This is the most secure option for wireless networks. This section assumes you currently have the “Wireless Security Configuration” window displayed on your computer. To use the WPA option: 1. Select the WEP 64-bits option from the “Security Mode” drop-down. 2.
SpeedStream Wireless DSL Gateway Advanced Features 5. Type a key in the “Shared Key” box. The shared key is used to generate a dynamic encryption key for gateway security. 6. Type a numeric value (in seconds) of the time lapse in changing the key in the “Group Key Renewal” box and click Next. Note: The minimum time value is 30. Figure 61. Wireless WPA Configuration Window 7. Please see the section in this document titled Wireless Filter and Options Configuration.
SpeedStream Wireless DSL Gateway Advanced Features Wireless Filter and Options Configuration The “Wireless Filter Configuration” window allows you to either permit or deny access to the gateway of wireless devices based on the MAC address of the device. A MAC (Media Access Control) address refers to a hardware address that uniquely identifies each device of a network. Note: Please see the user documentation for each device you wish to deny or allow access for a particular MAC address. Figure 62.
SpeedStream Wireless DSL Gateway Advanced Features 4. Click Next. The system responds with the “Wireless Options Configuration” window. Figure 63. Wireless Options Configuration Window 5. Optionally, configure the following items: • Data Transfer Rate If a particular wireless client is unable to auto-negotiate a connection to the Gateway, the data transfer rate may be set to a specific data rate such as 11 Mbps for 802.11b wireless clients.
SpeedStream Wireless DSL Gateway Advanced Features 6. Click Next. The system responds with the “Wireless Wizard” window. Figure 64. Wireless Wizard Window 7. Click Finish. 8. Click Reboot for your wireless configuration to take effect.
SpeedStream Wireless DSL Gateway Advanced Features Click Configure the Universal Plug and Play Settings link to display the following window: Figure 65: UPnP Configuration Screen Three options are provided for UPnP: • Disable UPnP Prevents the Gateway from using the UPnP feature to communicate with other devices or your operating system. Also may be disabled if your operating system does not support UPnP.
SpeedStream Wireless DSL Gateway Advanced Features 2. Select Add or Remove Programs > Add/Remove Windows Components to open the Windows Components Wizard dialog box. 3. Select Network Services and click Details. Check the Universal Plug and Play check box. 4. Click OK. The system installs the UPnP components automatically.
SpeedStream Wireless DSL Gateway Advanced Features 5. After finishing the installation, go to My Network Places. You will find an icon (ex: Residential Gateway Device) for the UPnP function. 6. Double-click the icon. The Gateway will open another Web page for UPnP functions. Now, the NAT traversal function of UPnP will be available. The Gateway will create virtual servers automatically when it detects the computer running some Internet applications that require this configuration.
SpeedStream Wireless DSL Gateway Advanced Features Firewall A firewall is a system designed to prevent unauthorized access to or from a private network. The firewall screen provides a listing of options to be enabled or disabled as well as links to configure the more complex details of each feature. Note: Clicking the “Configure” hyperlink next to an option for the firewall allows you to customize a particular setting. 1. From the “Security Settings” window, click Firewall Settings.
SpeedStream Wireless DSL Gateway Advanced Features • High: Provides maximum firewall protection. Only certain applications are allowed through the firewall or traffic that is already "in conversation" with an application from the host PC and host application. ICSA 3.0a Compliant. • Custom: Set your own rules for firewall protection (For Advanced Users). This option is used with IP filtering to set customized rules for both inbound and outbound traffic. 5. Click Apply. 6.
SpeedStream Wireless DSL Gateway Advanced Features 3. Select the checkboxes next to the corresponding option under the "After enabling the Attack Detection System, select events below to filter and/or log:" heading. Note: You can select the "Filter all" and "Log all" checkboxes to both select and log all options.
SpeedStream Wireless DSL Gateway Advanced Features IP Filtering IP filtering options are only available if your Firewall Level setting is Custom. This method of firewall protection is recommended for advanced users only. Click the Configuration button to step through the IP Filter Configuration Wizard for Inbound and Outbound IP Filter Rules. To use the IP filtering option: 1. Click the "Configure" hyperlink next to the "IP Filtering" heading. 2. Click Add New IP Filter Rule. 3.
SpeedStream Wireless DSL Gateway Advanced Features 20. GRE (Generic Routing Encapsulation): A tunneling protocol that is used primarily for VPN (Virtual Private Networks). 21. Optionally, you can type a protocol number in the "Select by Number" box. 22. Click Next. 23. Select one of the following options from the "Source Port Operator" drop-down: • any: Any port is accepted. • less than or equal to: Less than or equal to a numeric value in the "Port 1" box.
SpeedStream Wireless DSL Gateway Advanced Features 2. Click Gateway in the toolbar. 3. Click Security in the left-navigation pane. 4. Click Firewall Settings. The system responds with the “Firewall Settings” window. Figure 68. Firewall Settings Window with the DMZ Option Selected 5. Under the "Gaming" heading, select the "DMZ" checkbox. 6. Click the "Configure" hyperlink next to the "DMZ" checkbox. 7. Select one of the following options: • Disable DMZ: The firewall is not bypassed.
SpeedStream Wireless DSL Gateway Advanced Features Snooze Control The snooze feature allows you to bypass the firewall for a set amount of time so outside support personnel can access your gateway or network. Note: Important! This function is recommended for use only when you require this special level of unrestricted access as it leaves your Gateway and network exposed to the Internet with no firewall protection. Figure 69.
SpeedStream Wireless DSL Gateway Advanced Features Administrator Password You may change the admin password at any time if you have administrative rights to the gateway. To change the admin password: 1. Log on as the administrator. 2. Click Gateway in the toolbar. 3. Click Security in the left-navigation pane. 4. Click Admin Password. 5. Type your admin username and password and click OK. 6. Make any changes to the admin username and password then click Save Settings.
SpeedStream Wireless DSL Gateway Advanced Features To use address translation with NAPT: 1. Click the "Configure" hyperlink next to the "Port-Bypass (NAPT)" option. 2. Click the option(s) of your choice from the list under the "Available Applications" heading. Once clicked, these applications appear under the "Enabled Applications" heading indicating they are now active. NAPT is used to allow multiple users access to Internet applications while masking their IP addresses from outside users. 3.
SpeedStream Wireless DSL Gateway • Advanced Features Redirect selected protocol/service to IP Address: The protocol or service that you select is directed to an IP address on your LAN that you type in the box next to this field. 7. Click Apply. Gateway Health The gateway health options are used to gauge the various measures of gateway’s health. These options include: statistics, update firmware, diagnostics, and reboot.
SpeedStream Wireless DSL Gateway Advanced Features Statistics Statistics are displayed for your Internet connection, Network status, Security, and the Gateway system log. Click the hyperlink of your choice for the type of statistics you wish to view. Figure 71: Statistics Window Internet Stats These statistics are commonly used by your Internet Service provider to diagnose service-related issues.
SpeedStream Wireless DSL Gateway Advanced Features Click the “DSL” hyperlink under the “Internet Stats” heading to display information about your DSL connection. Figure 73. DSL Statistics Home Networking Stats These statistics are helpful when used to troubleshoot issues on your home network. These statistics are displayed for each physical interface connected to the Gateway. They are separated into Ethernet and USB statistics. Select the link for the interface you are interested in viewing.
SpeedStream Wireless DSL Gateway Advanced Features Logging Extensive activity logs are provided for advanced troubleshooting and administrative use. The following types of logs are available: • System Displays Gateway status, user login, interfaces accessed, etc. Activity displayed in the system log is defined using the checkboxes provided at the bottom of the screen. Click Apply after making any changes.
SpeedStream Wireless DSL Gateway Advanced Features Important: Do not turn off or interrupt the Gateway during a firmware upgrade session. The Gateway could be rendered inoperable! Diagnostics The Gateway provides diagnostic tests and data for each interface. This data is commonly requested by technical support to assist in troubleshooting. To use the diagnostic option: 1. Select a connection to test from the “Connection to Test” drop-down. 2. Click Run Diagnostics.
SpeedStream Wireless DSL Gateway Advanced Features The example below displays a diagnostic result with failures detected: Figure 78. Diagnostic Process with Failures Customize Several options are available for you to customize the Gateway’s display. Select the icon for the option you wish to configure.
SpeedStream Wireless DSL Gateway Advanced Features Color Palette Multiple color selections are available to customize the appearance of the configuration interface/program. To use the color palette option: 1. From the “Customized Settings” window, click Color Palette. The system responds with the “Customized Colors” window. Figure 80. Customized Color Window 2. Using the color drop-downs from the different display options, select the colors you wish to use in the system. 3.
SpeedStream Wireless DSL Gateway Advanced Features Language Multiple languages may be available for displaying text in the configuration interface/program. This option may not be available on your Gateway configuration. • Select your desired language and click Apply. Time Zone Configure the Time Client parameters to automatically synchronize the Gateway’s internal date and time settings with those of your selected time zone.
SpeedStream Wireless DSL Gateway Advanced Features Reboot / Reset The Reboot screen offers two options: reboot and reset. Please see the section below for more information. Reboot Reboot should be used when the Gateway needs to be restarted. The Gateway can also be rebooted using the power switch on the rear panel of the Gateway. Note: This option can be used at either the user or administrator level. To use the reboot option: 1. Click the Reboot icon. The system responds with the “System Reboot” window.
SpeedStream Wireless DSL Gateway Advanced Features Reset Reset should be used when you find it necessary to recover the factory default settings. This may be necessary when a custom configuration did not go as planned, when a new configuration is desired, or when the Gateway does not appear to be working properly. Important: This option resets all custom settings, users, and passwords on your gateway. Note: You must be logged on as the administrator to use this option. To use the reset option: 1.
SpeedStream Wireless DSL Gateway A Appendix A Troubleshooting Overview This chapter covers some common problems that may be encountered while using the Speedstream Wireless DSL Gateway and some possible solutions to them. If you follow the suggested steps and the Gateway still does not function properly, contact your Internet Service Provider or Technical Support for further assistance. General Issues Problem 1: Can't connect to the Gateway to configure it.
SpeedStream Wireless DSL Gateway Appendix A - Troubleshooting Problem: Some applications do not run properly when using the Gateway. Solution: The Gateway processes the data passing through it, so it is not transparent. • If you are running a supported Windows operating system, ensure that the UPnP feature is enabled. Refer to UPnP (Universal Plug and Play) in Chapter 5 for more information on this feature.
SpeedStream Wireless DSL Gateway Appendix C: Technical Support B Appendix B Specifications Media Interface: RJ-11 DSL WAN connection (5) 10/100Base-T RJ-45 Ethernet LAN connections (Auto-MDI/MDI-X) USB Type B connection DB-9 RS-232 Serial console port Diagnostic LEDs: Power, Status, Link and Activity for DSL, Ethernet, USB, and Wireless Management: Intuitive, Web-based management Comprehensive hardware diagnostics SNMPv1 support UPnP IGD-NAT traversal support XML Management Scheme, DSL Forum 2002-2
SpeedStream Wireless DSL Gateway Routing: Appendix C: Technical Support DHCP server and DNS agent Network Address Port Translation (NAPT) Network Address Translation (NAT) Packet filtering RFC 2364 Point-to-Point Protocol over ATM PVCs (PPPoA) RFC 2516 Point-to-Point Protocol over Ethernet (PPPoE) RFC 2684 (formerly 1483) Bridged Ethernet and routed encapsulation RFC 2225 (formerly 1577) Classical IP over ATM PPPoE Relay/Bridging Configurable PAP and CHAP authentication TCP/IP with RIP1 and RIP2 or stat
Efficient Networks 4849 Alpha Road Dallas, TX 75244 USA +1 (972) 852-1000 Tel +1 (972) 852-1001 Fax support@efficient.com http://www.support.efficient.