
User guide


Accessing the Command Line Interface 313
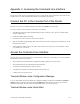
Appendix C. Accessing the Command Line Interface
Th
This section provides step-by-step instructions on how to connect the PC to the Console Port of the router. It then
describes how to access the Command Line Interface from different environments.
Connect the PC to the Console Port of the Router
For local access, the PC (or ASCII) terminal is connected to the Console port of the router.
To connect your PC to the console port of the router, you will need:
¥ One TPE straight-through cable (red-labeled cable provided - if already in use, you need to obtain another
straight-through cable)
¥ One RJ-45 to DB-9 adapter (provided)
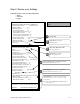
1. Connect the PC to the console port of the router as follows:
2. Plug one of the TPE straight-through cableÕs RJ-45 connectors into the console port (the rightmost port on the
back panel of the router).
3. Attach the RJ-45 to DB-9 adapter to the cableÕs other connector and connect it to your workstationÕs serial
port (usually Com 1 or Com 2).
Access the Command Line Interface
Once the router is powered on and the PC is connected to the console port, you are ready to access the Command
Line Interface. It can be accessed from:
¥ The terminal window from within the Configuration Manager application (for local access)
¥ The terminal window from within the Quick Start application
¥ A terminal session under Windows (for local access)
¥ A terminal session under a non-Windows platform (for local access)
¥ A Telnet session (for remote access)
Terminal Window under Configuration Manager
To access the terminal window from within the Configuration Manager application, click Tools and Terminal
Window from the main menu. The menu selection Commands provides shortcuts to most of the commands
described in this manual. These shortcuts will substantially reduce your amount of keying.
Terminal Window under Quick Start