
User guide


310 Appendix B. Configuring IPX Routing
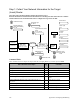
Step 1: Collect Your Network Information for the Target
(Local) Router
The remote side of the WAN link has all of the file and print services.
Enter the needed network information in the blank boxes of the diagram. Then match the boxesÕ numbers
with the numbers in the Command Table below to configure the target router for IPX.
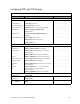
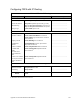
Command Table
These commands are used to configure the Target (client-side) router (ipx_client). Log in with the password admin.
IPX Commands with examples
Ref
#
Comments
eth ipx enable 1 Enable IPX Routing
eth ipx addr 123 2 Set the local ÔwireÕ address
eth ipx frame 802.2 3 Set the Frame Type
remote add ipx_server 4 Add a connection name
remote setIpxaddr 456 ipx_server 5 Set the WAN network # (common to both
sides)
remote addIpxsap SERVER2 2002 00:00:00:00:00:01 0451 4 1
ipx_server
6 Add a Þle server (SAP)
remote addIpxroute 2002 1 4 ipx_server 7 Add a route to the server
save 8 Save your settings
reboot 9 Reboot for changes to take effect
Enable IPX routing
External Network #
(Local Wire address)
Ex: 123
IPX Frame Type
Ex: 802.2
System Name of remote
router
Ex: ipx_server
ISDN or DSL
IPX Router
(Remote Router)
Name: "ipx_server"
Reboot the router
Server Name
Server Type
SAP info
Socket #
Node #
Ex: 00:00:00:00:00:01
Internal Network #
Ex: 2002
Novell file
Route to server
through the remote
router
Ex: 4
Ex: 451
server
7
8
6
WAN Network #
Ex: 456
9
5
IPX router
(Target Router)
Name: "ipx_client"
Novell Client
Workstation
Novell Client
Workstation
Novell Client
Workstation
1
2
3
4