6SHHG6WUHDP 6HULHV $'6/ 5RXWHU ,QVWDOODWLRQ *XLGH Part No.
Copyright 1999, Efficient Networks, Inc. All rights reserved. Printed in the U.S.A. Product names mentioned herein may be trademarks and/or registered trademarks of their respective companies. Efficient Networks, Inc. shall not be liable for technical or editorial errors or omissions in this document; nor for incidental or consequential damages resulting from the furnishing, performance, or use of this material. Efficient Networks, Inc.
rights of ENI. 8. Licensee Responsibility And Indemnification. The End User understands and acknowledges that it is solely responsible for the use it makes of the Software. Accordingly, the End User agrees to indemnify and hold ENI harmless from any demands, claims or suits by a third party for loss, damages or expenses (including attorney’s fees) arising out of or related to use of the Software by the End User. 9.Enhancements.
Efficient Networks, Inc.
Contents About the 5600 Series DSL Router. . . . . . . . . . . . . . . . . . . . 7 Routing vs. Bridging . . . . . . . . . . . . . . . . . . . . . . . . . . . . 7 Where and Why to Use the Router. . . . . . . . . . . . . . . . . 8 How to Use this Guide . . . . . . . . . . . . . . . . . . . . . . . . . . 9 Installation Requirements . . . . . . . . . . . . . . . . . . . . . . . . . . 11 Package Contents . . . . . . . . . . . . . . . . . . . . . . . . . . . . 11 Installation Instructions . . . . . . . . . . . .
Asynchronous Transfer Mode . . . . . . . . . . . . . . . . . . . 30 Encapsulation Methods: PPP and RFC 1483. . . . . . . . 30 Point-to-Point Protocol (PPP). . . . . . . . . . . . . . . . . 31 RFC 1483. . . . . . . . . . . . . . . . . . . . . . . . . . . . . . . . 31 Dynamic Host Configuration Protocol (DHCP) . . . . . . . 31 DHCP Relay. . . . . . . . . . . . . . . . . . . . . . . . . . . . . . 32 DHCP Server . . . . . . . . . . . . . . . . . . . . . . . . . . . . . 32 Domain Name Service (DNS). . . . . . .
6 Efficient Networks, Inc.
Introduction About the 5600 Series DSL Router The SpeedStreamTM 5600 Series Ethernet to ADSL router provides ATM-based network access for home users, telecommuters, or remote offices and are equipped with one Ethernet port and one Asymmetric Digital Subscriber Line (ADSL) port. These internet sharing devices use Discrete Multitone (DMT) technology to set data transmit rates. When the unit is first powered on, it will “train” the line to get the best data transmission rate.
interface card installed in a network node. Bridging is a simple transmission scheme and there is little software management involved in the sending of packets. Packets are simply forwarded from one node to the next. • Routers are much more complex than bridges. Routers send packets from node to node based on IP addresses. An IP address can be viewed as a modifiable identifier that is mapped to the MAC address of network node. The IP address of a node may change dynamically or by user configuration.
The router can also be connected to a single PC equipped with an Ethernet card and connected to a DSL phone jack to provide access to the wide area network (internet).
10 About the 5600 Series DSL Router Efficient Networks, Inc.
Hardware Installation Installation Requirements To successfully install the 5600 series router, you will need the following: • A computer equipped with an Ethernet network interface card OR an Ethernet hub • A DSL-ready telephone line installed at the installation site • If you want to configure the router via the serial port before placing it into service on a network, you will need a computer that has terminal emulation software such as Microsoft HyperTerminal or ProComm.
Installation Instructions NOTE: The labels for the back panel of the router are located on the underside of the unit. 1 Be sure the Power switch is in the OFF position. 2 Connect the power cable to the power connector on the back of the router; then connect it to a power outlet.
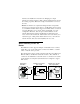
RJ45 Connector Information The pinout of the router’s Category 3 and 5 UTP jack is different than a standard Ethernet UTP jack. Transmit + Transmit – Receive + Receive – Ethernet loopback connectors will not work on the port and vice versa. RJ45 Connector 12 345 67 8 Once the connector is plugged into a board that is installed in a chassis, the removal lever on the connector may be hard to reach. Do not try to pull the connector out of the port without pushing up on the removal lever.
3 The enet LED will turn solid green when there is a link detected, then begin to flash green when Ethernet traffic is flowing. 4 The atm LED will flash green indicating traffic flow.
Getting Started Accessing the Router There is very little setup required to get your 5600 series router up and running. The 5600 Series router can be accessed and configured in two ways: • Network access via TELNET, HTTP, or FTP • Local terminal using a serial connection The router has no password initially right out of the box. However, be sure to set the password to protect it from being modified by users on the network. Refer to “Setting the Password” on page 24 for details.
2-c Select the IP Address tab and verify that Obtain an IP address automatically is selected. If not, then select this button. Click OK twice. Once you have established an Ethernet link to the router, there are three methods you can use to access the router. HTTP Web-browser Access Most HTML browsers can be used, though Internet Explorer 4.0 or Netscape 4.0 are recommended. IE 2.0 and Netscape 2.0 and their predecessors are not supported.
2 When the MSDOS window appears, enter telnet 10.0.0.1 or telnet speedstream. 3 This will bring up a Telnet window which will display the command prompt for the router’s command line interface. 4 Refer to “Command Line Interface” on page 20 for details on the user interface. FTP Access for Firmware/Configuration Uploads The router provides an FTP server and can accept FTP client commands from an external host.
To save the current configuration from the router: 1 After logging in to the FTP prompt and switching to binary mode, change to the directory on your computer where the you wish to store the configuration file. For example, if it is to be stored on a floppy disk, insert the diskette in the drive and type: lcd a:\ 2 Type: get system.
Logging on via the Serial Port When you first connect to the router through the serial port, the router will be in “auto-baud” mode where it is waiting for keyboard input to set the baud rate. In the auto-baud mode, the router starts at 9600 baud and looks for the [Enter] key being pressed. If the data received is not an [Enter], the baud rate increases up to the default rate of 38400.
HTML Web Interface The HTML interface for the router first displays a page showing the current configuration of the router. The first page also provides links to the following functions: Simple Setup Presents configuration forms where you can enter the minimum configuration parameters needed to configure the router for use on the network. Advanced Setup Leads to a more detailed interface with several links that allow more in-depth configuration of functions available on the router.
Command Prompt/Error Prompt The following are the keyboard conventions used during a command session. Normally, the command line prompt is: Command-> However, if there has been a “soft” error during power-on self test (POST), the prompt will display as: post_error-> If you see this prompt, you can connect to the router via serial port and reboot the router. When the router reboots, the POST error messages will be displayed to the serial console.
22 Types of User Interfaces Efficient Networks, Inc.
Configuring the Router How do you want to use the Router? The router is configured with several default configuration settings and these settings will be appropriate for most installations (see page 25 for default configuration settings). However, to assess whether these settings will work for you, you need to decide how you are planning to use the router. The flowchart below allows you to choose a simple configuration procedure to use to configure your router.
Setting the Password The router has no password protection as configured from the factory. As soon as you log into the router, you should set the password. This can be done from the HTML interface by clicking on the Set Password link or from the command line interface using the set password command. Password protection can be disabled again by entering the current password and a blank for the new password.
Factory Default Configuration The router is shipped from the factory with particular default settings. You may or may not need to change these depending on what kind of network the router is installed.
Router PPP Configuration The modem is configured by default from the factory to be in router mode using PPP encapsulation. This greatly simplifies the configuration procedure. To configure the router via HTML: 1 On the main page, click on Simple Setup. 2 If your service provider has specified a VPI/VCI number to use, enter the numbers in the VPI and VCI fields. 3 Enter the PPP username and password specified by your service provider. 4 Select Set.
4 Select Max as the rate. 5 Enter an IP address and netmask to use for the DSL/WAN interface. 6 Select Modify VC. 7 Select the “Advanced Setup” button in the top left panel. 8 Select the “Command List” button in the top left panel. 9 From the command list on the left, select “ipgateway”. 10 Enter the “Enter new IP address” field, enter the IP address of an IP gateway (default route) that is on the same subnet as the router.
Testing the Configuration After completing the configuration process, you may test the operation of the router by starting a Web browser and accessing a remote web site such as http://www.efficient.com. Alternatively, you can open an MS DOS (or shell) window and issue a “ping ” command to a known host on the wide-area network. 28 How do you want to use the Router? Efficient Networks, Inc.
Terminology and Concepts Acronyms ADSL Asymmetric Digital Subscriber Line ATM Asynchronous Transfer Mode ATU ADSL Termination Unit CHAP Challenge-Handshake Authentication Protocol CO Central Office DHCP Dynamic Host Configuration Protocol DNS Domain Name Service DSL Digital Subscriber Line DSLAM Digital Subscriber Line Access Multiplexer Firmware Software, in binary form, stored within a flash PROM ICMP Internet Control Message Protocol IPCP IP Control Protocol ISP Internet Service
Technical Concepts This section provides very brief descriptions of some of the features available on the 5600 series router/bridge. Digital Subscriber Line (DSL) DSL describes a family of digital services provided by local telephone companies to local subscribers. There are many forms of DSL: Asymmetric DSL (ADSL), Symmetric (or single pair) DSL (SDSL), and many others.
1483 encapsulation. A brief explanation of these two encapsulation methods follows. Point-to-Point Protocol (PPP) PPP is a single or multi-link interface between two packet switching devices, such as a bridge or router. PPP has built-in negotiation for addresses and connection parameters and can route multiple protocols over a single link. One benefit of using PPP is it offers interoperability of multi-vendor equipment as well as support for dynamic configuration between the connecting devices.
DHCP Relay The router can be configured to operate as a DHCP relay agent. This allows local machines on the LAN to acquire their IP addresses via DHCP requests and replies that are forwarded through the router to/from a DHCP server on the WAN. In this case, the DHCP requests are forwarded to a specific DHCP server on the WAN network and the DHCP reply is forwarded back to the LAN network. The DHCP relay agent can be configured with a Primary and a Secondary DHCP Server IP address.
distinct DNS functions provided by the router: the DNS resolver and the DNS server. DNS Resolver The DNS resolver is the entity that creates a DNS request for transmission to a DNS server (which may be co-located in the router or be an external DNS server). The DNS resolver is only used by certain user interface commands that allow a hostname argument as well as an IP address argument. The DNS resolver requires the user to configure a single DNS server IP address to which to direct DNS requests.
unique within the private address space, but two private address spaces are not guaranteed unique. Use of private address spaces has some disadvantages including the need to re-address any host that must change from a private address to a public address. Plus the privately addressed hosts are unable to communicate with all hosts in an internet. These problems can be handled by the use of Network Address Port Translation (NAPT). NAPT is an extension to Network Address Translation (NAT).
Technical Reference 5660 DSL Router/Bridge Specifications Size 5.5W in. x 7D in. x 1.5H in. (14W cm x 17.8D cm x 3.8H cm) Weight 1.25 lbs. (0.57 Kg) Power Integrated 110-240 VAC; 50-60 Hz power supply; 0.1A @ 110VAC, 0.05A @ 240VAC Temperature Operating: 0° to 40° C Non-Operating, storage: -10°C to 85° C Humidity Operating humidity: 10% to 90% noncondensing Non-operating storage humidity: 5% to 95% non-condensing Ringer Equivalency REN=0.8B Performance Meets or exceeds requirements for T1E1.
5621 DSL Router/Bridge Specifications 36 Size 5.5W in. x 7D in. x 1.5H in. (14W cm x 17.8D cm x 3.8H cm) Weight 1.25 lbs. (0.57 Kg) Power Integrated 110-240 VAC, 50-60 Hz power supply 0.2A @ 110VAC, 0.1A @ 240VAC Temperature Operating: 0° to 40° C Non-Operating, storage: -10°C to 85° C Humidity 10% to 90% noncondensing Non-operating storage humidity: 5% to 95% non-condensing Ringer Equivalency REN=0.8B Performance Meets or exceeds requirements for T1E1.
Index Numerics E 3020/3060 connector information 13 5621 humidity 36 5621 weight 36 5660 humidity 35 5660 weight 35 Encapsulation 25 Encapsulation Protocol 26 Ethernet connection to modem 15 Ethernet Interface IP address 25 Ethernet interface network mask 25 A Accessing the modem FTP 17 HTTP 16 TELNET 16 ATM VCI number, default 25 B Bridge Configuration 27 C Cabling 11, 35, 36 Configuration testing 28 configuration, saving 18 configuration, uploading 18 F Firmware download 18 FTP access 17 H Hardwa
Network addresses public vs private 33 O Operating temperature 35, 36 T TELNET access 16 Temperature 35, 36 terminal connection 18 U P password protection 20 Performance 35, 36 Power 35, 36 Power switch 12 PPP Authentication default configuration 25 PPP encapsulation 26 PPP Encapsulation default configuration 25 PPP interface IP address 25 network mask 25 Private network addresses 33 public network addressing 33 Uploading modem configuration 18 V VCI, default 25 W WAN interface 25 R Reset password