
Installation guide


Setting up your optional Business Internet Dial Enterprise Hours 29
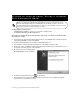
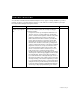
8. In the Global Roaming window, click your
country in the Country pull-down menu.
9. Click your city in the City pull-down menu.
10. Click the number you want to dial from the list
that appears in the Phone Book section of the
window.
11. If you need to use dialing prefixes or codes to
turn off Call Waiting™ or to access an outside line
before dialing, click Dial Properties and type
them in the Dial Properties window.
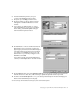
12. Click Connect to connect to the Business Internet
Dial Enterprise service. A User Info window will
appear. Type your Business Internet Dial Enterprise
username and password in the boxes provided. If
your domain is not bellnet.ca, ask your account
administrator for your domain, and type it in the
Domain box. Click OK.
If you need more help using the Global Roaming
software, click the Help button in the main window.
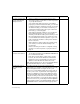
13. Click the Options menu, then click Update Phonebook. If you are going to be dialing into the Business
Internet service from other cities, make sure that you update the phonebook before you travel.
14. Double-click the Internet Explorer icon on your desktop. Internet Explorer will start and display your
Business Internet Dial Enterprise home page.
You must always dial with Global Roaming first, then start Internet Explorer.