
Installation guide


26 Troubleshooting
REMOVING THE BUSINESS INTERNET HIGH SPEED ENTERPRISE SOFTWARE FROM THE COMPUTER
To remove the Business Internet High Speed Enterprise software from your computer, follow these steps:
Removing the USB software
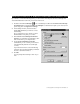
a. Click , click Settings, then click Control Panel.
b. Double-click Add/Remove Programs (Change/Remove with Windows 2000), then click Efficient
Networks SpeedStream DSL.
c. Click the Add/Remove button, then follow the instructions to remove the software.
d. When the computer restarts, unplug the USB cable from the computer.
Internet Explorer
a. Click , click Settings, then click Control Panel.
b. Double-click Add/Remove Programs, then click Microsoft Internet Explorer X and Internet Tools
where X is the version number.
c. Click the Add/Remove button, and follow the instructions.
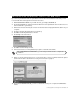
Access Manager
a. Click , click Programs, click Business Internet High Speed Enterprise, then click Uninstall
Access Manager.
b. Click Yes, and follow the instructions. When you are asked to remove shared files, click Yes to All.
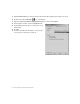
If you have Windows XP
• Click , then click Connect To, then click Show all connections. Delete the connections
you no longer want to use.
•
• As part of your Business Internet High Speed Enterprise membership, the Help section of the Business
Internet High Speed Enterprise Web site (http://en.bellnet.ca) is a great resource for up-to-date infor-
mation about your account and how to use the Business Internet High Speed Enterprise software. At
any time you are connected to the Internet, click the Help button on any Business Internet High Speed
Enterprise page. You will be linked to the latest news and tips about your Business Internet High Speed
Enterprise software, including information about available upgrades, and billing information.
• If you need help using the Internet Explorer software, you can consult its built-in help by clicking the
Help menu, then by clicking Internet Explorer Help.
• You can get help for the Access Manager by double-clicking the Access Manager icon, then clicking the
Help button. You do not have to be online to do this.
• If you receive an error message on your screen, please write it down before contacting our support ser-
vices. Also, if the error occurred while following the instructions in this guide, note the page and step
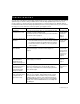
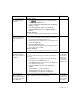
PROBLEM SUGGESTED ACTION REFERENCE
You see a message
about locating NTSPP-
PoEx in the registry.
Uninstall Access Manager. Disable any anti-virus programs
that may be running, then reinstall the Access Manager from
the Business Internet High Speed Enterprise CD-ROM.
Beginning the
Installation on
page 4
O THER TROUBLESHOOTING RESOURCES