
Installation guide


Configuring the Software 15
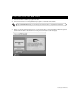
5. Click the Extras button to install the iPass Global Roaming dialer and the VPN Remote Access Client. Refer
to Setting up your optional Business Internet Dial Enterprise Hours on page 28 for instructions on how to
use iPass Global Roaming. Refer to Installing the VPN Remote Access Client (optional) below for instruc-
tions on how to use the VPN software.
6. After you have installed the extra software, click Finish to end the software installation. Please proceed
to Connecting to and Disconnecting from the Internet with Windows XP on page 15 below.
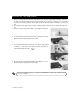
1. If you wish to install the VPN Remote Access Client software, exit all applications or programs, make
sure you are not connected to the internet, and disable any virus protection software before installing
the software.
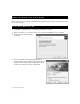
2. In the Extras screen, click IP VPN Remote Access Service.
3. Follow the instructions on the screen, clicking Next or Yes at each step. A progress bar will show the VPN
Remote Access Client software being installed on your computer. You may be asked for your original
Windows CD-ROM during this process.
4. On the last screen, click Finish. Your computer will restart.
5. Click Close and then Finish to end the software installation.
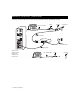
1. To connect to the Internet, double-click the Business Internet High Speed Enterprise icon on the
Desktop, then click Connect. Then click the Internet Explorer icon.
2. When you are ready to disconnect from the Business Internet High Speed Enterprise service, double-click
the Business Internet High Speed Enterprise icon on the Desktop, then click Disconnect.
The installation and configuration of your Business Internet High Speed Enterprise software is
now complete!
I NSTALLING THE VPN REMOTE ACCESS CLIENT (OPTIONAL)
CONNECTING TO AND DISCONNECTING FROM THE INTERNET WITH WINDOWS XP