INSTALLATION GUIDE Make the most of your Business Internet High Speed Enterprise service! . . . . . . . . . . . . . . . . . . . 1 Minimum hardware requirements. . . . . . . . . . . . . . . . . . . . . . . . . . . . . . . . . . . . . . . . . . . . . . . . . . . . . . . .2 Quick start procedures . . . . . . . . . . . . . . . . . . . . . . . . . . . . . . . . . . . . . . . . . . . . . . . . . . . . . . . . . . . . . . . . .2 Beginning the Installation . . . . . . . . . . . . . . . . . . . . . . . . . . . . .
NX-E-041 Windows Installation Guide © 1997-2004 Bell Canada All rights reserved Printed in Canada The software and services described in this document are furnished under license and service agreements. Your service provider reserves the right to revise this document and the software, and to make changes to the content of the document and software, without notice. This document may not be copied in whole or in part without the written consent of your service provider.
MAKE THE MOST OF YOUR BUSINESS INTERNET HIGH SPEED ENTERPRISE SERVICE! Below are all the steps you will go through to get connected with the Business Internet High Speed Enterprise service.
MINIMUM HARDWARE REQUIREMENTS For the Business Internet High Speed Enterprise software to work reliably and efficiently, your computer must meet or exceed the minimum requirements specified in the table below: Processor System Memory Hard drive Display Network CD-ROM drive Windows 133 MHz Pentium or equivalent processor Windows XP*/Me/98/2000**/NT 4.
8. To disconnect, click the File menu in Internet Explorer, then click Exit . To disconnect from the Internet, right-click the Access Manager icon at the bottom right of your screen, then click Disconnect . If you have Windows XP, double-click the connection icon in the lower right hand corner of the screen, then click Disconnect .
BEGINNING BEFORE YOU THE INSTALLATION BEGIN For the Business Internet High Speed Enterprise software to work reliably and efficiently, your computer must meet or exceed the minimum hardware requirements specified on page 2. Before you begin, have the following information ready in order to install the software. You can find this information on the first page of this guide.
4. Tests are conducted to ensure that your computer meets the minimum requirements needed to install the software. When a hardware or software component meets or exceeds the recommended requirements, a green check mark is displayed to the right of the component. When a hardware or software component does not meet the minimum requirements, a red X is displayed to the right of the component, and the software cannot be installed.
INSTALLING CHECK HARDWARE THE THE CONTENTS OF YOUR STARTER KIT Your Business Internet High Speed Enterprise Starter kit should contain the following: 1c 1b 1a 1e 2 3 4 1c 5 1d 1. DSL high speed modem box, if you ordered one from Bell, should contain: a. DSL high speed modem (your modem may look different, depending on the brand) • Note: BC and Alberta customers’ modems will be shipped separately from their Internet High Speed Starter kit. b. DC power supply with cable c.
Leave your computer on while you perform the following steps. CONNECTING A FILTER TO EVERY PHONE You must now install a filter on every phone with the same telephone number as your Business Internet High Speed Enterprise service. If you require additional filters or wall filters for wall mounted phones, you can order them online at http://www.proformagms.com/bell Repeat this process for every desktop phone on the same line as your Business Internet High Speed Enterprise service: 1.
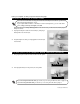
IF YOU ARE USING THE ETHERNET CABLE Please follow these instructions if you are using the Ethernet cable. If you are using the USB cable, please proceed to If you are using the USB cable on the next page. 1. 2. 3. Make sure that the Efficient Networks SpeedStream 5200 modem has adequate ventilation. Place the modem on an even, hard surface at least one foot away from your monitor, computer case, or other electronic devices including speakers.
IF 1. 2. YOU ARE USING THE USB CABLE The USB software installation program will start. Follow the instructions in the SpeedStream program to install the USB software. If you have Windows 98, you will need your Windows CD to complete the installation. 3. When you see the window telling you to connect the modem, connect the Efficient Networks SpeedStream 5200 modem as described in Connecting the USB modem on the next page.
CONNECTING THE USB MODEM 1. Make sure that the Efficient Networks SpeedStream 5200 modem has adequate ventilation. Place the modem on a hard, level surface at least one foot away from your monitor, computer case, or other electronic devices including speakers. The modem will need to be within 6 feet (or 2 meters) of your phone jack. 2. Connect the power supply to the modem, and then plug the other end into a surge protected power bar. Connect one end of the phone cable to your telephone wall jack.
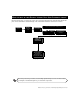
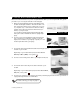
CHECKING YOUR SETUP If you have the Alcatel modem, the overall wiring should look like this: RJ11 PHONE CABLE FILTER SPLITTER PHONE JACK RJ11 PHONE CABLE DC POWER SUPPLY RJ45 ETHERNET CABLE If you have the SpeedStream modem, the setup should look like this if you are using the Ethernet cable: FILTER RJ11 PHONE CABLE SPLITTER PHONE JACK RJ11 PHONE CABLE DC POWER SUPPLY RJ45 ETHERNET CABLE Installing the Hardware 11
CHECKING YOUR SETUP (CONTINUED) Your setup should look like this if you are using the USB cable with the SpeedStream modem: FILTER SPLITTER PHONE JACK RJ11 PHONE CABLE RJ11 PHONE CABLE DC POWER SUPPLY USB CABLE All other rooms with phones that have the same number as your internet service: 12 Installing the Hardware RJ11 PHONE CABLE FILTER PHONE JACK
CHECKING YOUR SETUP (CONTINUED) 1. Make sure your modem and computer are turned on. 2. If you have the SpeedStream modem with an Ethernet cable, wait until the pwr, dsl, and enet lights are on. If you are using the USB cable, wait until the pwr, dsl and usb lights are on. If you have an Alcatel modem, wait until there are two solid green lights on the modem. If the lights are not on, turn the modem and computer off.
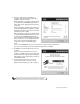
CONFIGURING THE SOFTWARE Before continuing, you should have completed the steps in Beginning the Installation on page 4 and Installing the Hardware on page 6. IF YOU HAVE WINDOWS XP 1. Click Next to install the Business Internet High Speed Enterprise software. 2. After the installation, your computer restarts. Do not remove the CD-ROM from your computer. 3. On the Finished screen that appears, click Finish. 4. The Connect Business Internet High Speed Enterprise window appears.
5. 6. Click the Extras button to install the iPass Global Roaming dialer and the VPN Remote Access Client. Refer to Setting up your optional Business Internet Dial Enterprise Hours on page 28 for instructions on how to use iPass Global Roaming. Refer to Installing the VPN Remote Access Client (optional) below for instructions on how to use the VPN software. After you have installed the extra software, click Finish to end the software installation.
IF YOU DO NOT HAVE WINDOWS XP 1. Click Next to install the Business Internet High Speed Enterprise software. 2. After the installation, your computer restarts. If you have Windows 98 or Me, your computer will restart twice. 3. Click the Extras button to install the iPass Global Roaming dialer and the VPN Remote Access Client. Refer to Setting up your optional Business Internet Dial Enterprise Hours on page 28 for instructions on how to use iPass Global Roaming.
CONFIGURING THE ACCESS MANAGER When your computer has restarted, you will see a message informing you that it is setting up your new software. It should only take a few minutes to configure the software. 1. 2. 3. Double-click the Access Manager icon on the desktop. Double-click the Create New Profile icon in the Access Manager window. Follow the instructions to create a new profile, and input the following info when prompted: • For the name of the profile: type Business Internet High Speed Enterprise.
CONNECTING AND DISCONNECTING FROM THE INTERNET You must install the Access Manager to connect and disconnect from the Business Internet High Speed Enterprise service. To install the Access Manager follow the instructions in Beginning the Installation on page 4. If you have Windows XP, you will not use the Access Manager. Please refer to Connecting automatically to the Business Internet High Speed Enterprise service on page 19.
C ONNECTING AUTOMATICALLY TO THE BUSINESS INTERNET H IGH S PEED ENTERPRISE SERVICE If you want to connect automatically (that is, you don’t want to manually start the Access Manager and click the Connect button each time), follow these instructions. 1. Double-click the Access Manager icon on the desktop. Double-click the Business Internet High Speed Enterprise icon. Right-click the Access Manager icon at the bottom right of your screen (in the system tray), then click Application Settings. 2.
SWITCHING FROM THE USB CABLE TO THE ETHERNET CABLE If you are using the Efficient Networks SpeedStream 5200 modem with a USB cable and you wish to use the Ethernet cable instead, please follow these instructions. 1. Connect the Ethernet cable to the computer, as shown in Installing the Hardware on page 6. 2. Click the icon 3. When a message appears saying it is OK to unplug the USB device, unplug the USB cable from your computer. 4. If you have Windows XP, you’re done.
SWITCHING FROM THE ETHERNET CABLE TO THE USB CABLE If you are using the Efficient Networks SpeedStream 5200 modem with the Ethernet cable and you wish to use the USB cable instead, please follow these instructions. 1. Download the USB software. In your Web browser, go to http://en.bellnet.ca. 2. Click the Downloads link, and download the USB driver for the SpeedStream 5200 modem. Choose to download the file to your Desktop. 3.
11. If you have Windows XP, you’re done. Windows XP will automatically detect which cable you are using. 12. Double-click the Access Manager icon on the desktop. 13. Right click the Business Internet High Speed Enterprise icon, then click Properties. 14. In the Properties window, click the Configuration tab. 15. In the Adapter pull-down menu, click the entry for your Ethernet card. 16. Click OK. 17. Connect to the Internet as described in Connecting and disconnecting from the Internet on page 18.
TROUBLESHOOTING As a subscriber of the Business Internet High Speed Enterprise service, support for the Business Internet High Speed Enterprise software is always available. Business Internet High Speed Enterprise Services do not provide support for software other than the Internet Explorer software and the Access Manager that are included with the Business Internet High Speed Enterprise service. Most problems are easy to solve. Here are the solutions to some of the most common problems you might encounter.
PROBLEM SUGGESTED ACTION You cannot browse the Internet Make sure that the cable is connected securely to the Efficient Networks SpeedStream 5200 modem, and that you are using the right kind of cable. If you are using the Ethernet cable, turn the Efficient Networks SpeedStream 5200 modem off, then back on. You see a message about a network error Exit the browser software, then restart your computer and try connecting again.
PROBLEM SUGGESTED ACTION You see a message saying “Failed to Bind to Tap Driver”. Windows 98/Me: You see a message about being unable to initiate the PPPoE session. Windows 98/Me: 1. In the Access Manager window, double-click the Business Internet High Speed Enterprise icon. 2. Right-click the Access Manager icon in the taskbar, and click Profile Properties. 3. Click the Configuration tab. 4. Make sure that your Ethernet card is selected in the pulldown menu, then click OK.
PROBLEM You see a message about locating NTSPPPoEx in the registry. SUGGESTED ACTION REFERENCE Uninstall Access Manager. Disable any anti-virus programs that may be running, then reinstall the Access Manager from the Business Internet High Speed Enterprise CD-ROM.
• you were at. This information will help the technical support agent’s give you the assistance you need as quickly as possible. If you cannot send email to our support services, please have your personal Business Internet account information in front of you, then call the Business Internet Technical Support Line. The appropriate number for your region is on the first page of this guide.
SETTING UP YOUR OPTIONAL BUSINESS INTERNET DIAL ENTERPRISE HOURS As part of your Business Internet High Speed Enterprise service your receive 20 hours of Business Internet Dial Enterprise service FREE each month! When you want to access the Business Internet service while away from the office, you can use a dialup connection. Follow the directions below to configure a dialup connection. You will need the following items. • • A regular dial-up modem to connect your computer to a telephone line.
8. In the Global Roaming window, click your country in the Country pull-down menu. 9. Click your city in the City pull-down menu. 10. Click the number you want to dial from the list that appears in the Phone Book section of the window. 11. If you need to use dialing prefixes or codes to turn off Call Waiting™ or to access an outside line before dialing, click Dial Properties and type them in the Dial Properties window. 12. Click Connect to connect to the Business Internet Dial Enterprise service.
DISCONNECTING FROM THE INTERNET When you are finished exploring the Internet, follow these steps to disconnect from the Business Internet Dial Enterprise service and exit your software: 1. Quit the Internet applications you are using. 2. Right-click the small Global Roaming icon screen). 3. Click Disconnect. CHANGING THE NUMBER in the system tray (the lower right-hand corner of the YOU DIAL To change the number you dial (for instance, if you move to another city), follow these steps. 1. 2. 3.
TROUBLESHOOTING 7 As a subscriber of the Business Internet Dial Enterprise service, support is always available to you. Most problems are easy to solve. Here are the solutions to some of the most common problems you might encounter while installing and using the software.
PROBLEM You can’t connect to the Business Internet Dial Enterprise service SUGGESTED ACTION • • • • • Check for a dial tone on your phone line. For more information, please consult There is no dial tone present on your phone line above. Your modem may need to be reset for it to initialize properly. If you have an external modem, you can reset it simply by turning it off and then on again. If you have an internal modem, you will need to shut down your computer and restart it again.
OTHER TROUBLESHOOTING RESOURCES REMOVING THE GLOBAL ROAMING SOFTWARE 1. 2. 3. 4. Click Start, click Settings, then click Control Panel. In Windows XP, click Start then click Control Panel. Double-click Add/Remove Programs, then click Global Roaming. Click the Add/Remove button (in Windows XP click Change/Remove), and follow the instructions to remove the Global Roaming software.