
User Guide


®
A NORDSON COMPANY
Ultra TT Bluetooth
®
Configuration Procedure
B. Set up Ultra TT Hardware for Firmware Flashing
1. Power down the Ultra TT, using the main circuit breaker on the back of the machine.
2. Unplug the power cord from the Ultra TT.
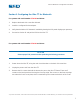
3. Remove the 11 screws that hold the electronics pan to the Ultra TT frame. There are 5
screws on the back panel and 4 along the front top edge. Two screws on the front top edge
are under the Y-axis cover plate, which is attached by two screws at the back of the cover.
4. Slide the electronics pan out by placing your hands under the front bezel and lifting slightly
as you pull the pan out of the Ultra TT. Slide the pan out far enough to access the DIP
switches on the right side of the main electronics board.
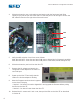
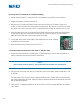
5. Locate DIP switch SW3. Slide SW3-2 (the middle bit) to the OFF position
to enable the re-flash mode.
6. Slide the electronics pan back into the Ultra TT.
C. Download the Firmware File to the Ultra TT with the PDA
1. Turn on the PDA and launch the EFD Ultra TT PDA Application. Do not tap any buttons or
menus other than those listed in these instructions.
NOTE
In the re-flash mode, the Ultra TT will not initialize with the PDA as it normally does.
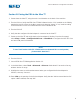
2. Tap the main menu bar, then tap the “Controller” menu item. Verify that the baud rate is set
at 115200.
The lower half of this screen is titled “Update firmware from:” If more than one firmware file
has been loaded onto this PDA, select the desired firmware file from the dropdown list, then
tap the Download button.
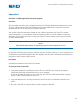
3. Since the TT is already powered up, when the “Boot…Flash” message appears, just tap the
“OK” button.
12