Ultra® TT Bluetooth® Configuration Procedure USA: 800-556-3484 or +1-401-434-1680 Europe: 0800 585733 or +44 (0) 1582 666334 Asia: +86 (21) 5854 2345 technical@efd-inc.com www.efd-inc.com This is an EFD publication, which is protected by copyright. No part of this document may be photocopied, reproduced, or translated to another language without the prior written consent of EFD. The information contained in this publication is subject to change without notice.
® Ultra TT Bluetooth® Configuration Procedure A NORDSON COMPANY This document accompanies the EFD Ultra TT Bluetooth Kit (PN 700855) and provides step-bystep instructions for configuring the Ultra TT for use with Bluetooth. The Kit contains the following: • CD containing EFD Ultra TT Version 1.
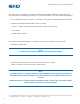
® Ultra TT Bluetooth® Configuration Procedure A NORDSON COMPANY Section I. Configuring the Socket™ Adapter What you will need: • • • • Computer with RS232 port and HyperTerminal Socket Cordless Serial Adapter AC Adapter Null Modem Connector (depending on your computer’s configuration) Configuring the adapter: 1. Plug the AC adapter into an AC outlet and connect the other end to the Socket adapter. 2. Depending on your computer’s configuration, do ONE of the following: a.
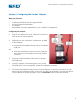
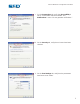
Ultra TT Bluetooth® Configuration Procedure ® A NORDSON COMPANY 6. Select the COM port to which the Socket adapter is connected and click “OK.” Click here to change PORT Click “OK” once correct PORT is selected 7. Click the Properties button on the main window. 8. On the General tab, enter EFxxxxx (where xxxxx is the 5-digit serial number of the Ultra TT unit) in the Friendly Name box.
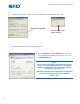
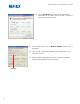
Ultra TT Bluetooth® Configuration Procedure ® A NORDSON COMPANY 9. On the Connections tab, verify that Accessibility is set to “Connectable and Discoverable” and Notifications is set to “Do not generate notifications.” 10. On the Security tab, verify that no boxes have been checked. 11. On the Port Settings tab, verify that the parameters have been set as shown.
® Ultra TT Bluetooth® Configuration Procedure A NORDSON COMPANY 12. On the Advanced tab, verify that the parameters have been set as shown, then click “OK.” You will be returned to the main screen. 13. On the main screen, click on Write to Adapter. Select “Yes” if prompted. 14. Click on Exit. The Socket adapter is now configured for use with your Ultra TT. 15. Remove the Socket adapter from the computer and label it with the Friendly Name entered in Step 8.
® Ultra TT Bluetooth® Configuration Procedure A NORDSON COMPANY Section II. Configuring the Ultra TT for Bluetooth For systems with serial number EF30188 and below: 1. Replace the board with a new Rev H board . 2. Install the configured Socket adapter. 3. Verify that the Version 1.2 firmware is installed by viewing the LCD panel display upon power-up. 4. Proceed to Section III and pair the PDA to the Ultra TT.
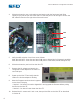
® Ultra TT Bluetooth® Configuration Procedure A NORDSON COMPANY 4. Slide the electronics pan out by placing your hands under the front bezel and lifting slightly as you pull the pan out of the Ultra TT. Slide the pan out far enough to access the DIP switches found on the right side of the main board. SW2 SW1 SW3 8 5.
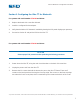
® Ultra TT Bluetooth® Configuration Procedure A NORDSON COMPANY Section III. Pairing the PDA to the Ultra TT 1. Power down the Ultra TT, using the main circuit breaker on the back of the machine. 2. Turn the PDA on. Verify that EFD Ultra TT PDA Software Version 1.2 is installed on the PDA by tapping the top-left corner on the Main screen and choosing “About.” If not, install according to the instructions on the CD included with the Ultra TT Bluetooth Kit. 3. Turn the PDA off. 4.
® Ultra TT Bluetooth® Configuration Procedure A NORDSON COMPANY Important Notes Recharge the PDA and sync it to your computer at the end of every day. Otherwise, you might lose the information entered since the last sync session. The next time you want to connect to the Ultra TT using the same PDA, launch the EFD Ultra TT PDA Application. When asked if you wish to reconnect to the last device you communicated with, select “Yes” and go through the re-initialization steps.
® Ultra TT Bluetooth® Configuration Procedure A NORDSON COMPANY Appendix A EFD Ultra TT PDA Application Firmware Upgrade Overview This procedure describes how to upgrade the EFD Ultra TT PDA Application firmware on the Ultra TT using a PDA. Note that the PDA software must first be loaded onto a computer so that the firmware data file can be hot-synced (copied) to the PDA.
® Ultra TT Bluetooth® Configuration Procedure A NORDSON COMPANY B. Set up Ultra TT Hardware for Firmware Flashing 1. Power down the Ultra TT, using the main circuit breaker on the back of the machine. 2. Unplug the power cord from the Ultra TT. 3. Remove the 11 screws that hold the electronics pan to the Ultra TT frame. There are 5 screws on the back panel and 4 along the front top edge.
® Ultra TT Bluetooth® Configuration Procedure A NORDSON COMPANY 4. A sequence of status messages will appear to the right of the download button. The first message is “Erasing flash...” Once the flash memory has been erased, the message will change to “Starting download...” A gas gauge, showing the percentage of bytes sent compared to the total number of bytes to send, will be displayed. When all bytes have been downloaded, a “Waiting to complete” message will be displayed.
® Ultra TT Bluetooth® Configuration Procedure A NORDSON COMPANY F. Restore Machine-specific Configuration Data 1. Turn on the PDA and start the EFD Ultra TT PDA Application. Tap the Tools button and then the Database Manager button. 2. From the “Type:” drop-down list, select ACL. 3. From the Databases list select the SNxxxxx.ACL file synced in Step A above. 4. Tap the Download button. 5.
® Ultra TT Bluetooth® Configuration Procedure A NORDSON COMPANY Troubleshooting Firmware download fails to complete, resulting in Error #1104 (A Comm error has disabled communications). First, try to flash the firmware again. Exit the EFD Ultra TT PDA application and cycle the power on the TT off and then back on. Start over at Section C, step 1. If the flash fails again, attempt to flash at 9600 baud. To set the machine to 9600 baud (115200 is the default) set DIP switch SW2-1 to ON .
A NORDSON COMPANY For EFD sales and service in over 30 countries, contact EFD or go to www.efd-inc.com/contact EFD, Inc. East Providence, RI USA 800-556-3484; +1-401-434-1680 (outside the USA) automation@efd-inc.com www.efd-inc.com/xyz EFD International Inc. Dunstable, Bedfordshire, UK 0800 585733 or +44 (0) 1582 666334 Ireland 00800 8272 9444 europe@efd-inc.com www.efd-inc.com/xyz EFD, Inc., Asia China: +86 (21) 5854 2345 china@efd-inc.com www.efd-inc.com/cn/xyz Singapore: +65 6896 9630 sin-mal@efd-inc.