
Installation & Assembly
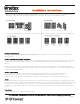
Table Of Contents
- Installation Procedures for Kinetex Modules
- Adhesive Requirement
- Site and Modular Material Conditioning
- Surface Preparation
- Subfloors
- Subfloors Continued
- Full Spread Adhesive System
- Tools
- Installing Kinetex Modules
- Alignment
- NOTE: Inadequate amounts of adhesive can cause modules to shift and move and will not be covered by warranty. J+J Flooring will not be responsible for the adhesive bond where other adhesives have been used.
- Module Placement
- Modular Install Pattern
- Module Repositioning During Installation
- Module Replacement
- Joints
- Transitions
- Stairs
- Cutting/Trimming
- Completing the Installation
- NOTE: These installation recommendations are made for the experienced installer. Adherence to these procedures will result in a quality installation. Any questions concerning these recommendations or any special situation encountered should be directe...
- Following the Installation

Installation Instructions
Page 3 of 4
2/2020
Modular Install Pattern
Follow approved installation method(s) for each specific product. Kinetex modules have an arrow on the back of each module denoting
machine direction.
Module Repositioning During Installation
To reposition a Kinetex module during installation, remove it by gently lifting along all four sides of the module with a spatula or putty knife,
rotating around each side of the module gently. The center of the module should be the last part of the module touching the floor upon
removal.
Do not stretch a module while it is in the adhesive in order to align next to an adjoining tile. An attempt to stretch will likely result in the
module pulling back to its original position. Never attempt to remove a module all at once by pulling one or only two sides of the module. Doing
so may lead to distorting the module.
Module Replacement
On occasion, it may be necessary to replace damaged or heavily soiled modules. Modules can be replaced with new Kinetex
modules from on-site inventory or from another area of the installation. A difference of appearance may be noticed when
modules are replaced; this difference usually diminishes in a short time. A light application of Kinetex Adhesive may be required.
Joints
Although a tight installation is required, care should be taken to avoid exerting excessive pressure when butting one module against another.
This can result in buckled or peaked joints. It is important for the installer to do a periodic check throughout the installation for tightness. This
check should occur after the placement of each 5 to 7 tiles to ensure proper alignment. Failure to effectively place modules will create the
possibility for gaps and allow the subfloor to be visible between the tiles. These gaps may be more noticeable when viewed from a standing
position.
Transitions
Transition to Kinetex must accommodate a thickness of 3/16”.
Approved installation method(s) for Kinetex are shown below. Follow arrows printed on back of the product. Recommended installation
methods are style specific. Refer to the applicable sample folder or jjflooring.com for style specific installation methods.
For additional information, please
call 800.451.1250 ext. 8020 or visit efcontractflooring.com.