
Installation guide

8 EX9001-48
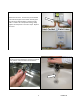
4) COMMISSIONING THE HEATER
BEFORE SWITCHING THE ELECTRICAL BREAKER “ON”, MAKE SURE THE INLET AND
OUTLET BALL VALVES ARE FULLY OPEN AND WATER IS FLOWING THROUGH THE HOT WATER FAUCET
FOR A MINUTE OR TWO UNTIL THE FLOW IS CONTINUOUS AND FREE FROM AIR POCKETS. DO NOT
SWITCH THE BREAKER “ON” IF THERE IS A POSSIBILITY THE WATER IN THE HEATER IS FROZEN.
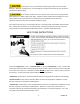
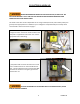
1) Make sure water is flowing through the faucet.
2) Switch “ON” the electric power supply at the breaker.
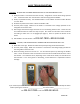
3) The power indicator light on the circuit board should
come “ON” after a delay of a few seconds.
4) Check the performance of the flow switch by opening
and closing the OUTLET BALL VALVE a few times. Keep
the INLET BALL VALVE fully “OPEN”. The power
indicator light should be “ON” ONLY when water is
flowing through the heater. Return the outlet valve to
the fully “OPEN” position.
For “Single Point” and “Flow Controlled” heaters, go to 5). For “Thermostatic”, go to 6).
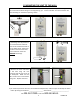
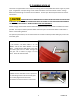
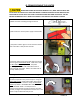
5) “Single Point” and “Flow Controlled”. At this point,
the water temperature may not be very hot. Using the
OUTLET BALL VALVE, slowly reduce water flow until the
desired temperature is achieved. Keep the INLET BALL
VALVE fully “OPEN”. NEVER RESTRICT THE WATER FLOW
USING THE INLET VALVE. The temperature is
proportional to the flow through the heater; the lower
the flow, the higher the temperature and vice versa. The
heater is fully installed and ready for use.