
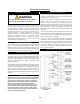
Installation Guide and Manual


53
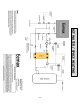
Operating Sequence
WARNING
Do not exceed “Safe” pressure with the Enclosure Pressure Control Valve.
Operators must follow step-by-step sequence of the Start-Up Instructions Nameplate
on the Protection System.
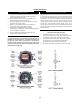
Class I Purging Operation
With the protective gas supply connected, enclosure power
deenergized and alarm system energized (if utilized).
1. Carefully read Start-Up Instructions on system.
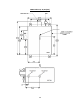
2. Check operation of the Enclosure Protection Vent (EPV-3)
opening it manually several times. (see page 50, 'Helpful
Hint").
3. Seal protected enclosure(s).
4. Unlock T-bar Valve Key from the RECV stern and place in the
EPCV stern. (see important notes, page 50), open Enclosure
Pressure Control Valve, by turning CCW. to set Enclosure
Pressure Gauge at “Safe” pressure, the Pressure Loss Alarm
Switch (if utilized) should then activate to silence the alarm
system.
5. Ensure the Protection System Enclosure Pressure Gauge
maintains a "Safe" pressure for one (1) minute.
6. Carefully remove T-bar Valve Key from Enclosure Pressure
Control Valve stem. Ensure Enclosure Pressure Gauge “Safe”
pressure setting is stable.
7. Utilizing the T-Par Valve Key supplied with system, open
Rapid Exchange® Control Valve fully by turning 90° CCW and
quickly ensure the Enclosure Protection Vent opens. Note:
The Enclosure Pressure Gauge should move quickly off scale
to the right, this is normal for all Rapid Exchange® purging
systems.
8. Standby for the exchange time as specified on the Start-Up
Instructions (five minutes minimum) then close the Rapid
Exchange® Control Valve fully and ensure T-bar Valve Key is
firmly locked in Rapid Exchange® Control Valve stem.
9. Wait for the Enclosure Pressure Gauge to return to a “Safe”
pressure and energize the protected enclosure(s) power via
the local disconnect switch.
10. Ensure the Enclosure Pressure Indicator maintains a "Safe"
pressure before leaving system unattended.