
Installation Guide and Manual


52
Set-up Procedure
Helpful Hints
“Safe" pressure, for purposes of this manual, is defined
as a minimum .25 inch (6.4 mm) of water column.
Regulator may be in the locked position upon arrival. To
adjust regulator, pull handle to outward position.
Carefully insert T-bar valve key to align valve stem tip of
both valves. Practice locking and unlocking key in the
RECV valve stem. Practice and familiarization of this
process should ease operation of the system.
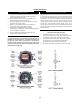
To test the vent's operation, gently prod the vent flapper
open with a soft pointed object, (example: eraser end of
a pencil) ensuring that the vent valve works freely. On
vertically configured vents, this can be accomplished
from within the protected enclosure. Side mounted -90
configured vents can be tested by removing the conduit
plug at the bottom of the mounting tee. Multiple
operations require only one test per day if enclosure is
not opened or left unattended.
Important Notes
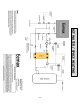
The Rapid Exchange® Control Valve and the Enclosure
Pressure Control Valve are both operated by utilizing the
removable T-bar Valve Key supplied with the system. The
purge system is shipped with the T-bar Valve Key locked in
the Rapid Exchange® Control Valve stem. To remove the T-
bar Valve Key, wrap your index and middle finger around
the T-Bar and place your thumb firmly against the system
face plate. Pull the T-bar Valve Key straight out firmly. This
will unlock and free the T-bar Valve Key for use in the
Enclosure Pressure Control Valve stem. When Set-Up or
Operating procedures are complete. Replace the T-bar
Valve Key in the Rapid Exchange® Control Valve stem and
push in firmly to lock in position. THE T-BAR VALVE KEY
LOCKS IN THE RAPID EXCHANGE® CONTROL VALVE STEM
ONLY.
Operators must secure wrist or stop watch to manually
time Exchange Cycle for all applications.
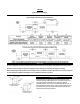
Pepperl+Fuchs Rapid Exchange® Purging Systems are
designed to provide a pre-calibrated and certified volume
exchange rate. With the Rapid Exchange® pressure gauge
set at 60 psi (4.14 bar) minimum, the model 3003 will
accomplish the required volume exchanges at a rate of
ONE MINUTE PER 3 CUBIC FOOT (85 /min) of enclosure
volume.
The volume exchange rate is based on a four (4) enclosure
volume exchange. Multiply the required exchange time by
2.5 for applications requiring a ten (10) volume exchange
for motors. Regardless of enclosure volume or system flow
rate. Pepperl+Fuchs requires that operators withhold
power to the enclosure while inducing the Class I
enclosure volume exchange, for at least five (5) minutes.
Normal exchange times should be doubled if large
obstructions block protective gas flow.
Class I Purging Set-Up
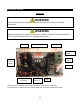
READ IMPORTANT NOTES BEFORE
PROCEEDING WITH SET-UP
1. Utilizing the T-bar Valve Key supplied with system (see
important notes), close Rapid Exchange® Control and
Enclosure Pressure Valves fully by turning clockwise (CW).
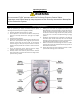
2. Engage the protective gas supply to the System Supply Inlet
and set the Rapid Exchanger Pressure Gauge to 60 psi.
3. Temporarily connect a 0-10 inch (0-254 mm) water column
pressure gauge or manometer to the protected enclosure.
4. Check operation of Enclosure Protection Vent as detailed
above. (see “Helpful Hints”)
5. Seal enclosure(s) and adjust Enclosure Pressure Control
Valve, utilizing the T-bar Valve Key, by opening slowly
counterclockwise (CCW) to set a "Safe" pressure on the
Enclosure Pressure Gauge. NOTE: If pressure setting is
difficult to stabilize or set. (see page 18, "Trouble-Shooting
Procedures").
6. Carefully remove T-bar Valve Key from Enclosure Pressure
Control Valve stem. Ensure Enclosure Pressure Gauge "Safe"
pressure setting is stable.
7. Utilizing the T-bar Valve Key supplied with system (see
important notes above), lock T-bar Valve Key into Rapid
Exchange® Control Valve stem. Open valve fully by turning
90° CCW and quickly ensure the Enclosure Protection Vent
opens. Note: The Enclosure Pressure Gauge should move
quickly off scale to the right, this is normal for all Rapid
Exchange® purging systems.
8. Readjust the regulator to 60 psi (4.14 bar) minimum, while
inducing Rapid Exchange® until the test gauge reads
approximately 3 to 5 inches (76-127 mm) of pressure and
does not fluctuate. (insufficient enclosure pressure will cause
the Enclosure Protection Vent to "shuttle') DO NOT exceed
10 inches (254 mm) of pressure within the protected
enclosure.
9. Close Rapid Exchanger Control Valve fully and ensure T-bar
Valve Key is firmly locked in Rapid Exchange® Control Valve
stem.
10. Cease testing and remove test equipment.