
Installation Guide and Manual


11
Startup Process
Plumbing Installation Checklist MUST BE FILLED OUT AND LEFT WITH WATER HEATER. MUST FLUSH WATER HEATER
FOR MINIMUM 5 MINUTES AT A MINIMUM.
Eemax Installation Checklist and Startup Procedure for SafeAdvantage and SpecAdvantage Water Heaters
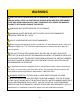
Important - Read and fully understand all steps outlined below before proceeding. Failure to do so may damage the
water heater and void any warranty. Technical support is available at 1 (800) 543-6163
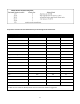
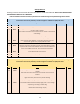
Plumbing Installation Checklist
Step
Category
Action
Confirmed By
Notes
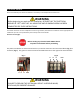
1
Water
Heater is supplied with clean potable water
2
Water
Plumbing orientation is correct – water connections on the bottom - inlet on
the right, outlet on the left
3
Water
Ensure piping connections are not causing stress or torque on the inlet and
outlet fittings
4
Water
No leaks at water connection or in plumbing network
5
Water
Water pressure is between 40-90 PSI (min 35psi)
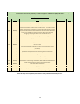
6
Water
Long pipe runs, high flow rates and valves closing can cause pressure spikes
(water hammer) above 1000 PSI. Consult piping schematic to ensure
arrestors and regulators are properly sized and located.
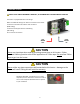
7
Water
(with power off) Open supply valves to water heater - run water through
fixtures to purge all air and debris in system. With water flowing, visually
inspect the clear element tubes between the inlet and outlet manifold to
ensure no air bubbles are present. (this may take several minutes)
8
Water
Using a flashlight, visually inspect heating chamber for any signs of leakage
9
Water
Ensure Water Heater will not freeze
10
Water
Ensure all local plumbing codes are met
11
Water
Plumbing installation correct and complete
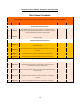
Important - Read and fully understand all steps outlined below before proceeding. Failure to do so may damage the
water heater and void any warranty. Technical support is available at 1 (800) 543-6163
Electrical Installation Checklist
Step
Category
Action
Confirmed By
Notes
12
Power
(with power off) - Breaker and disconnect are of proper size and correctly
installed
13
Power
(with power off) - Wiring and conduit are of proper size and correctly
installed.
14
Power
(with power off) - Wiring connections at terminals are correct orientation,
tight, with no stray wire strands or pinched sheathing
15
Power
(with power off) - Proper ground,(not neutral) is clean, and tight
16
Power
(no water flowing, do not turn it on, close outlet water shut off valve if
uncontrolled environment-left hand side) Apply power - ensure voltage
and phasing is according to model rating
17
Power
Disengage power after voltage and phasing is confirmed (open outlet
shutoff valve if closed during step 14)
18
Power
Ensure all local electrical codes are met
19
Power
Electrical Installation correct and complete