OAP1750 Panduan Instalasi Cepat 11-2020 / v1.
I. Informasi Produk I-1. Isi Paket 3 2 1 4 5 6 1. 2. 3. Access Point Antena (2.4G x 3 & 5G x 3) Wall Mount Bracket x 1 4. 5. 6.
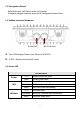
I-2. Persyaratan Sistem - Kabel Ethernet, PoE Switch atau PoE Injector - Komputer dengan browser web untuk konfigurasi Access Point I-3. Sekilas mengenai Hardware A LAN (PoE) B 3 LED & Reset A. Port LAN dengan Power over Ethernet (PoE PD) B. 3 LED + Reset antarmuka M-smart I-4. Status LED Power LAN Wireless Hijau Mati Hijau Berkedip Mati Hijau Berkedip Mati LED Behavior Access point menyala. Access point mati. Port LAN terhubung. Aktifitas (transfer dan menerima) Port LAN tidak terhubung.
I-5. Reset Jika Anda mengalami masalah dengan access point Anda, Anda dapat mengatur ulang perangkat kembali ke pengaturan pabrik. Ini akan me-reset semua pengaturan kembali ke default. 1. Tekan dan tahan tombol reset pada access point selama sekitar 10 detik. Kemudian lepaskan tombol. Mungkin Anda memerlukan pensil atau benda agak tajam untuk menekan tombol reset. 2. Tunggu access point me-restart dan access point akan siap saat lampu LED menyala hijau. I-6.
Pemasangan bracket 2. Pasang pengikat dan access point ke dinding menggunakan sekrup kayu dan colokan yang tersedia. Pemasangan Tiang 3. Perbaiki dudukan dan access point ke tiang menggunakan besi pengikat yang sudah disediakan.
II. Pengaturan Cepat Access Point outdoor long range Dual-Band 802.11ac ini memiliki fitur dan fungsi yang kuat,antara lain: - Teknologi nirkabel 802.11ac concurrent Dual-band berkecepatan tinggi. - Dapat mengelola sampai dengan 32 SSID - SNMP v1/v2c/v3 Access point Anda akan dapat segera digunakan hanya dalam beberapa menit. Dapat difungsikan sebagai access point (mode AP) atau sebagai bagian dari sebuah array AP (AP Managed mode).
3. Atur IP address komputer Anda menjadi 192.168.2.x dimana x adalah angka dalam kisaran 3-100. Pastikan tidak ada koneksi jaringan aktif lainnya pada komputer Anda (putuskan koneksi Wi-Fi dan kabel Ethernet). 4. Masukkan default IP address dari access point 192.168.2.2 ke bar URL pada web browser. 5. Anda akan diminta untuk memasukkan user name dan password. Masukkan username default "admin" dan password default "1234". 6. Setelah itu Anda akan tiba di layar “System Information” seperti dibawah.
Langkah berikutnya akan membantu Anda untuk mengkonfigurasi pengaturan dasar access point,sebagai berikut: - IP Address LAN SSID 2.4GHz & 5GHz & Keamanan Nama & Password administrator Tanggal & Waktu Direkomendasikan agar Anda melakukan konfigurasi sebelum menggunakan access point. 1. Untuk merubah IP address access point, pergi ke “Network Settings” > “LAN-side IP Address” 2. Masukkan IP address yang ingin Anda gunakan untuk access point Anda.
Untuk mengaktifkan beberapa SSID 2.4GHz, buka menu berlabel “Enable SSID number” dan pilih berapa banyak SSID yang Anda butuhkan. Lalu masukkan SSID baru pada bidang isian yang sesuai dengan nomor di bawah ini, sebelum mengklik "Apply". 4. Untuk mengkonfigurasi keamanan jaringan access point nirkabel 2.4GHz Anda, pergi ke “Wireless Settings” > “2.4GHz 11bgn” > “Security”. Pilih “Authentication Method” dan masukkan “Pre-shared Key” atau “Encryption Key” tergantung pada pilihan Anda, lalu klik "Apply".
5. Pergi ke “Wireless Settings” > “5GHz 11ac 11an” dan ulangi langkah 3 & 4 untuk jaringan access point nirkabel 5GHz. 6. Untuk merubah nama dan password administrator menggunakan konfigurasi melalui antarmuka web browser, pergi ke “Management” > “Admin”. 7. Lengkapi bidang isian “Administrator Name” dan “Administrator Password” dan klik ”Apply” 8. Untuk mengeset waktu yang benar pada access point Anda, pergi ke : “Management” > “Date and Time Settings”. 9.
III. Edimax Pro NMS Edimax Pro Network Management Suite (NMS) mendukung manajemen terpusat untuk membuat group access point, atau dikenal sebagai Array AP. NMS ini mendukung hingga 16 access point Edimax Pro tanpa memerlukan AP controller nirkabel tambahan atau sampai dengan 32 access point dengan menggunakan AP controller Edimax APC 500 - mengurangi biaya dan memfasilitasi manajemen AP yang efisien. Pengaturan NMS Edimax Pro sangat sederhana.
Bila menggunakan NMS controller Edimax AP, AP lain yang terhubung secara otomatis akan ditetapkan menjadi AP Managed. Apabila AP controller tidak dapat menemukan OAP1750 Anda sebagai AP Managed, Anda dapat mengkonfigurasi pengaturan secara manual seperti di bawah ini: 1. Pastikan semua AP termasuk OAP1750 Anda terhubung ke Ethernet atau Switch PoE yang terhubung ke gateway / router. Anda dapat menggunakan router Anda sebagai server DHCP atau dapat juga mengkonfigurasi AP Controller sebagai server DHCP. 2.
3. Pastikan Anda telah menentukan dan telah memilih satu AP sebagai AP Controller yang akan mengelola semua AP lain yang terhubung (hingga 32 tergantung pada model). 4. Hubungkan komputer ke OAP1750 melalui switch PoE menggunakan kabel Ethernet.
5. Buka web browser dan masukkan IP address OAP1750 di bidang IP address. IP address default adalah 192.168.2.2 IP address komputer Anda harus dalam subnet yang sama dengan OAP1750 tersebut. Untuk bantuan lebih lanjut silakan mengacu pada petunjuk pengguna. Jika Anda mengubah alamat IP dari AP Controller, atau jika gateway / router menggunakan server DHCP, pastikan Anda memasukkan alamat IP yang benar. Lihat pengaturan gateway / router. 6. Masukkan username & password untuk login.
8. Klik "Apply" untuk menyimpan pengaturan,selanjutnya AP Controller & Managed AP Anda akan segera berfungsi. Gunakan Edimax NMS pada controller AP Anda untuk mengelola & memantau AP Managed Anda. Silakan lihat pada buku panduan AP controller jika Anda membutuhkan bantuan mengenai Edimax NMS.
COPYRIGHT Copyright Edimax Technology Co., Ltd. all rights reserved. No part of this publication may be reproduced, transmitted, transcribed, stored in a retrieval system, or translated into any language or computer language, in any form or by any means, electronic, mechanical, magnetic, optical, chemical, manual or otherwise, without the prior written permission from Edimax Technology Co., Ltd. Edimax Technology Co., Ltd.
Federal Communication Commission Interference Statement This equipment has been tested and found to comply with the limits for a Class B digital device, pursuant to Part 15 of FCC Rules. These limits are designed to provide reasonable protection against harmful interference in a residential installation. This equipment generates, uses, and can radiate radio frequency energy and, if not installed and used in accordance with the instructions, may cause harmful interference to radio communications.
EU Declaration of Conformity English: This equipment is in compliance with the essential requirements and other relevant provisions of Directive 2014/53/EU, 2014/35/EU. Français: Cet équipement est conforme aux exigences essentielles et autres dispositions de la directive 2014/53/EU, 2014/35/EU. Čeština: Toto zařízení je v souladu se základními požadavky a ostatními příslušnými ustanoveními směrnic 2014/53/EU, 2014/35/EU.
Declaration of Conformity We, Edimax Technology Co., Ltd., declare under our sole responsibility, that the equipment described below complies with the requirements of the European Radio Equipment directives. Equipment: 11ac Dual Band Concurrent Outdoor AP Model No.: OAP1750 The following European standards for essential requirements have been followed: Directives 2014/53/EU Spectrum EMF : EN 300 328 V2.1.1 (2016-11) EN 301 893 V2.1.1 (2017-05) : Draft EN 301 489-1 V2.2.
Notice According to GNU General Public License Version 2 This product includes software that is subject to the GNU General Public License version 2. The program is free software and distributed without any warranty of the author. We offer, valid for at least three years, to give you, for a charge no more than the costs of physically performing source distribution, a complete machine-readable copy of the corresponding source code.
1. You may copy and distribute verbatim copies of the Program’s source code as you receive it, in any medium, provided that you conspicuously and appropriately publish on each copy an appropriate copyright notice and disclaimer of warranty; keep intact all the notices that refer to this License and to the absence of any warranty; and give any other recipients of the Program a copy of this License along with the Program.
5. You are not required to accept this License, since you have not signed it. However, nothing else grants you permission to modify or distribute the Program or its derivative works. These actions are prohibited by law if you do not accept this License. Therefore, by modifying or distributing the Program (or any work based on the Program), you indicate your acceptance of this License to do so, and all its terms and conditions for copying, distributing or modifying the Program or works based on it. 6.