EW-7822ULC / UTC Quick Installation Guide 03-2021 / v1.
I. Product Information .............................................................................. 1 I-1. Package Contents ..................................................................................................................1 I-2. I-3. I-4. LED Status ..............................................................................................................................1 System Requirements .............................................................................................
Multi-Language Quick Installation Guide (QIG) on the CD Čeština: Českého průvodce rychlou instalací naleznete na přiloženém CD s ovladači Deutsch: Finden Sie bitte das deutsche S.A.L. beiliegend in der Treiber CD Español: Incluido en el CD el G.R.I. en Español. Français: Veuillez trouver l’français G.I.R ci-joint dans le CD Italiano: Incluso nel CD il Q.I.G. in Italiano. Magyar: A magyar telepítési útmutató megtalálható a mellékelt CD-n Nederlands: De nederlandse Q.I.G.
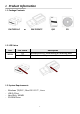
I. Product Information I-1. Package Contents EW-7822ULC or EW-7822UTC QIG CD I-2. LED Status LED WLAN LED Status On Off Description Wireless activity: transmitting or receiving data. No wireless activity. I-3. System Requirements - Windows 7/8/8.1~, Mac OS X 10.7~, Linux USB 2.
I-4. Safety In order to ensure the safe operation of the device and its users, please read and act in accordance with the following safety instructions. 1. The wireless adapter is designed for indoor use only; do not place the wireless adapter outdoors. 2. Do not place the wireless adapter in or near hot/humid places, such as a kitchen or bathroom. 3. The wireless adapter contains small parts which are a danger to small children under 3 years old.
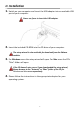
II. Installation 1. Switch on your computer and insert the USB adapter into an available USB port of your computer. Never use force to insert the USB adapter. 2. Insert the included CD-ROM into the CD drive of your computer. The setup wizard is also available for download from the Edimax website. 3. For Windows users the setup wizard will open. For Mac users the CD’s “Mac” folder will open.
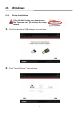
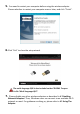
III. Windows III-1. Driver Installation If the CD didn’t auto-run, please open the “Autorun.exe” file to start the setup wizard. 1. Click the wireless USB adapter to continue. 2. Click “Install Driver” to continue.
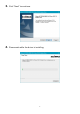
3. Click “Next” to continue. 4. Please wait while the driver is installing.
5. You need to restart your computer before using the wireless adapter. Choose whether to restart your computer now or later, and click “Finish”. 6.Click “Exit” to close the setup wizard. The multi-language QIG is also included on the CD-ROM. To open it click “Multi-language QIG”. 7. Please disable any other wireless adapters as described in V. Disabling Network Adapters. Then, Windows users can connect to an available Wi-Fi network as usual. For guidance on doing so, please refer to VI.
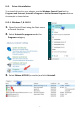
III-2. Driver Uninstallation To uninstall drivers for your adapter, use the Windows Control Panel built-in Programs and Features, Uninstall a Program or Add or Remove Programs feature. An example is shown below: III-2-1. Windows 7, 8.1 & 10 1. Open Control Panel using the Start menu or Search function. 2. Select Uninstall a program under the Programs category. 3. Select Edimax AC1200 (or similar) and click Uninstall.
IV. Mac OS IV-1. 1. 2. 3. Driver Installation Open the “RTLWLANU_MacOS..” (or similar) folder and double click the “Installer.pkg” file to open the driver installation wizard. Click “Continue” to proceed to the next step. The next screen displays important information, please read it carefully. Click “Continue” when you are ready to continue.
4. Select a language (the default language is English) and click “Continue” to install the driver. 5. To read the software license click “Read License” and then click “Agree” to confirm you agree to the terms. You must agree to the terms to continue installing the software.
6. 7. If prompted, select which user to install the software for and click “Continue”. Click “Install” to install the driver.
8. You may be prompted to enter your system/administrative password before the installation can begin. Enter your password and click “Install Software”. 9. You will be prompted that you must restart your computer when the installation is complete. Click “Continue Installation” to proceed.
10. Please wait while the driver is installing. 11. When the installation is complete, you will see the following screen informing you that “The installation was successful”. Click “Restart” to restart your computer. 12. Next, please disable any other wireless adapters as described in V. Disabling Network Adapters. Then you can connect to a Wi-Fi network as described in VI. Using The Adapter.
IV-2. Driver Uninstallation 1. Open the “RTLWLANU_MacOS..” (or similar) folder. 2. Double click the “Uninstall.pkg” file and follow the on-screen instructions.
V. Disabling Network Adapters To ensure that your USB wireless adapter can function correctly, it is recommended that you disable any other existing wireless network adapters installed on your computer. If you are unsure how to do so, you can refer to the user manual for your computer, or follow the guidance below. V-1. Windows 7 Go to Start > Control Panel. Click View network status and tasks > Wireless Network Connection and click Disable.
V-2. Windows 8.1 & 10 1. Go to File Explorer > Network (right click) > Properties > Change adapter settings. 2. Right click your wireless adapter, select “Properties” and then “Disable”.
V-4. Mac 1. Select “System Preferences” from the dock. 2. In “System Preferences”, select “Network”. 3. 4. All of your network connections will be displayed, as shown below. Select “Wi-Fi” from the left panel. Click “Turn Wi-Fi” off in the main panel.
VI. Using The Adapter After you have installed the driver and if necessary disabled other wireless adapters Windows users can connect to a Wi-Fi network as usual. Mac users need to connect to a Wi-Fi network using the included utility, as described in VI-2. Mac VI-1. Windows Below is an example of how to connect - the process may vary according to your Windows edition. 1. Click the network icon (examples below) in the system tray and select “Connect to a network”. 2.
3. After correctly entering your password, you will be successfully connected to your Wi-Fi network. VI-2. Mac 1. Click the new USB adapter icon from the menu in the top right of your Mac desktop. 2. Available Wi-Fi networks will be displayed. Select your Wi-Fi network as you usually would.
3. Enter the password (network key) for the Wi-Fi network and click “Join”. 4. After entering your password, you will be successfully connected to your Wi-Fi network. You can use the other items in the menu to switch your USB adapter on/off, join another network (manually enter SSID name) display WPS PIN or activate WPS push button mode.
WPS (Wi-Fi Protected Setup) is a simple, alternative way to establish connections between WPS compatible devices. Most modern wireless network devices feature a built-in WPS button, which activates WPS on that device. When WPS is activated in the correct manner and at the correct time for two compatible devices, they will automatically connect to each other.