0
Table of Contents TABLE OF CONTENTS ............................................................................................................ 0 1. IMPORTANT INFORMATION............................................................................................. 2 SAFETY PRECAUTIONS ........................................................................................................... 2 DANGER: BE CAREFUL WITH ELECTRICITY. ............................................................................
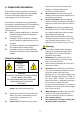
1. Important Information Please take the time to read this user manual before using the WD‐1000TX and WD‐1000RX. It contains important information about operating your PC to TV wireless kit. z z Our company’s limited warranty applies when the product is handled properly for intended use, in accordance with its operating instruction.
EN 301 489‐17 Electromagnetic compatibility and Radio spectrum Matters (ERM); Electro magnetic Compatibility (EMC) standard for radio equipment; Part 17: Specific conditions for 2,4 GHz wideband transmission systems, 5GHz high performance RLAN equipment and 5,8 GHz Broadband Transmitting Systems EN 60065 Audio,video and similar electronic apparatus—Safety requirements DECLARATION OF CONFORMITY This device complies with Part 15 of the FCC Rules.
z z z z z z z z z CAUTION: Using the RF module in z the US Any changes or modifications not expressly approved by the grantee of this device could void the user's authority to operate the equipment.
CAUTION: Using this System in Canada CAUTION: Using the System in the US z z z z z z z Any changes or modifications not expressly approved by the grantee of this device could void the user's authority to operate the equipment.
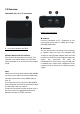
2. Introduction 2.1 Packing Content WD‐1000TX (TX) and WD‐1000RX (RX) wireless Please check whether the following items are HD audio/video transmission solution allows present in the package. If any items missed or users to see on the HDTV a great variety of damaged, please call your dealer. uncompressed 1080p content or web entertainment that’s available on thief computer, free of the constraint of cables.
2.2 Overview WD‐1000TX (TX): PC to TV Transmitter Main Unit Back Panel X HDMI IN Connect Transmitter to PC / Notebook or any Source device that have an HDMI port using a provided HDMI cable. Y USB Power You can connect the transmitter to the desktop or laptop’s USB port with the provided USB Y‐cable, Or use the power adapter with mini USB connector included in the package to supply the power. The transmitter will then be USB‐powered.
WD‐1000RX (RX): PC to TV Receiver Main Unit Back Panel X HDMI OUT Connect the HDTV set via an HDMI cable. Y DC IN Connect the receiver’s power adapter. Front Panel Buttons and LEDs X Power Button with LED indicator Press to turn the receiver on and off. The indicator in the power button lights up in blue when the power is on, and turns red in standby mode. Y INFO./CHANNEL Selection Button Press this button once for OSD displayed the information on the HDTV screen.
3. Installation Step 1: Setup the WD‐1000TX transmitter Connect an HDMI‐ready computer to the WD‐1000TX: (1) Connect the WD‐1000TX’s (transmitter) “HDMI IN” to the HDMI‐ready computer’s “HDMI OUT” or Source player’s “HDMI OUT” with an HDMI cable (included). (2) Power Connection : A. Connect dual USB ports of HDMI‐ready computer with mini USB port (POWER labeled on back panel) of WD‐1000TR transmitter through the USB Y‐cable for power supply.
Step 2: Setup the WD‐1000RX receiver HDTV set Connection with WD‐1000RX: (2) Connect the supplied power adapter to the DC IN jack of the WD‐1000RX and a wall socket. The LED indicator on the POWER button lights up in solid purple when the WD‐1000RX is connected to the power mains. (1) Connect the HDMI cable to the HDMI OUT jack of the WD‐1000RX and to your HDTV set (or an HD projector).
Step 3: Boot up the WD‐1000TX and WD‐1000RX (1) After the power cord is plugged into the electrical outlet, the WD‐1000TR will be turned on automatically. (2) If it is in Standby mode (Both POWER LED of transmitter and receiver are lit in red), press the POWER button on both transmitter and receiver to turn on the WD‐1000TX and WD‐1000RX. It will take about 1 minute for the system to boot up.
(4) During the warm‐up period, the POWER LED will blink in blue until the signal link between the WD‐1000TX and the WD‐1000RX is established. Ensure your TV set or projector is in “HDMI input” mode, and is already powered on. (5) If you have electronic devices such as a cordless phone, wireless access point/ router sharing the 5GHz channel frequency, when you use it near the WD‐1000TR, you may experience disturbed picture or diminished sound quality. Press the INFO.
Method 3. Exit the wireless RF channel adjustment mode 1. Enter the wireless RF channel adjustment mode 2. Changes to the next available RF wireless channel Press the INFO./CHANNEL button on the top of Receiver box over 3 seconds for current channel status display. Press the INFO./CHANNEL button on the top of Receiver No button is pressed box again within 5 seconds to for 5 seconds. switch channel randomly. ▃▆█ HDMI [CH 8] 1280x1024 Press again to change channel OSD Display Status Exit. B.
(6) If all operation is normal, the POWER LED and INFO./CHANNEL LED will glow in solid blue. Please refer to the next form containing detailed LED description : Note: A. Make sure the display for your HDMI‐ready computer connected to the WD‐1000TX has already been turn on the external display. Please see the Chapter4.1 for the detail operation. B. Warming‐up or source switching time should take approximately 15~20 seconds if the operation is in normal condition.
Note: A. If the RF connection over 80sec and still not established, it might link is lost or the transmitter is most likely out of range. You may have to verify the range and adjust or shorten the distance between your HDTV set with the transmitter and the receiver. The maximum video transmission range for 1080p content is up to 30 feet in line of sight (LOS). < The minimum range is 6.5 feet. > B.
(8) TRANSMITTER/RECEIVER Status on OSD vs. buttons: X Press the POWER button on the top of Transmitter (or Receiver) to enter “Standby mode” from “active mode”. OSD Displayed : ▃▆█ HDMI CH10 1280x1024 Standby Mode Y Press the INFO./ CHANNEL button on the top of Receiver, the Signal Quality, Source, Channel and resolution will be displayed for user reference. OSD Displayed : ▃▆█ HDMI CH10 1280x1024 Press again to exit the OSD ZPress the INFO.
Step 4: Mounting the WD‐1000RX to the Wall (1) Refer the drawing of the bottom page that have relative position of the key holes and attach this paper on wall. (5) Place WD‐1000RX key holes over the protruding screws and slide down into position. (2) Drill pilot holes. (3) Insert the supplied two Anchors into the wall. (4) Insert two screws into the anchors. Leave 1/8” length for mounting the Transmitter or receiver.
4. Troubleshooting Problem The WD‐1000TR front panel power indicator (red LED) doesn't light up. Solution • Check if the power plugs of WD‐1000TX/WD‐1000RX are properly inserted into a functioning power outlet. • Make sure both POWER LED of WD‐1000TX/ZWD1222R are lit in the blue. • The wireless link might require 80 seconds to connect between transmitter and receiver, and show video on the TV screen. Please be patient and wait for a while.
WD‐1000TR transmitter are powered on. * Ensure the display setting for your PC (or laptop) had been switched to clone mode, Projector out mode or dual display mode for enable external display. (Refer Chapter 4.1 for the detail operation.) Poor picture quality or intermittent video play. • Check if your video resolution with HDMI input from your PC device is either 1080p, 1080i, 720p, 576p, or 480p.
On Windows Vista OS: 1. Click to open Windows Mobility Center o from Start n 2. On the External Display title, click Connect displayp to open New display Detected 3. Choose Mirrored or Extended mode to enable external display. On Windows XP OS: 1. Click the right key of the mouse on the desktop 2. Click Graphic Option / Output to 3. Click Clone mode or extended display Note: For more information, please type “change display settings” on Windows Help and Support.
4.2 MAC OS Display setting of Laptop for enables external display MAC OS will detect external display equipment automatically and switch to a better video resolution when user plugs in the display cable to Apple Mac series. Once MAC OS do not detect external display automatically, please check below : 1. Click to open Displays form / System Performance 2. Click Detect Displays for re‐detect the external display 4.3 Windows OS Audio setting of Laptop for switch to HDMI output On Windows7 OS : 1.
2. On the Volumep title, click the Change Audio settingq icon to open Sound page 3. Select HDMI outputr and press OKs On Windows XP OS : 1. Click to open Audio setting from Control panel 2. Select HDMI Output and Press OK Note: For more information, please check “Windows Help and Support”.
5. Supported Resolution If the SOURCE LED continues to blink in blue (slower than “no signal” mode); OSD display: “No Supported Format” and there is no video displayed or the video quality suffers, it indicates that the video frame rate from your A/V source device is not supported. Ensure that the consumer timing of your HD device is compliant with the standard listed below: Video Format Timings Resolution Primary CEA Video Timing 640x480p @ 59.94 / 60Hz 720x480p @ 59.
6. Audio Bit Rate Support 24 Digital Audio from HDMI inputs: Up to 6Mbit/s bit‐rate support. Support AC3 and DTS. 2‐channel PCM audio : 16~24 bits audio sample with 32~48KHz sampling rate 2channel PCM 32KHz 44.
7. Product Specification General Specifications Supported Video HDMI Input Resolutions Supported Audio Digital Audio Formats Transmission Distance System Latency Antenna Operating Frequencies Power Supply Operating Temperature Interfaces HDMI Input A/V Interfaces HDMI Output Power Power Input Interface Power Switch Switches INFO.
26
27