Copyright© by Edimax Technology Co, LTD. all rights reserved. No part of this publication may be reproduced, transmitted, transcribed, stored in a retrieval system, or translated into any language or computer language, in any form or by any means, electronic, mechanical, magnetic, optical, chemical, manual or otherwise, without the prior written permission of this company.
1. Introduction It is a combination 10/100M Ethernet adapter and integrated standard-based 3-port USB hub all in one easy to use device. As a fully integrated USB solution, the new USB/Ethernet adapter allows users to easily connect to the Ethernet network with a complete out of the box, Plug-N-Play solution. 2. Features z Complies with IEEE 802.3/802.3u standards z Complies with USB 2.0 and backward compatible with USB1.1 with data rates 1.5/12/480 Mbps z Built in 3 ports USB2.
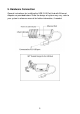
5. Hardware Connection General instructions for installing the USB 2.0 3 Port Hub with Ethernet Adapter are provided below. Since the design of system may vary, refer to your system’s reference manual for further information, if needed.
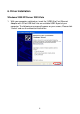
6. Driver Installation Windows 2000/XP/Server 2003/Vista 1. With your computer switched on, insert the “USB2.0 to Fast Ethernet Adapter with 3-Port USB Hub” into an available USB2.0 port of your computer. The following message will appear on your screen, Please click ‘Cancel’ and use the wizard to install driver.
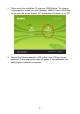
2. Please insert the installation CD into your CDROM drive. The Autorun setup programs should run under Windows 2000/XP/Server 2003/Vista, or you can click on the “Browse CD” to find other OS drivers in the CD. 3. Connect the Ethernet adapter’s USB end to a free USB port of your computer. Then a pop-up message will appear in the notification area indicating the installation is complete.
. Mac 10.3.X/10.4.X/10.5.X 1. Insert the provided driver CD into your CD-ROM drive. Double-click the CD and navigate to the directory of \Drivers\Mac\ 2. Wait a while for the program to install the driver. 3. When the installation is done, click Finish. 4. Please enter your password as prompted. 5. Select Continue Installation to install the software and then Reboot the Mac. 6. Connect the Ethernet adapter to a free USB port.
Federal Communication Commission Interference Statement This equipment has been tested and found to comply with the limits for a Class B digital device, pursuant to Part 15 of FCC Rules. These limits are designed to provide reasonable protection against harmful interference in a residential installation. This equipment generates, uses, and can radiate radio frequency energy and, if not installed and used in accordance with the instructions, may cause harmful interference to radio communications.
8