
User's Manual
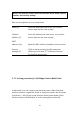

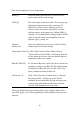

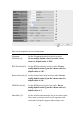

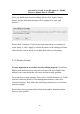
Table Of Contents
- Chapter I: Product Information
- Chapter II: System and Network Setup
- 2-1 Build network connection
- 2-2 Connecting to wireless broadband router by web browser
- 2-3 Using ‘Quick Setup’
- 2-4 Basic Setup
- 2-5 Setup Internet Connection (WAN Setup)
- 2-5-1 Setup procedure for ‘Dynamic IP’:
- 2-5-2 Setup procedure for ‘Static IP’:
- 2-5-3 Setup procedure for ‘PPPoE’:
- 2-5-4 Setup procedure for ‘PPTP’:
- 2-5-5 Setup procedure for ‘L2TP’:
- 2-5-6 Setup procedure for ‘Telstra Big Pond’:
- 2-5-7 Setup procedure for ‘DNS’:
- 2-5-8 Setup procedure for ‘DDNS’:
- 2-5-9 Setup procedure for ‘WISP’:
- 2-6 Wired LAN Configurations
- 2-7 Wireless LAN Configurations
- 2-7-1 Basic Wireless Settings
- 2-7-1-1 Setup procedure for ‘Access Point’:
- 2-7-1-2 Setup procedure for ‘Station-Infrastructure’:
- 2-7-1-3 Setup procedure for ‘AP Bridge-Point to Point’:
- 2-7-1-4 Setup procedure for ‘AP Bridge-Point to Multi-Point’:
- 2-7-1-5 Setup procedure for ‘AP Bridge – WDS’
- 2-7-1-6 Setup procedure for ‘Universal Repeater’
- 2-7-2 Advanced Wireless Settings
- 2-7-3 Wireless Security
- 2-7-4 Wireless Access Control
- 2-7-5 Wi-Fi Protected Setup (WPS)
- 2-7-6 Security Tips for Wireless Network
- 2-7-1 Basic Wireless Settings
- Chapter III Advanced Functions
- Chapter IV: Appendix

84
Here are descriptions of every setup items:
Band (2): Select the band you want to use; all the wireless
routers must use the same setting.
SSID (3): Input the SSID of your wireless router, the setting
should be the same with other wireless routers for
the convenience of roaming.
Channel Select the channel you want to use, all the wireless
Number (4): routers must use the same setting.
Associated Clients (5):Click ‘Show Active Clients’ button, then an “Active
Wireless Client Table” will pop up. You can see the
status of all active wireless stations that are
connecting to the access point.
MAC address Input the MAC address of other wireless routers.
1 to 4 (6 - 9):
Security Click to set security settings for this connection
Setting (10): (Please go to section ‘2-7-3 Wireless Security’ for
detailed instructions).
1
2
3
4
5
7
8
6
9
10