
User's Manual
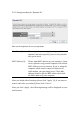
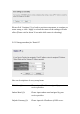


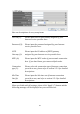
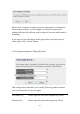
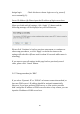
Table Of Contents
- Chapter I: Product Information
- Chapter II: System and Network Setup
- 2-1 Build network connection
- 2-2 Connecting to wireless broadband router by web browser
- 2-3 Using ‘Quick Setup’
- 2-4 Basic Setup
- 2-5 Setup Internet Connection (WAN Setup)
- 2-5-1 Setup procedure for ‘Dynamic IP’:
- 2-5-2 Setup procedure for ‘Static IP’:
- 2-5-3 Setup procedure for ‘PPPoE’:
- 2-5-4 Setup procedure for ‘PPTP’:
- 2-5-5 Setup procedure for ‘L2TP’:
- 2-5-6 Setup procedure for ‘Telstra Big Pond’:
- 2-5-7 Setup procedure for ‘DNS’:
- 2-5-8 Setup procedure for ‘DDNS’:
- 2-5-9 Setup procedure for ‘WISP’:
- 2-6 Wired LAN Configurations
- 2-7 Wireless LAN Configurations
- 2-7-1 Basic Wireless Settings
- 2-7-1-1 Setup procedure for ‘Access Point’:
- 2-7-1-2 Setup procedure for ‘Station-Infrastructure’:
- 2-7-1-3 Setup procedure for ‘AP Bridge-Point to Point’:
- 2-7-1-4 Setup procedure for ‘AP Bridge-Point to Multi-Point’:
- 2-7-1-5 Setup procedure for ‘AP Bridge – WDS’
- 2-7-1-6 Setup procedure for ‘Universal Repeater’
- 2-7-2 Advanced Wireless Settings
- 2-7-3 Wireless Security
- 2-7-4 Wireless Access Control
- 2-7-5 Wi-Fi Protected Setup (WPS)
- 2-7-6 Security Tips for Wireless Network
- 2-7-1 Basic Wireless Settings
- Chapter III Advanced Functions
- Chapter IV: Appendix

58
Here are descriptions of every setup items:
User ID (1): Please input user ID (user name) assigned by your
Internet service provider here.
Password (2): Please input the password assigned by your Internet
service provider here.
L2TP Please input the IP address of PPTP gateway
Gateway (3): assigned by your Internet service provider here.
MTU (4): Please input the MTU value of your network connection
here. If you don’t know, you can use default value.
Connection Please select the connection type of Internet connection
type (5): you wish to use, please refer to section 2-5-3 for detailed
descriptions.
Idle Time Please input the idle time out of Internet connection
Out (6): you wish to use, and refer to section 2-5-3 for detailed
descriptions.
When you finish with all settings, please click ‘Apply’ (7) button and the
following message will be displayed on your web browser:
1
2
4
3
5
7
6