
User's Manual
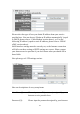
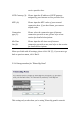

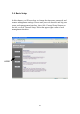


Table Of Contents
- Chapter I: Product Information
- Chapter II: System and Network Setup
- 2-1 Build network connection
- 2-2 Connecting to wireless broadband router by web browser
- 2-3 Using ‘Quick Setup’
- 2-4 Basic Setup
- 2-5 Setup Internet Connection (WAN Setup)
- 2-5-1 Setup procedure for ‘Dynamic IP’:
- 2-5-2 Setup procedure for ‘Static IP’:
- 2-5-3 Setup procedure for ‘PPPoE’:
- 2-5-4 Setup procedure for ‘PPTP’:
- 2-5-5 Setup procedure for ‘L2TP’:
- 2-5-6 Setup procedure for ‘Telstra Big Pond’:
- 2-5-7 Setup procedure for ‘DNS’:
- 2-5-8 Setup procedure for ‘DDNS’:
- 2-5-9 Setup procedure for ‘WISP’:
- 2-6 Wired LAN Configurations
- 2-7 Wireless LAN Configurations
- 2-7-1 Basic Wireless Settings
- 2-7-1-1 Setup procedure for ‘Access Point’:
- 2-7-1-2 Setup procedure for ‘Station-Infrastructure’:
- 2-7-1-3 Setup procedure for ‘AP Bridge-Point to Point’:
- 2-7-1-4 Setup procedure for ‘AP Bridge-Point to Multi-Point’:
- 2-7-1-5 Setup procedure for ‘AP Bridge – WDS’
- 2-7-1-6 Setup procedure for ‘Universal Repeater’
- 2-7-2 Advanced Wireless Settings
- 2-7-3 Wireless Security
- 2-7-4 Wireless Access Control
- 2-7-5 Wi-Fi Protected Setup (WPS)
- 2-7-6 Security Tips for Wireless Network
- 2-7-1 Basic Wireless Settings
- Chapter III Advanced Functions
- Chapter IV: Appendix

45
2-4-1 Time zone and time auto-synchronization
Please click ‘System’ menu on the left of web management interface, then
click ‘Time Zone’, and the following message will be displayed on your
web browser:
Please select time zone at ‘Time Zone’ drop-down list, and input the IP
address or host name of time server. If you want to enable daylight
savings setting, please check ‘Enable’ box, and set the duration of
daylight setting. When you finish, click ‘Apply’. You’ll see the following
message displayed on web browser:
Press ‘Continue’ to save the settings made and back to web management
interface; press ‘Apply’ to save the settings made and restart the router so
the settings will take effect after it reboots.
NOTE: You can refer to the instructions given in last chapter: ‘Using
Quick Setup’, for detailed descriptions on time zone settings.