
User's Manual
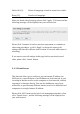
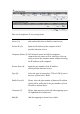


Table Of Contents
- Chapter I: Product Information
- Chapter II: System and Network Setup
- 2-1 Build network connection
- 2-2 Connecting to wireless broadband router by web browser
- 2-3 Using ‘Quick Setup’
- 2-4 Basic Setup
- 2-5 Setup Internet Connection (WAN Setup)
- 2-5-1 Setup procedure for ‘Dynamic IP’:
- 2-5-2 Setup procedure for ‘Static IP’:
- 2-5-3 Setup procedure for ‘PPPoE’:
- 2-5-4 Setup procedure for ‘PPTP’:
- 2-5-5 Setup procedure for ‘L2TP’:
- 2-5-6 Setup procedure for ‘Telstra Big Pond’:
- 2-5-7 Setup procedure for ‘DNS’:
- 2-5-8 Setup procedure for ‘DDNS’:
- 2-5-9 Setup procedure for ‘WISP’:
- 2-6 Wired LAN Configurations
- 2-7 Wireless LAN Configurations
- 2-7-1 Basic Wireless Settings
- 2-7-1-1 Setup procedure for ‘Access Point’:
- 2-7-1-2 Setup procedure for ‘Station-Infrastructure’:
- 2-7-1-3 Setup procedure for ‘AP Bridge-Point to Point’:
- 2-7-1-4 Setup procedure for ‘AP Bridge-Point to Multi-Point’:
- 2-7-1-5 Setup procedure for ‘AP Bridge – WDS’
- 2-7-1-6 Setup procedure for ‘Universal Repeater’
- 2-7-2 Advanced Wireless Settings
- 2-7-3 Wireless Security
- 2-7-4 Wireless Access Control
- 2-7-5 Wi-Fi Protected Setup (WPS)
- 2-7-6 Security Tips for Wireless Network
- 2-7-1 Basic Wireless Settings
- Chapter III Advanced Functions
- Chapter IV: Appendix

112
Here are descriptions of every setup items:
Enable Port Check this box to enable port mapping,
Forwarding (1): and uncheck this box to disable port mapping.
Private IP (2): Input the IP address of the computer on local
network which provides internet service.
Computer Name (3): Pull down the menu and all the computers
connected to the router will be listed here. You can
easily to select the computer name without checking
the IP address of the computer.
Type (4): Select the type of connection, TCP or UDP. If you’re
not sure, please select ‘Both’.
Port Range (5): Input the starting port number in the left field, and
input the ending port number in the right field. If
you only want to redirect a single port number, just
fill the port number in the left field.
Comment (6): Please input any text to describe this mapping, up to
16 alphanumerical characters.
Add (7): Add the mapping to port forwarding table.
Reset (8): Remove all inputted values.
Port Forwarding All existing port forwarding mappings will
Table (9): be displayed here.
Delete (10): Please select a port forwarding mapping by
clicking the ‘Select’ box of the mapping, then click
‘Delete Selected’ button to remove the mapping. If
there’s no existing mapping, this button will be
grayed out.