
Installation Sheet


Note:
This manual is intended as a guide for installation.
While there are many different ways to install this kit, we recommend you follow these instructions.
If you are uncomfortable in your ability to assemble this kit, seek professional assistance.
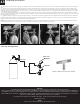
Before you start, make sure the
CO
2
cylinder (#8) is full and the
valve is closed completely by
turning the knob clockwise until it
stops. Attach the CO
2
regulator
(#6) to the CO
2
cylinder by
screwing the hex nut on the right
side of the regulator onto the
cylinder valve. Hand tighten the
nut until it stops and then slightly
tighten from there with a wrench
or pliers.
NOTE: A fiber washer is normally
required to connect a regulator to
a CO
2
cylinder, but the standard
regulator provided includes a
built-in o-ring. Once that o-ring
has worn out or leaks it will need
to be replaced. Replacement parts
can be found at kegerator.com.
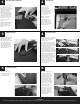
Now mount the CO
2
cylinder holder (#9) to the
cabinet. Match up the holes
on the cylinder holder with
the four existing screws
protruding out the back of
the cabinet and slide the
holder down to lock it in
place. Place the CO
2
cylinder with the regulator
connected into the cylinder
holder. Position the CO
2
regulator in the holder so
that you will be able to
read the numbers on the
gauge and have easy
access to the shut-off
valve.
Make sure the CO
2
regulator (#6)
shut off valve is closed by checking
that the lever below the main body is
perpendicular (9 o’clock) to the valve
barb fitting. Then remove the black
rubber plug from the back of the unit.
(A) From the inside of the kegerator,
push the end of the CO
2
tube (#7)
through the predrilled hole and out
the back of the cabinet.
(B) Slide the metal hose clamp (#16)
over the CO
2
tube coming from the
back of the unit.
(C) Attach the end of the CO
2
tube
that does not have the hex nut fitting
to the hose barb fitting on the bottom
of the regulator (#6).
(D) Secure the tube by sliding up the
previously installed metal hose clamp
(#15) all the way up to where the
hose meets the regulator. Use a
flathead screwdriver to tighten. Make
sure the clamp does not impede the
valve.
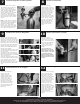
Remove the rubber
protective cap located on
the side of the keg coupler
(#10). Secure the hex nut
at the end of the CO
2
tube
(#7) to the side of the
coupler. Use a wrench to
tighten hex nut to the
coupler.
* Do not remove or
discard the gray check
valve located on the side
of the coupler. This part
prevents liquid from
going into the regulator
and also provides a seal
between the air line and
coupler.
Remove the rubber cap
from the top of the
coupler. Place the
neoprene washer (#15)
located under the rubber
cap to the top of the
coupler (#10). Take the
hex nut from the end of
the beer line (clear line
pre-attached to the tower)
and screw it onto the top
of the keg coupler so that
the neoprene washer is
between it.
Connect Regulator to CO
2
Cylinder Mount CO
2
Cylinder
Connect CO
2
Tube to Regulator Attach CO
2
Tube to Coupler
Connect Beer Line to Coupler
To connect the keg coupler
(#10) to the keg (#14),
first make sure the black
pull handle of the keg
coupler is in the up position
(45° angle). Insert the
keg coupler into the valve
on top of the keg and turn
clockwise until it stops
about 90° to lock the
coupler into place. Now
pull the tap handle out
(away from the keg coupler
(#10) and push down until
it locks into position. Listen
for the “click” of the pull
handle when it shifts into
the final downward
position. The keg is now
tapped.
Tap the Keg
A
B
C
D
7
8
9
10
11
12