
Installation Sheet


Warning:
CO
2
can be dangerous! CO
2
cylinders contain high-pressured gas, which can be hazardous if handled improperly. Please handle with care.
1
2
3
4
5 6
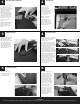
Make sure unit is empty
(including white metal
keg floor (#11). Carefully
tip the beer dispenser on
its side. Connect the
casters (#12) to the
cabinet by screwing in
each metal bracket into
one of four caster holes
(casters in the front of
the cabinet require the
washers #12). Then
carefully set the unit
upright.
Note: Allow the dispenser
to stand in an upright
position for 24 hours
before plugging in the
unit.
Install Caster Wheels Power On
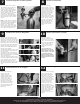
Remove Plug Mount Tower
Install Handle & Drip Tray
Plug unit into a
standard 3-prong
110/volt electrical
outlet. Turn the
thermostat clockwise to
the desired tempera-
ture. The recommend-
ed setting is between
4-5 on the dial.
NOTE: Temperature
settings can vary
depending on beer
type, ambient tempera-
ture and preference.
We do not recommend
plugging this unit into
an extension cord.
Carefully remove the top
cabinet plug located on
the top of the unit by
opening the cabinet, and
with your hand, push
plug through the top of
the cabinet from the
inside. Use flat head
screwdriver as a prying
tool if necessary.
(A) Place the black rubber tower
gasket (#19) flat on the top of
the cabinet and line up the
predrilled holes.
(B) Unbox the tower (#3) and
unravel the beer line hose from
the bottom. Feed the clear beer
line through the large opening at
the top of the cabinet.
(C) Place the tower on top of
the unit and align the screw
holes at the bottom of the tower
to the predrilled holes located on
the top of the cabinet. Secure
the tower by attaching the four
tower screws (#21) with a
phillips head screwdriver to the
top of the cabinet. The faucet
connection for the tower should
now face the front of the
cabinet. If the tower is not
facing the front of the cabinet,
remove it and reinstall it to the
proper position.
Screw the black faucet
handle (#1) onto the
faucet (#2). Make sure
the faucet (#2) is vertical
with the black handle
facing the upward. The
faucet should be first
“hand tightened,” then
secured with the faucet
wrench (#17). Place the
plastic drip tray (#5) on
the top of the cabinet
beneath the faucet.
NOTE: Do not twist the
faucet if it does not line
up properly. Instead
remove the faucet with
the faucet wrench and
reinstall the faucet to the
desired position.
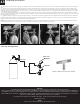
Install Railing
Take the railing (#4)
and slide its “feet” into
the pilot holes in the
top of the cabinet
A
B
C