
Install Manual
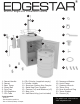

Twin Tap Configuration
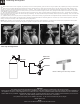
CO2 LINE
BEER LINE
Metal T fitting for twin tap models
Warning:
This guide is provided for informational purposes only. It is provided as a supplement to the owner’s manual.
Please refer to the owner’s manual for a full discourse on installation, usage and maintenance. If you have any questions about the installation of
this appliance, feel free to contact EdgeStar service at 866.319.5473 or consult a qualified installer. Neither the manufacturer nor its distributors
shall be liable for any incidental, consequential, indirect, special, or punitive damages of any nature, including without limitation, lost revenues or
profits, or any other damage whether based in contract, tort, or otherwise.
Co2 cylinder comes empty due to HAZMAT restrictions. It will need to be filled locally at any air/gas
supplier prior to use.
Note:
Some Coors or Miller Brand kegs will not fit inside this unit.
13
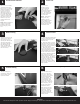
Calibrating the Regulator
(A) With the shut-off valve on the regulator (#6) closed (lever in the 9 o’clock position), open the valve on the gas cylinder (#8) completely by turning it counterclock-
wise.
(B) Slowly turn the regulator adjustment knob clockwise until the desired pressure is shown on the pressure gauge on the top. By turning the knob clockwise it will
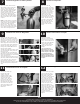
increase (+) pressure and counterclockwise will decrease (-) pressure. Under normal circumstances, we recommend setting the regulator at 10-12psi. NOTE: When
adjusting pressure from a high pressure to a lower pressure, you will need to release the higher pressure out by pulling the manual pressure release valve ring located
on the bottom right of the regulator.
(C) Once the desired pressure is set, open the shut-off valve by turning the lever down (6 o’clock position or parallel to the blue air line). Gas should now be flowing
from the regulator to the keg coupler. You will hear the keg pressurizing. The output needle will drop momentarily while the pressure is equalizing. Then, the needle will
return to the point you set it at.
(D) (Optional) Once you have all your pressure settings dialed in, screw down the locking ring (behind the main adjustment knob) clockwise until it firmly stops and is
against the body of the regulator. By doing this step it will stop the adjustment knob from increasing pressure. If however you need to increase pressure, loosen the
locking nut away from the body of the regulator and make any adjustment.
NOTE: Other conditions, such as altitude, beer type, and temperature may require some adjustment. It is always wise to follow up any adjustment to the regulator
with a brief pull of the pressure release valve ring on the regulator or coupler to ensure an accurate output reading.
A B C D