
Use and Care Guide


8
Operation
Installation Check List Before Operation
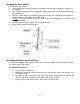
1. Have all packing materials and tape been removed from the interior and exterior of the
wine refrigerator?
2. Have the installation instructions been followed, including connecting the machine to
electricity? And has proper grounding been installed for the wine refrigerator?
3. Has the machine been leveled?
4. Is the wine refrigerator in a site where the ambient temperature is between 50° F and
95° F all year round?
5. Is there a clearance of at least 2” at the rear, ½” at the top, and ½” at the sides for proper
air circulation?
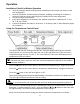
Using the Temperature Control Panel
This wine cooler has two cooling zones that are controlled independently by two separate
control panels: one for the left side zone and one for the right side zone. Each zone has a
temperature range from 40° F to 65° F. The control panel in each zone will display the set
temperature inside the cabinet.
Press the button on the control panel to decrease the temperature by 1 degree increments.
Press the button on the control panel to increase the temperature by 1 degree increments.
Press the button to turn the inner light on or off.
Press and hold the power button for approximately 3 seconds to turn the unit’s power on or off.
The Run Light will illuminate when the unit is cooling.
The Celsius or Fahrenheit light will be lit depending on which unit of temperature is currently
displayed. To switch between C and F, press and hold the and buttons at the same time
for approximately 5 seconds until the temperature scale changes.
Allow at least 24 hours before storing your wines to allow the temperature to acclimate.
Note: Whether your wine cooler can reach the actual set temperature depends on the ambient
environmental conditions.
Caution: If you powered the unit off, please wait at least 5 minutes before powering it back on.
Caution: If you powered off
the unit, please wait at least
5 minutes before powering it
back on.