
User's Manual

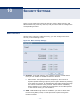
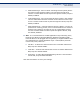
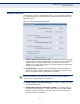
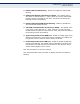

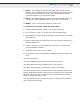

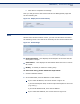
Table Of Contents

C
HAPTER
11
| Access Control Settings
Rule
– 84 –
◆ Action - Here displays the action the Router takes to deal with the
packets. It could be Allow or Deny. Allow means that the Router permits
the packets to go through the Router. Deny means that the Router
rejects the packets to go through the Router.
◆ Status - This field displays the status of the rule. Enabled means the
rule will take effect, Disabled means the rule will not take effect.
◆ Modify - Here you can edit or delete an existing rule.
To add a new rule, please follow the steps below.
1. Click the Add New button and the next screen will pop-up.
2. Give a name (e.g. Rule_1) for the rule in the Rule Name field.
3. Select a host from the Host drop-down list or choose “Click Here To Add
New Host List”.
4. Select a target from the Target drop-sown list or choose “Click Here To
Add New Target List”.
5. Select a schedule from the Schedule drop-down list or choose “Click
Here To Add New Schedule”.
6. In the Action field, select Deny or Allow.
7. In the Status field, select Enabled or Disabled to enable or disable your
entry.
Click the Save button.
Click the Enable All button to enable all the rules in the list.
Click the Disable All button to disable all the rules in the list.
Click the Delete All button to delete all the entries in the table.
You can change the entry’s order as desired. Fore entries are before hind
entries. Enter the ID number in the first box you want to move and another
ID number in second box you want to move to, and then click the Move
button to change the entry’s order.
Click the Next button to go to the next page, or click the Previous button
return to the previous page.