
User's Manual

– 1 –
Quick Start Guide
1. Unpack the AP and Check Contents
ECW5212
802.11a/ac/b/g/n
Wireless Access Point
AC power adapter
Four adhesive rubber feet
Documentation—Quick Start Guide (this document)
and Safety and Regulatory Information
Note:
For safety and regulatory information, refer to the
Safety and Regulatory Information document included with
the AP.
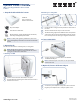
2. Mount the AP
The AP can be mounted on a desktop, wall, or ceiling T-bar.
Note:
The AP can be placed on a desktop using the
included rubber feet. When mounting the AP on a wall or
ceiling, do not attach the rubber feet.
a. Mounting on a Wall
Set two screws in the wall 140 mm (5.51 in.) apart.
Slide the AP’s wall mounting slots down onto the screws so
that the unit is secure.
1
2
1
2
b. Mounting on a Ceiling T-Bar
Position the AP’s ceiling-mount clip holders on either side of
the T-bar.
Turn the AP until the two clips lock it to the T-bar.
The AP mounting supports two different sizes of suspended
ceiling T-bars. The position illustrated above left is for 15 mm
bars. Use the position at a 90 degrees angle for 24.5 mm bars.
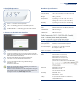
3. Connect LAN Cable
Connect Category 5e or better cable to the Eth/PoE
1000BASE-T RJ-45 port.
Note:
The Eth/PoE port connection can also provide PoE
power to the unit.
3. (Optional) Connect AC Power Adapter
Connect the power adapter to the power socket on the AP.
Plug the power adapter into a nearby AC power source.
2
1
3
1
2
3
1
1
1
2
1
2
E032016-CS-R01
150200001406A
www.edge-core.com
802.11a/ac/b/g/n Wireless Access Point
ECW5212