
Installation Guide


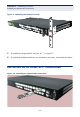

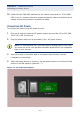
Table Of Contents
- ECS4810-12M Managed 12-Port Gigabit Ethernet Switch
- Compliances and Safety Statements
- About This Guide
- Contents
- Tables
- Figures
- Introduction
- Installing the Switch
- Making Network Connections
- Troubleshooting
- Cables
- Specifications
- Glossary
- Index

C
HAPTER
2
| Installing the Switch
Connecting to a Power Source
– 40 –
10. Check the the PWR LED indicator as the switch is powered on. If the PWR
LED is not on, recheck the power supply and power cable connections at the
supply source and at power conversion module.
CONNECTING AC POWER
To connect the switch to an AC power source:
1. First verify that the external AC power supply can provide 100 to 240 VAC,
50-60 Hz, 0.65 A minimum.
2. Plug the power cable into a grounded, 3-pin, AC power source.
3. Insert the plug on the other end of the power cable directly into the
receptacle on the switch.
4. After the power source is tuned on, set the power switch on the front of the
switch to the ON position (marked “–”).
Figure 12: AC Power Rececptacle
N
OTE
:
For international use, you may need to change the AC line cord.
You must use a line cord set that has been approved for the receptacle
type in your country.