
Installation Guide


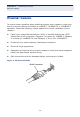


Table Of Contents
- Compliances and Safety Statements
- About This Guide
- Contents
- Tables
- Figures
- Introduction
- Installing the Switch
- Making Network Connections
- Troubleshooting
- Cables
- Specifications
- Glossary
- Index

C
HAPTER
2
| Installing the Switch
Grounding the Chassis
– 40 –
GROUNDING THE CHASSIS
Before powering on the switch, ground the switch to earth as described below.
1. Ensure that the rack on which the switch is to be mounted is properly
grounded and in compliance with ETSI ETS 300 253.
2. Ensure that there is a good electrical connection to the grounding point on
the rack (no paint or isolating surface treatment).
3. Disconnect all power cables to the switch.
4. The switch chassis is connected internally to 0 V. This circuit is connected to
the single-hole grounding terminal on the front of the switch (lower left
corner). The surface area around this terminal is not painted in order to
provide for a good connection. Attach a 6 AWG stranded copper wire to the
grounding terminal on the switch.
5. Then attach the grounding wire to the ground point on the rack.
C
AUTION
:
The earth connection must not be removed unless all supply
connections have been disconnected.