
Installation Guide


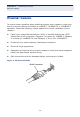


Table Of Contents
- Compliances and Safety Statements
- About This Guide
- Contents
- Tables
- Figures
- Introduction
- Installing the Switch
- Making Network Connections
- Troubleshooting
- Cables
- Specifications
- Glossary
- Index

C
HAPTER
2
| Installing the Switch
Installing an Optional SFP/XFP Transceiver
– 39 –
INSTALLING AN OPTIONAL SFP/XFP TRANSCEIVER
Figure 10: Inserting an SFP/XFP Transceiver into a Slot
This switch supports 1000BASE-SX/LX/LH and 100BASE-FX SFP-compatible
transceivers on ports 1-24, and 10GBASE-SR/LR/ER XFP-compatible
transceivers on port 25-26. To install an SFP/XFP transceiver, do the following:
1. Consider network and cabling requirements to select an appropriate
transceiver type.
2. Insert the transceiver with the optical connector facing outward and the slot
connector facing down. Note that SFP/XFP transceivers are keyed so they
can only be installed in the correct orientation.
3. Slide the transceiver into the slot until it clicks into place.
N
OTE
:
SFP/XFP transceivers are hot-swappable. The switch does not
need to be powered off before installing or removing a transceiver.
However, always first disconnect the network cable before removing a
transceiver.
N
OTE
:
SFP/XFP transceivers are not provided in the switch package.
17
18
19
20
21
22
23
24
10
11
12
13
14
15
16
P25
P26
Management
Console