
ECS4210-12T_Installation Guide
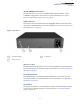
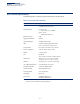
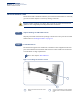
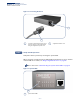
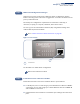
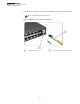

Table Of Contents
- Front Page - ECS4210-12T Installation Guide
- How to Use This Guide
- Contents
- Figures
- Tables
- Switch Description
- Installation Overview
- Switch Chassis
- Power and Grounding
- Port Connections
- Switch Management
- Troubleshooting
- Index
- Back Page

Chapter 2
| Installation Overview
Switch Installation Tasks
– 17 –
Make Initial Configuration Changes
At this point you may need to make a few basic switch configuration changes
before connecting to the network. It is suggested to connect to the switch console
port to perform this task.
The serial port’s configuration requirements are as follows: 115200 bps, 8
characters, no parity, one stop bit, 8 data bits, and no flow control.
You can log in to the command-line interface (CLI) using default settings: User
“admin” with the password “admin”.
Go to “How to Connect to the Console Port” on page 40
Figure 7: Console Port
For information on initial switch configuration:
Refer to the CLI Reference Guide.
Install Transceivers and Connect Cables
Install SFP transceivers and connect network cables to port interfaces:
◆ For RJ-45 ports, use 100-ohm category 3 or better Ethernet cable for 10BASE-T
connections, use 100-ohm category 5 or better Ethernet cable for 100BASE-TX
and 1000BASE-T connections.
◆ Install SFP transceivers and then connect fiber optic cabling to the transceiver
ports.
Task 6
Console Port
1
1
Task 7