
ECS4110-52T_Quick Start Guide-R1.0

Quick Start Guide
– 3 –
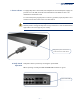
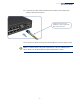
3. Connect Power To supply AC power to the switch, first verify that the external AC power supply can
provide 100 to 240 VAC, 50-60 Hz and 1A minimun for the ECS4110-52T or 7A
minimum for the ECS4110-52P.
To connect AC power, plug the power cord into a grounded, 3-pin, AC power source
and then into the AC socket on the rear of the switch.
Caution:
Use the AC power cord supplied with the switch. For international users
that may need to change the AC power cord, you must use a cord set that has been
approved for the socket type in your country.
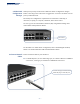
4. Verify Switch
Operation
Verify basic switch operation by checking the system LEDs.
When operating normally, the PWR and DIAG LEDs should be on green.
Plug the AC power cord into the
socket on the rear of the switch.
System Status LEDs