
Quick Start Guide-R01

Quick Start Guide
– 2 –
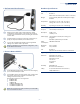
6. Perform Initial Configuration
At this point you may need to make a few basic switch
configuration changes before connecting to the network.
Connect a PC to the switch console port using the included
console cable.
Configure the PC’s serial port: 115200 bps, 8 characters, no
parity, one stop bit, 8 data bits, and no flow control.
Log in to the command-line interface (CLI) using default
settings: User “admin” with no password.
Note:
For information on initial switch configuration, refer
to the Administrator’s Guide.
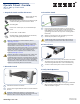
7. Connect Network Cables
For the RJ-45 Management port, connect 100-ohm Category
5, 5e or better twisted-pair cable.
Connect DAC cables to the SFP+/QSFP+ slots. Or first install
SFP+/QSFP+ transceivers and then connect fiber optic
cabling to the transceiver ports.
The following transceivers are supported:
◆
40GBASE-CR4
◆
40GBASE-SR4
◆
10GBASE-CR
◆
10GBASE-SR (ET5402-SR)
◆
1000BASE-SX (ET4201-SX)
◆
1000BASE-LX (ET4201-LX)
Note:
As connections are made, check the port status LEDs
to be sure the links are valid.
3
1
2
1
2
3
2
1
1
2
Hardware Specifications
Chassis Specifications
SIze W x D x H:
438.4 x 473 x 43.4 mm (17.26 x 18.62 x 1.71 inches)
Weight 8.5 kg (18.74 lb), with two installed power supply
modules
Temperature Operating: 0° C to 40° C (32° F to 104° F)
Storage: -40° C to 70° C (-40° F to 158° F)
Humidity Operating: 5% to 95% (non-condensing)
Power Supply Specifications
AC Input 100-240 VAC, 50-60 Hz, 6-3 A
DC Output 5 VDC @ 3 A
12 VDC @ 33 A
Power Supply 100-240 VAC, 50-60 Hz, auto-sensing; hot
pluggable
400 Watts @ 240V/100V per module
Power
Consumption
244 Watts maximum
Maximum
Current
6 A @ 100 VAC
3 A @ 240 VAC
Size W x D x H:
54.5 x 220 x 40.25 mm (2.15 x 8.66 x 1.58 inches)
Regulatory Compliances
Emissions EN 55022:2010, Class A
EN 61000-3-2:2009, Class A
EN 61000-3-3:2008
FCC Class A
VCCI Class A
CE Mark
Immunity EN 55024:2010
IEC 61000-4-2/3/4/5/6/8/11
Safety UL (CSA 22.2 No 60950-1 & UL60950-1)
CB (IEC/EN60950-1)