COLOUR TFT LCD MONITOR USER’S MANUAL Model: C171 The display comes with a three year on site warranty. To activate your warranty please register your display at http://www.edge10.com b y c l i c k i n g o n t h e help & support link.
Menu: 1. Introduction Product Description ..............................................................................Page.2 Package Contents..................................................................................Page.2 Product Features................................................................................... Page.2 Cleaning.................................................................................................Page.2 Precautions..................................................
Introduction Product Description Congratulations on your purchasing this new generation of monitor. Your LCD monitor incorporates a high quality display into a small light weighted module. It has power-saving capabilities and emits no X-ray radiation. You will certainly benefit from this monitor in lots of ways to name some of them, comfort safety and environmental protection.
● Do not insert sharp objects or spill liquid into the LCD monitor through cabinet slots. It may cause accidental fire, electric shock or failure. ● Disconnect the power plug from the AC outlet if you are not using it for an indefinite period of time. ● Do not attempt to service this product yourself, as opening or removing covers may expose you to dangerous voltage points or other risks. ● Do not touch the screen directly with your fingers.
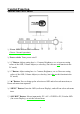
Control Function Button Front View Control ① Power LED: Indicates different status (Green---Normal operation) ② Power switch: Turns power on/off ③ “+” Button: Adjust setting bars i.e. Contrast, Brightness, etc. to increase setting values of the OSD; Volume Adjust (as a hot key, but it has no such function in the PC mode) ④ “-” Button: Adjust setting bars i.e. Contrast, Brightness, etc.
OSD Control Operating Procedure 1) Press “MENU” to enter the OSD menu. 2) Press “SOURCE” to Exit the OSD menu (on screen display), or Exit adjustment item. 3) Press “+”and “-” to select a main menu item. (Left/right) 4) Press “MENU” to confirm, and enter to the sub menu. 5) Press “MENU” and “▲” to select the sub menu items. (Up/down) 6) Press “+” and “-” to adjust the setting values, then press up or down to select next item.
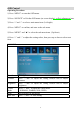
OSD Function OSD Language OSD H-Position OSD V-Position OSD Duration OSD Halftone Information Memory Recall Description Press“+” and“-”to select the language.
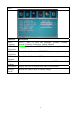
GEOMETRY Function H-Position V-Position Clock Phase Description Press “+” and“-” to move the screen right or left Press “+” and“-” to move the screen up or down Press “+” and“-” to adjust the distortion character Press“+” and“-” to adjust the real image value of the ADC PIP/POP FULL Function Multi Window Sub Source Size Description Press“+” and“-” to select the function mode. (off,PIP, POP Full) Press“+” and“-” to select the sub source.
Border Colour Sound Source Swap PIP Position Press“+” and“-” to adjust the Border colour of the sub window. (Blue or Black) Press“+” and“-”to choose the sound source (main or the sub window) Press“+” and“-”to change the displays between main window and sub window. Press“+” and“-”to adjust PIP position.
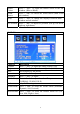
SOUND Function Bass Treble Balance Sound Mode Subwoofer AVC Loudness Super Bass Audio Mode Description Not available for this model Not available for this model Not available for this model Press “+”and“-” to select the sound mode (Standard, Personal, Music, and News) Press“+” and“-”to select the Subwoofer setting on or off Press“+” and“-”to select the auto turning setting on or off Press“+” and“-”to select the Loudness mode.(close, mode1, mode2, mode3, mode4) Press“+” and“-”to adjust the Super bass.
ADVANCE Function Sleep Timer 9 Win Description Press“+” and“-”to adjust the timer value, ( 0, 15, 30, 45, 60, 90, 120) Not available for this model 10
Inputs Diagram Inputs ① AC POWER INPUT: AC inlet for 100-240V power system. ② PC INPUT: This D-sub 15 sockets can be connected to a PC. ③/④ S-VIDEO INPUT/OUTPUT: Contact S-video signal by DIN socket. ⑤、⑥ AUDIO IN : These RCA sockets can be connected to other speakers (L–-Red terminal, R---White terminal). ⑦、⑧ AUDIO OUT: These RCA sockets can output sound to other speakers (L–-Red terminal, R---White terminal). ⑨/⑩ VIDEO-IN/OUT: This BNC socket can be connected to composite video output.
Display Angle Tilting For viewing clarity, you can tilt the LCD forward (Down to 2 degrees) or backward (Up to 18 degrees).
Product Specification Model Spec LCD Display Pixel pitch Max Resolution Dimensions Packing Dimensions Contrast Ratio Brightness Response Time Display Colour Viewing Angle L/R U/D PC Interface Video Sync Display Mode PC connector Front Control OSD Adjustment PC 17 " active matrix TFT LCD panel 0.264(H)x0.264(V) mm 1280(H)x1024(V)SXGA 198(D)x397H)x374(W) mm 145(D)x460(H)x418(W) mm 450:1 300cd/m2 5ms 16.7M +75°~-75° +70°~-60 ° RGB analog 0.
Display Model Display Mode Dot Clock (MHz) Horizontal Frequency (KHz) Vertical Operating Frequency( Mode Hz) (Analog) VGA 640 x 480 25.18 31.50 60.00 Analog VGA 640 x 480 31.50 37.90 72.00 Analog VGA 640 x 480 31.50 37.50 75.00 Analog SVGA SVGA SVGA XGA XGA XGA 800 x 600 800 x 600 800 x 600 1024 x 768 1024 x 768 1024 x 768 40.00 50.00 49.50 65.00 75.00 28.75 37.90 48.10 46.90 48.40 56.50 60.00 60.00 72.00 75.00 60.00 70.00 75.
15