
Installation manual


©2014 Edelbrock LLC
Part #1596, 1597, 1598, 1599
Brochure #63-1598
Rev. 9/19/14 - QT/mc
Edelbrock E-Force Supercharger System
2010-2014 Camaro SS
Installation Instructions
Page 26
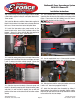
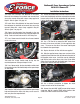
175. Install the grommet supplied in Bag #6 in the hole on
the passenger side coil cover.
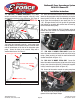
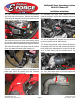
176. Slide the front fascia back into place and secure it by
reinstalling the stock fasteners, reversing the disassembly
process.
177. Reconnect the fog light electrical connectors and the
fascia wiring harness connector on the passenger side.
178. Use a 10mm socket to reconnect the positive battery
terminal.
179. Use a 10mm socket to reconnect the negative battery
terminal.
180. Remove intercooler reservoir cap and fill intercooler
system with a 50/50 blend of water and coolant.
181. Reconnect petcock and fill the engine coolant system
with a 50/50 blend of water and coolant (if applicable).
182. Reinstall and secure the front inner fender wells with
the stock fasteners.
183. Reinstall the front wheels and snug the lug nuts.
Lower the vehicle to the ground then torque the lug nuts in
a crossing pattern to 100 ft/lbs.
184. Reconnect the battery terminal if not already done so.
185. Turn the ignition to the ON position but DO NOT start
the vehicle. Closely inspecting the engine bay for any fuel
or coolant leaks. Repair any leaks before operating
vehicle! If no leaks are found, the engine can start.
186. Remove the engine oil dipstick.
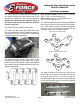
187. Lubricate the grommet on the passenger side coil
cover then install it by sliding the grommet down and
around the dipstick tube and pressing the ball studs into the
bracket grommets.
188. Return the dipstick to the dipstick tube.
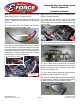
189. Install the driver side coil cover by sliding it into place
and pressing the ball studs into bracket grommets.
Congratulations on the installation of your new Edelbrock
E-Force Supercharger System. If you have any questions,
please call our Technical Support hotline and one of our
technicians will be happy to assist you.