
Installation manual


©2014 Edelbrock LLC
Part #1596, 1597, 1598, 1599
Brochure #63-1598
Rev. 9/19/14 - QT/mc
Edelbrock E-Force Supercharger System
2010-2014 Camaro SS
Installation Instructions
Page 21
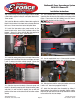
131. Two of the stock manifold bolt hole provisions in
the cylinder heads break into the crankcase and are not
used with this supercharger. These must be plugged by
installing two button head bolts supplied in Bag #3 in
the front passenger side and rear driver side bolt holes
to ensure a good seal.
132. Remove the tape covering the intake ports.
133. Connect the TMAP harness to the TMAP sensor at the
rear of the supercharger manifold. Bundle the harness up
and wrap over the top of the manifold to avoid damage
during installation of the supercharger.
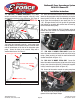
134. With the assistance of one or more people, lift the
supercharger assembly onto the engine. Use a 10mm
universal socket to install the M6 x 45mm intake manifold
bolts supplied in Bag #3 and torque them to 89 in/lbs in the
sequence shown below.
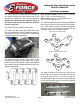
NOTE: Automatic Vehicles: 2010-’12 use belt #4061065
(106.5”). 2013-’14 use belt #4060102 (102”).
Manual Vehicles: 2010-’12 use belt #4061065 (105.5”).
2013-’14 use belt #4060102 (101.5”).
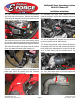
135. Route the supplied drive belt according to the diagram
below, except for the idler pulley adjacent to the tensioner.
Use a 15mm wrench to push the tensioner in enough for
the belt to slip on the idler pulley then inspect the belt
installation to make sure it is properly aligned.
S/C
TENS
WATER
PUMP
CRANK
SHAFT
P/S
PUMP
ALT
IDLER
IDLER IDLER
Vehicles w/ Power Steering Pump
S/C
TENS
WATER
PUMP
CRANK
SHAFT
ALT
IDLER
IDLER IDLER
IDLER
IDLER
Vehicles w/ Electric Power Steering
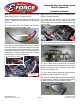
136. Apply o-ring lube to the seals of each of the fuel rail
fittings. Use a 13/16” wrench to install the plug in the rear
of the driver side rail and a 3/4” wrench to install the
crossover fittings in both rails as well as the inlet fitting at
the rear of the passenger side rail. Clock the inlet fitting to
the rounded side of the fuel rail.