
Installation manual


©2014 Edelbrock LLC
Part #1596, 1597, 1598, 1599
Brochure #63-1598
Rev. 9/19/14 - QT/mc
Edelbrock E-Force Supercharger System
2010-2014 Camaro SS
Installation Instructions
Page 20
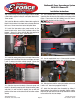
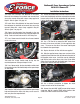
123. FOR 2012 - ‘14 MODEL YEARS ONLY Use a 10mm
wrench to install the standoff, supplied in Bag #2, to the
stud located on the back of the radiator fan. See Figure 3b
2012-’14
Figure - 3b
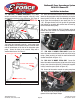
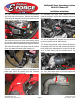
124. Install the intercooler reservoir - water pump hose
onto the outlet of the intercooler reservoir so that the other
end will extend down to the inlet of the intercooler water
pump. Secure the hose to the reservoir fitting with a
supplied hose clamp. See Figure 4.
To passenger side manifold
To driver side manifold
To water pump
Figure 4
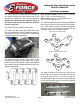
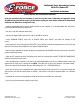
125. Lower the intercooler reservoir and its attached hose
down into the passenger side of the engine bay so that the
lower bracket will line up with the mounting hole (Refer
to the Figure that corresponds to your model year;“3a” or
“3b”), the upper bracket will line up with the passenger
side radiator fan assembly bolt and the hose will mate up
to the intercooler water pump.
126. Use a 13mm (10mm for 2012-’14 Models) socket to
reinstall the stock radiator fan assembly bolt through the
upper reservoir bracket.
127. FOR 2010-‘11 MODEL YEARS ONLY Secure the
lower intercooler reservoir bracket to the back of the fan by
using a 10mm socket to re-install the stock bolt onto the
standoff stud.(Refer to Figure “3a”).
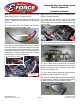
128. FOR 2012-’14 MODEL YEARS ONLY Secure the
lower intercooler reservoir bracket to the back of the fan by
using a 4mm allen to install the M5 X 10mm bolt, supplied
in bag 2, onto the spacer.(Refer to Figure“3b”).
129. Secure the intercooler reservoir to water pump hose
to the inlet of the water pump with a supplied hose clamp.
130. Install the factory o-ring intake seals into the machined
grooves of the supercharger flanges.