
Installation manual


©2014 Edelbrock LLC
Part #1596, 1597, 1598, 1599
Brochure #63-1598
Rev. 9/19/14 - QT/mc
Edelbrock E-Force Supercharger System
2010-2014 Camaro SS
Installation Instructions
Page 19
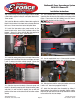
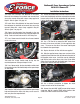
118. Use a Unibit to drill a 1-1/8” hole in the radiator
shroud on the driver side directly across from the heat
exchanger outlet.
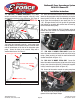
119. Slide the short section of the Intercooler Hose
Assembly through the hole and onto the heat exchanger
outlet. Secure it with a 3/4” hose clamp supplied in Bag
#2.
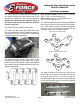
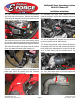
120. Mount the brackets, supplied in Bag #2, to the
intercooler reservoir with the M6 x 10mm bolts located in
Bag #2. Refer to figures 2a & 2b for the specific orientation
of the lower bracket for each model year.
2010-’11
Figure - 2a
Figure - 1
2012-’14
Figure - 2b
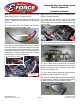
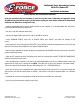
121. FOR 2010-‘11 MODEL YEARS ONLY Use a 10mm
socket to remove the upper-outside bolt from the back-
passenger side of the radiator fan; retain the bolt as it will
be re-used.
122. FOR 2012-‘14 MODEL YEARS ONLY Use a 13mm
wrench to install the standoff stud supplied in Bag #2 in
place of the bolt which was just removed. See Figure 3a.
2010-’11
Figure - 3a