
Installation manual


©2014 Edelbrock LLC
Part #1596, 1597, 1598, 1599
Brochure #63-1598
Rev. 9/19/14 - QT/mc
Edelbrock E-Force Supercharger System
2010-2014 Camaro SS
Installation Instructions
Page 16
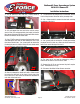
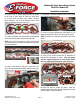
78. Apply blue Loctite, or equivalent, to the threads of an
M8 x 20mm bolt supplied in Bag #1 then use the supplied
washer and a 12mm socket to install the supplied idler
pulley onto the tensioner bracket.
79. Apply blue Loctite, or equivalent, to the threads of the
M10 x 75mm bolt supplied in Bag #1 then use a 15mm
socket to install the supplied tensioner onto the tensioner
bracket.
80. Use a 12mm socket and an M8 x 20mm bolt supplied
in Bag #1 to secure the ground strap to the back side of the
tensioner bracket.
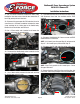
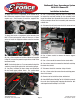
NOTE: If not already done so, it’s recommended to drain the
coolant by removing the petcock to avoid coolant spillage.
81. Use pliers to loosen the hose clamps and disconnect
the two small upper radiator hoses. Use caution when
removing and reinstalling hoses onto plastic fittings.
82. Use a 13mm socket (10mm on 2013-14 model years)
to remove the two bolts holding the fan assembly to the
top of the radiator then disconnect the electrical connector
on the passenger side of the fan assembly and remove the
radiator fans.
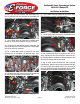
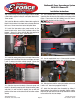
83. Disconnect the oil level sensor electrical connector from
the passenger side of the oil pan.
84. Use a 10mm socket to remove the starter support
bracket bolt.
85. Use a 13mm socket to remove the two starter bolts.
86. Use an 8mm wrench to remove the three bolts retaining
the starter heat shield.
87. Disconnect electrical connector at top of starter.
88. Use a 13mm socket to remove the nuts retaining power
wires to the starter.
89. Remove and set aside the starter and bracket.
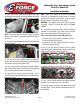
90. Install GM Flywheel Holding Tool #J-42386-A to prevent
the crank from rotating while loosening the balancer bolt
and torque the bolts holding it to 37 ft/lbs.