
Installation manual


©2014 Edelbrock LLC
Part #1596, 1597, 1598, 1599
Brochure #63-1598
Rev. 9/19/14 - QT/mc
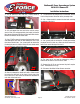
Edelbrock E-Force Supercharger System
2010-2014 Camaro SS
Installation Instructions
Page 14
NOTE: Steps 61-64 are for Manual Transmission vehicles.
Disregard otherwise and proceed to Step 65.
WARNING: The supplied valley plate must be used.
FAILURE TO DO SO WILL RESULT IN ENGINE DAMAGE.
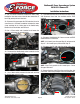
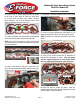
61. Using a 13mm socket, remove the (11) eleven bolts
securing the valley plate, then remove the valley plate. The
metal and rubber gasket beneath the valley plate will be
reused and should be left in place.
62. Use a flathead screwdriver to remove (8) eight o-ring
seals from the underside of the factory valley plate.
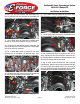
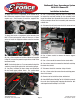
63. Inspect each o-ring seal for damage and replace any
that have been compromised. Install the o-ring seals onto
the supplied valley plate.
64. Carefully install the new valley plate making sure not to
dislodge the o-ring seals.
65. Apply anti-seize to the underside of the heads of the
eleven countersunk bolts from Bag #3. Using a 5mm Allen
tool and the counter sunk bolts, secure the valley plate to
the engine. Torque to 18 ft-lbs from the center out.
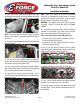
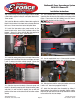
66. Apply thread sealant to the threads of the oil pressure
sensor then use a crescent wrench to install the sensor in
the new valley plate. Reconnect the oil pressure sensor
electrical connector.
67. Use a 15mm socket to remove the two bolts retaining
the belt tensioner.
NOTE: Steps 68-71 will demonstrate how to install the
Edelbrock heater hoses included with this kit. This
procedure is optional on 2013-14 model years as the factory
heater hoses are adequate.
68. Place a drain pan below the radiator petcock on the
driver side. Remove the radiator cap then loosen the
petcock to drain the engine coolant.
69. Disconnect the two heater hoses from the firewall using
a shop rag to absorb any excess coolant.
70. Disconnect the two heater hoses from the water pump
using a shop rag to absorb any excess coolant.