
Installation manual


©2014 Edelbrock LLC
Part #1596, 1597, 1598, 1599
Brochure #63-1598
Rev. 9/19/14 - QT/mc
Edelbrock E-Force Supercharger System
2010-2014 Camaro SS
Installation Instructions
Page 13
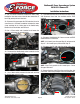
54. Trim the two (2) bosses projecting from the gasket
to the base of their tapers to allow the valley plate
to sit flush when installed (verify proper clearance
before installing). Use a file to remove any burrs, then
install the gasket onto the new valley tray.
55. Install the modified valley plate gasket and the supplied
valley plate onto the engine and proceed to Step 65.
NOTE: Steps 56-60 only applies to vehicles with solenoid
assemblies which are secured to the valley plate with rivets.
Disregard otherwise.
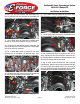
56. Using a cutoff wheel or equivalent, cutoff eleven (11)
rivets securing the solenoid assembly onto the valley plate.
Be careful not to damage the gasket as it will be reused.
57. Remove the solenoid assembly from the valley plate
and carefully remove the gasket.
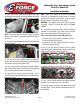
58. Using a precision grinding tool, grind down six (6)
bosses on the gasket until they are flush with the gasket.
NOTE: Be careful not to damage the perimeter seals of the
gasket.
Perimeter Seals
59. Using a 5/32” dill bit, drill out four (4) bleed holes in
between the lifter bosses as shown. Place the gasket
onto the supplied valley plate to verify that the drilled
holes are aligned with the grooves on the valley tray.
Groove On Valley Tray
Lifter Bosses
60. Clean the gasket to remove any debris. Install the
modified valley plate gasket and the supplied valley plate
onto the engine. Proceed to Step 65.