
Installation manual


©2014 Edelbrock LLC
Part #1596, 1597, 1598, 1599
Brochure #63-1598
Rev. 9/19/14 - QT/mc
Edelbrock E-Force Supercharger System
2010-2014 Camaro SS
Installation Instructions
Page 12
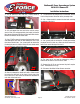
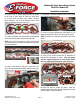
45. Use a pair of hose clamp pliers to loosen the clamp
retaining the vacuum hose to the brake booster fitting and
disconnect the hose. It will be removed with the manifold.
NOTE: Step 46 only applies to vehicles equipped with dual
mode exhaust systems. Disregard and proceed to Step 47
otherwise.
46. Disconnect the Dual Mode Exhaust Hose on the manifold
from the hard line.
47. Lift the rear of the manifold and pull it forward to
remove. Remove the o-ring seals from the manifold flanges
and set them aside as they will be reused.
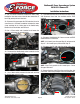
48. Use a clean shop rag to wipe down the intake flange of
both cylinder heads then put a small strip of masking tape
over each port to prevent debris from entering.
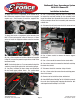
49. Unplug the oil pressure sensor connector. Use a
crescent wrench to remove the oil pressure sensor from the
engine valley plate.
NOTE: Steps 50-60 outlines the procedure for disabling
the Active Fuel Management system found on Camaros
equipped with automatic transmissions. Manual vehicles
disregard Steps 50-60 and proceed to Step 61.
WARNING: The supplied valley plate must be used on
all installs. FAILURE TO DO SO WILL RESULT IN ENGINE
DAMAGE.
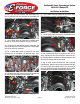
TIP: Valley plates with AFM systems will have solenoids
attached to the backside of the valley plate as pictured
below. Valley plates without AFM systems will not.
There are two (2) variants of the AFM valley trays:
- Use Steps 50-55 if your solenoid assembly is secured
to the valley plate with Torx bolts.
- Use Steps 56-60 if your solenoid assembly is secured
to the valley plate with rivets.
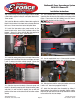
50. Use a T-20 Torx driver to remove the four (4) bolts
retaining the plastic solenoid bracket, then pry open the clip
at the rear of the plate to remove the bracket.
51. Rotate each solenoid 90° clockwise and remove.
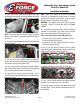
52. Use a T-30 Torx driver to remove the twenty (20) bolts
holding the steel sandwich in place and remove.
53. Carefully remove the plastic and rubber gasket from
the valley plate. Do not discard or damage the seal as it
will be reused.